
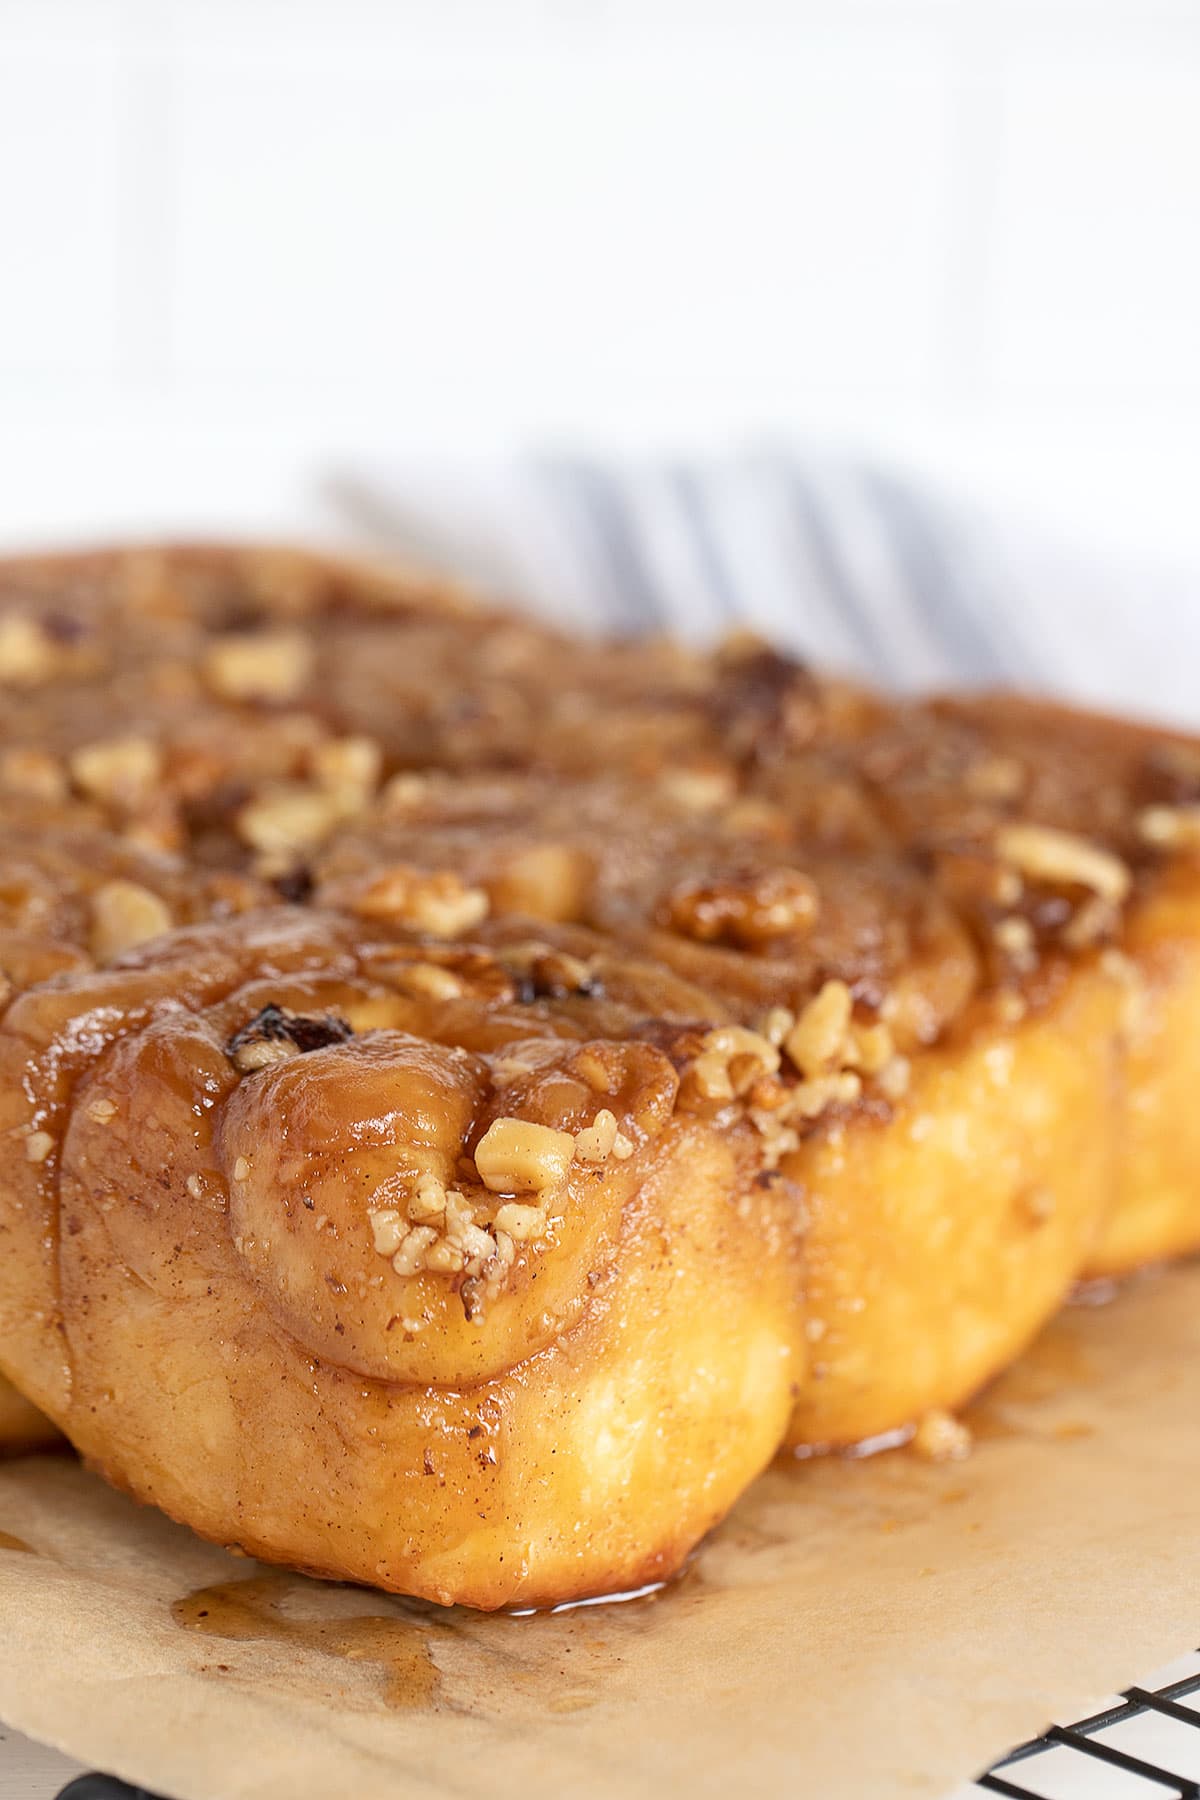
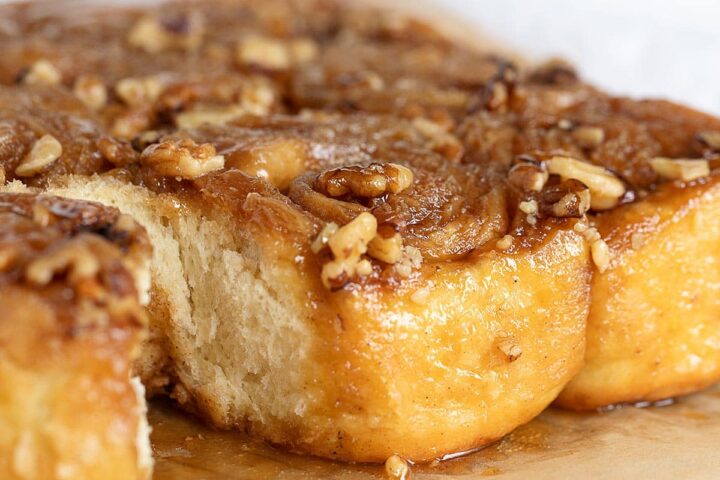
Wonderfully soft, tender maple sticky buns, with a sticky maple glaze and lots of walnuts, both on top and in the filling. Ready in no time thanks to quick rising yeast!
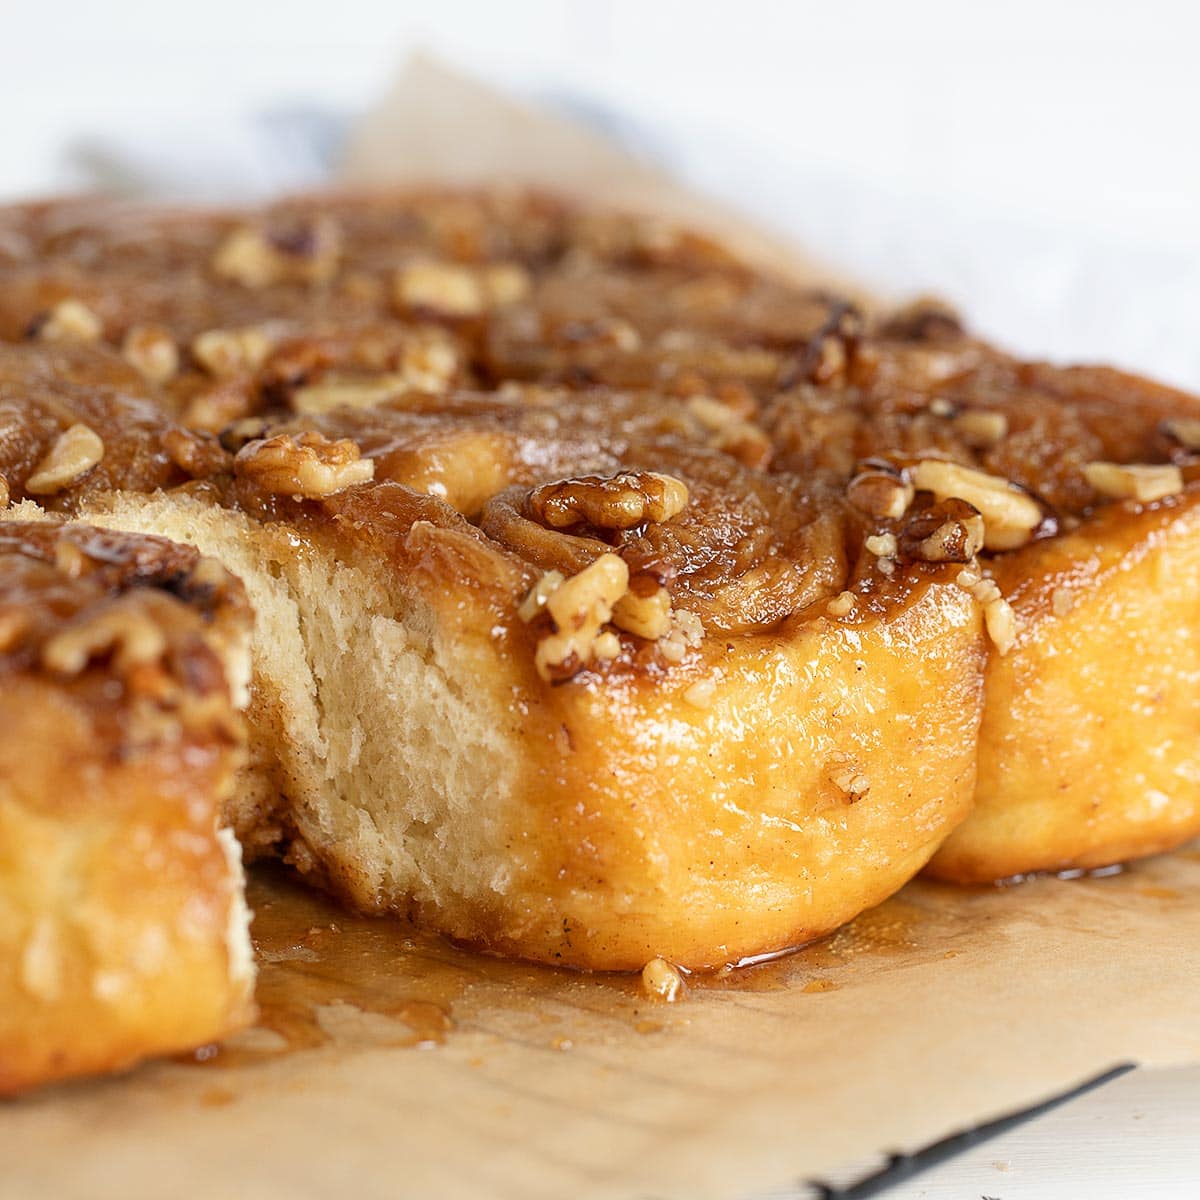
Any time is a good time for maple sticky buns, but they are a special treat in the Spring when fresh maple syrup is plentiful. I love that these come together quickly, too, thanks to quick-rising yeast. From start to fresh out of the oven is less than 2 hours!
Ingredients and Substitutions
Maple Syrup – For best maple flavour, reach for the dark or Grade B maple syrup. Maple syrup is labeled differently, but if you can see the colour, go for the darkest coloured syrup. That said, any pure maple syrup is good, so use what you have.
Walnuts – Maple and walnut is a classic combination and I love the combination of the sweet maple syrup with the slightly bitter nuts. You could also use pecans, if you prefer or omit the nuts altogether, if you like.
Brown Sugar – You can use either light or dark brown sugar, or a combination of both. I generally use light brown sugar and that’s what I used here. If you use dark, your rolls will look darker and have a touch or molasses flavour.
Quick or Rapid-Rise Instant Yeast – Quick or rapid rising instant yeast allows you to skip the first rise of typical yeast baking. I love it for these buns, not just for speedier prep time, but also for the nice light texture it produces. If you only have Active Dry or regular Instant yeast on hand, no worries. Simply do a standard first rise (until doubled) instead of the 10-minute rest.
You will also need – all purpose flour, milk, water, butter, salt and egg (1).
Step-by-Step Photos
Here’s a quick run through of the process to make these sticky buns …
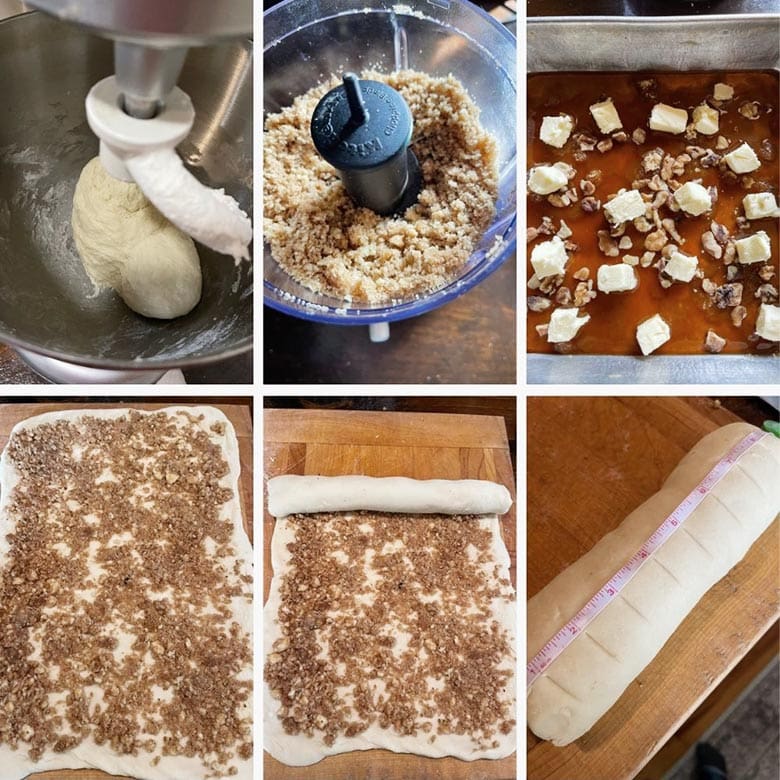
After mixing the dough, it just needs a 10-minute rest before rolling, shaping and cutting. While the dough is resting, mix up the filling and add the maple syrup, brown sugar, walnuts and butter to a greased 8×8-inch baking pan.
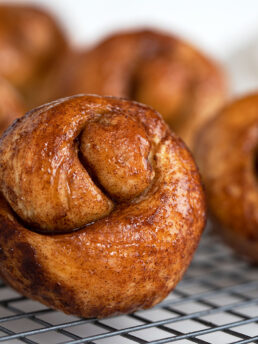
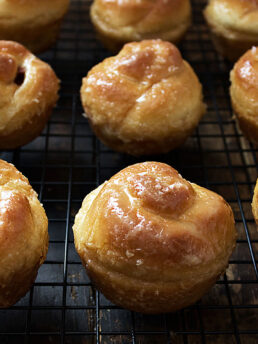
After the 10-minute dough rest, roll out the dough into a rectangle and spread the filling over-top. Roll up and cut into 9 even 1-inch slices.
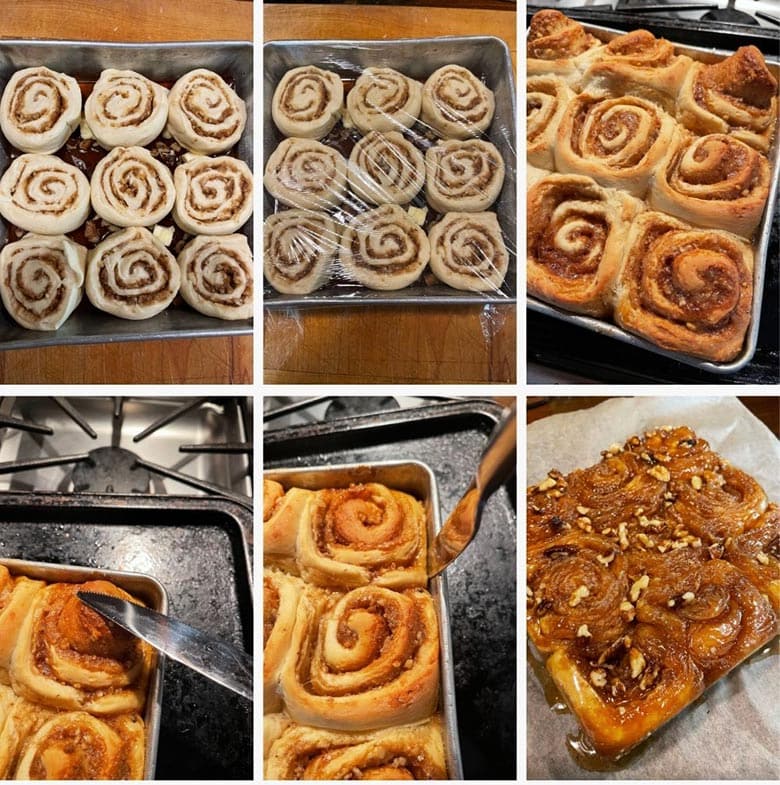
Place the slices on top of the syrup mixture in the prepared pan. Cover the pan with plastic wrap and allow to rise until doubled, about 35-45 minutes. Bake about 35 minutes. As soon as they are out of the oven, I like to press down any roll centres that have popped up during baking, so the rolls will sit flat once flipped over. Also run a knife around the outside of the pan, to be sure there is no sticking. Finally, flip the pan over onto a piece of parchment (to catch the drips).
Recipe Tips
- If you don’t have a food processor for the filling, just chop the walnuts more finely with a knife, then add to a bowl with the brown sugar and butter and cut together with a pastry cutter or two knives. Stir the maple syrup in at the end.
- Don’t skip the baking sheet under your baking pan, as these will bubble over the sides a bit.
- Check the rolls at about 30 minutes of baking and if they seem to be dark enough, loosely cover the top with a sheet of aluminum foil to prevent further browning. Even if they look browned at 30 minutes, you will want these to bake a full 35-40 minutes, to be sure they are nicely cooked right to the middle.
- Yes, you can double this recipe and make a 9×13-inch pan of sticky buns, if you’re feeding a crowd.
- These keep quite well in an air-tight container for several days on the counter. They also freeze beautifully for up to 3 months.
Top Tip
As soon as the buns are out of the oven and before you flip them over, take a knife and press down on any of the centre-of-the-rolls that have popped up. As we are going to be inverting the rolls, anything sticking up will make our rolls not sit flat.
Making Ahead, Storing and Freezing
These maple sticky buns are best enjoyed freshly baked, but will keep well-wrapped and stored at room temperature for a couple of days.
For longer storage, freeze well-wrapped up to 2 months.
Want to Save This Recipe?
Enter your email & I'll send it to your inbox. Plus, get great new recipes from me every week!
By submitting this form, you consent to receive emails from Seasons and Suppers.
Get the Recipe: Maple Sticky Buns
Ingredients
For the dough:
- 2 1/2 cups all-purpose flour, spooned and levelled, plus more as needed
- 1 teaspoon fine salt
- 2 1/4 teaspoons quick or rapid-rise instant yeast, *see Instructions below for using regular instant or active dry yeast
- 1/2 cup water
- 1/4 cup milk, at least 2%
- 2 Tablespoons butter, salted or unsalted
- 1 Tablespoons maple syrup, preferably dark or Grade B
- 1 large egg
For the filling:
- 1/4 cup chopped walnuts
- 1/2 cup brown sugar, light or dark, but I generally use light brown sugar
- 1/2 teaspoon cinnamon
- Pinch salt
- 2 Tablespoons salted butter, cold and cut into 4 pieces
- 1 Tablespoon pure maple syrup, preferably dark or Grade B
For the pan:
- 1/2 cup pure maple syrup, preferably dark or Grade B
- 1/2 cup brown sugar, light or dark, but I generally use light
- 1/4 cup chopped walnuts
- 4 Tablespoons salted butter, cut into about 16 smaller pieces
Instructions
- *If you don't have rapid or quick-rising yeast and need to use regular instant yeast (such as SAF) or Active Dry yeast, proof yeast in 1/4 cup lukewarm water. Mix remaining 1/4 cup water with the 1/4 cup milk and butter and heat as prescribed. Add all to the dough. PLUS* replace the 10-minute dough rest with a full first rise to doubled, probably 30-45 minutes.
- Combine 2 cups of the all purpose flour, salt and quick-rising yeast in a large bowl or the bowl of your stand mixer, fitted with the kneading hook. In a small saucepan or in the microwave, heat the water, milk and 2 Tbsp. butter until just warm to the touch (about 105F). Stir in the maple syrup.
- Stir the milk mixture into the dry ingredients, then add egg and mix in until well combined, scraping down the bowl as needed to combine the flour. Start adding more flour, in small increments, mixing in well before adding more. Continue adding flour until you have a moist dough that wraps around the hook and cleans the bowl of the mixer. Remove dough to a lightly floured surface and knead briefly. Form into a ball, cover with a clean tea towel and let rest 10 minutes.
- Meanwhile, prepare the filling. Add the chopped walnuts to a food processor and pulse a few times to break them down a bit. Add the brown sugar and butter and pulse a few times until you have an even crumb mixture. Add the maple syrup and pulse in once or twice. Set aside.
- Prepare the pan by greasing an 8x8-inch baking pan well with butter, oil or cooking spray. Pour the maple syrup into the pan and tilt to spread evenly over the bottom of the pan. Sprinkle the brown sugar evenly over-top. Scatter the walnuts evenly over-top, as well. Dot the diced butter over the top. Set aside.
- (Refer to the Step-by-Step Photos above the Recipe Card if you are unsure about this rolling and cutting process). Remove dough to a lightly floured work surface and deflate. Roll into a rectangle 9-inches wide and about 14-15 inches long. Scatter prepared filling over-top of the dough and spread out evenly right out to the edges. Starting from the short (9") end, roll up jelly-roll style. Use a measuring tape or stick to adjust the loaf to exactly 9-inches wide (press in from the ends of the roll). Measure out nine 1-inch slices using a measuring tape and cut the log into slices. Place the slices, cut side up, on top of the maple syrup/walnut mixture in the pan. Cover the pan with plastic wrap and set to rise until doubled, about 40-45 minutes.
- Preheat oven to 350F.
- When buns are risen, remove the plastic wrap and place the baking pan on top of a baking sheet (to catch any bubble-overs!). Place into preheated oven and bake for 35-40 minutes, or until golden and they sound hollow when tapped. *Check buns at about the 30 minute mark and if they are already browned sufficiently, loosely cover the top with a sheet of aluminum foil for the last part of baking.
- Remove from oven. Run a knife around the outside of the pan very thoroughly, to ensure there is no sticking on the sides of the pan. Also, if some of the centres of the buns have popped up during baking, use the side a knife to gently press them back down where they belong. Cover a baking sheet with a piece of parchment paper, then invert the hot buns on top of the parchment. If they don't immediately fall out, tap on the bottom of the pan with the butt of a knife until they do.
- Allow buns to cool to at just warm or cool completely before eating.
- These buns will keep several days at room temperature in an air-tight container. They will also freeze well.
Notes
More Sticky Bun Recipes to Love!
Hi! I’m Jennifer, a home cook schooled by trial and error and almost 40 years of getting dinner on the table! I love to share my favourite recipes, both old and new, together with lots of tips and tricks to hopefully help make your home cooking enjoyable, stress free, rewarding and of course, delicious!
These just came out of my oven and they smell and look heavenly! The I instructions are so good and I cannot wait for them to cool. I made a double batch and I am glad that I did! 😍😍😃👌
I can smell them from here :) Do enjoy, Carol! Thanks.
Can the dough be used to make cinnamon buns/rolls?
Hi Pina and yes, it could.
Made these tonight and they’re super good! Thanks for your awesome recipes – can’t wait to try more!
So glad you enjoyed them, Jola :) Thanks so much!
These sticky buns would fly off the table at our house Jennifer! They look super scrumptious. Keeping this one ear marked for Mother’s Day!
These would be perfect for Mother’s Day, Mary Ann :) Thanks so much!