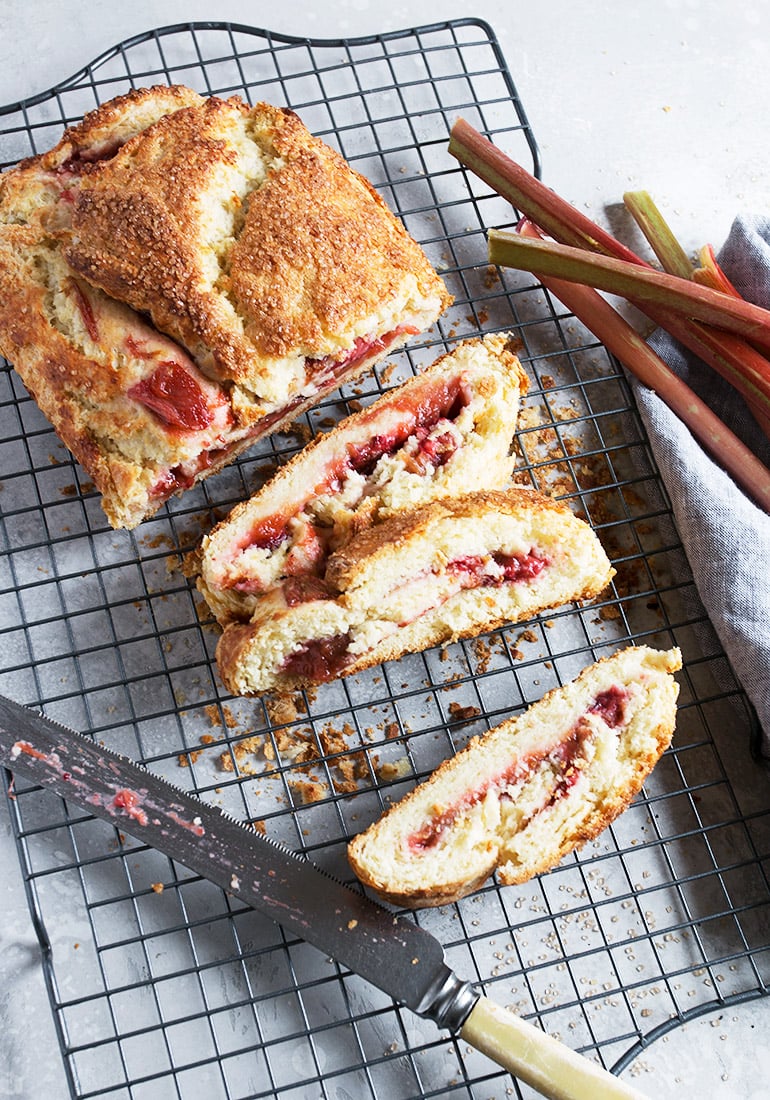
A tender buttermilk biscuit dough jelly roll, filled with a roasted rhubarb and strawberry filling, rolled up and baked to flaky, golden goodness.
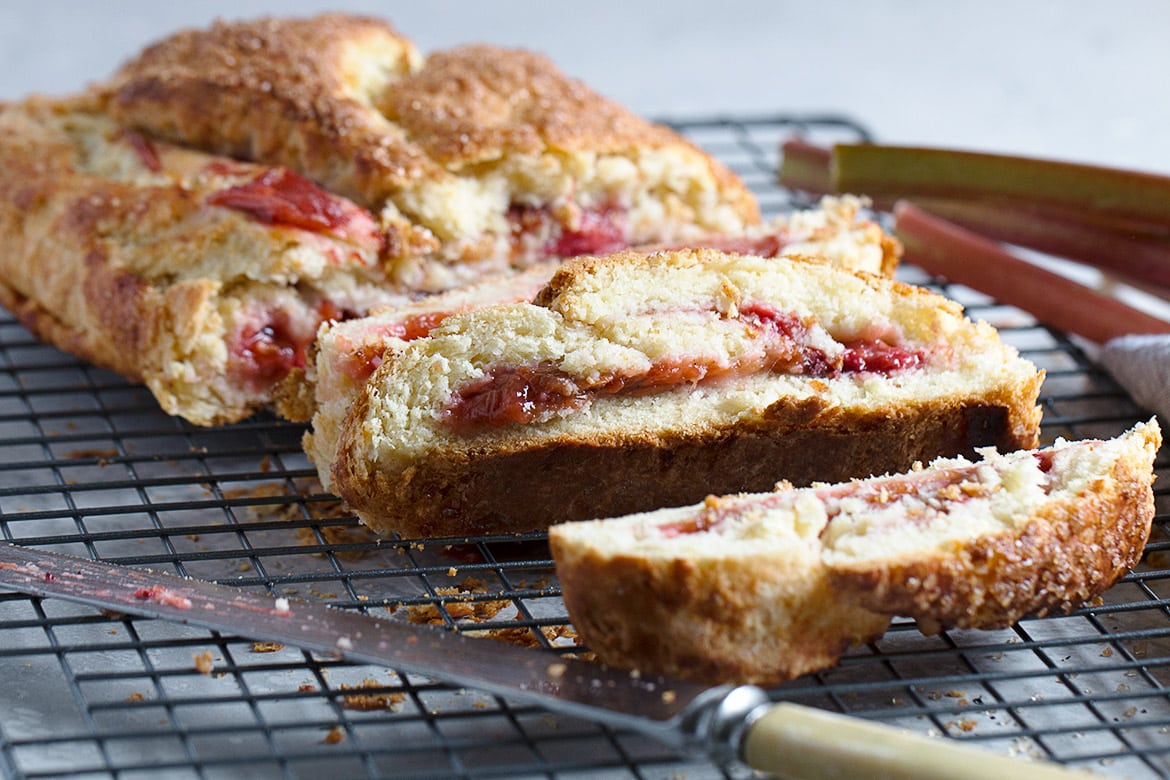
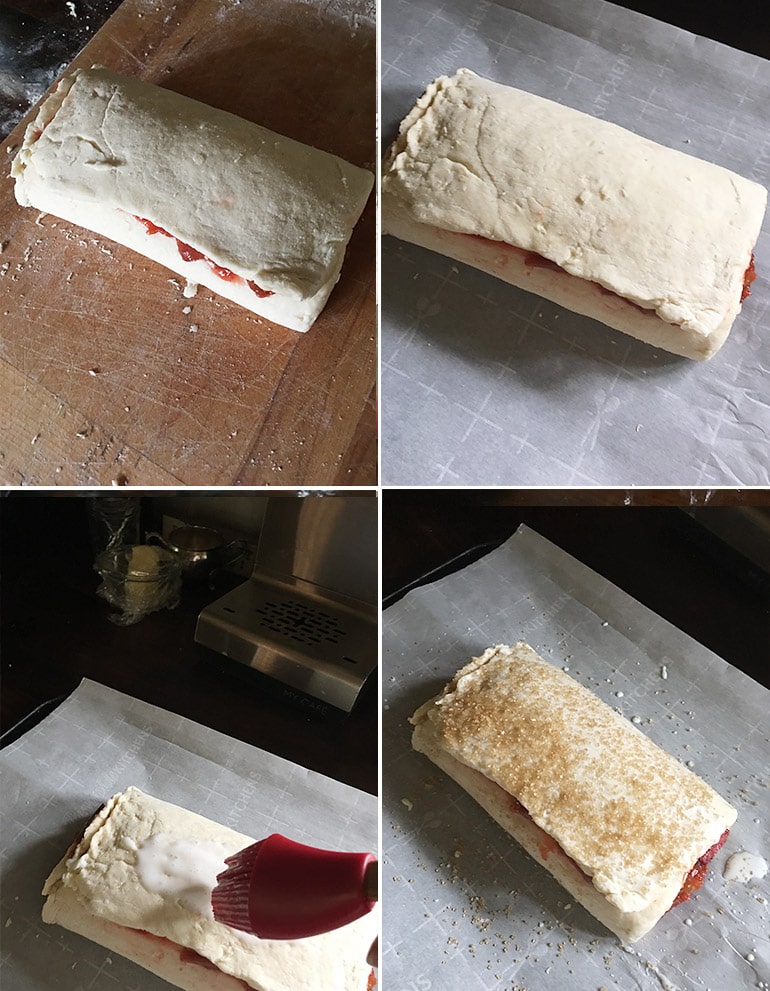
So what we have here is a basic buttermilk biscuit dough, that is rolled into a rectangle and then simply folded like a letter. So perhaps this one is a bit more of a jelly fold, than a roll, but you get the idea :)
Encased inside is a lovely roasted rhubarb filling, with just a handful of strawberries added to the mix to bring an extra bit of sweetness and as a flavour foil for the rhubarb.
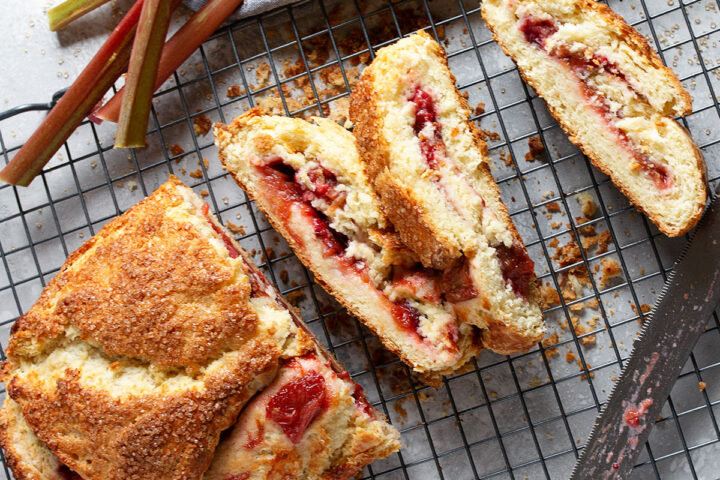
Before baking, the biscuit roll gets a brushing of buttermilk and a generous sprinkling of turbinado sugar. Once baked, the outside of this biscuit roll delivers the most lovely and crisp outside, that shatters when cut, like a pastry. And of course, inside is … well, a biscuit with jam.
Ingredients and substitutions
Rhubarb: I used fresh rhubarb and have yet to try this with frozen rhubarb. My thoughts are that frozen rhubarb should work just fine, as it will be roasted. I suspect the roasting time in the oven would be somewhat longer to allow the extra moisture to cook off.
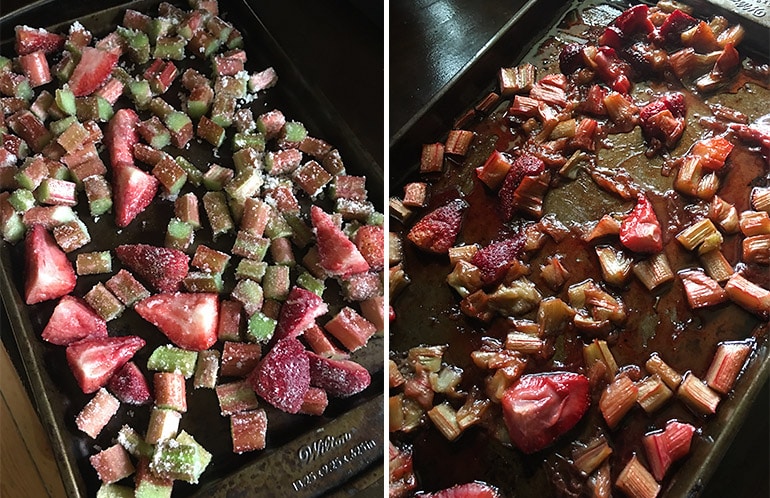
You’ll want to roast the rhubarb until it is soft and almost all the liquid has cooked off, but before the rhubarb begins to brown or scorch at all. It should resemble stewed rhubarb. Fresh rhubarb in my oven took about 45 minutes to get to that point. For frozen, just keep an eye on it and allow to cook to that point, however long that takes.
Strawberries: You will just need 4-5 large strawberries here. If you prefer, you could use raspberries. About a rounded cup of raspberries should work. If you’d rather not use any berries (only rhubarb), simply increase the amount of rhubarb to about 4 cups.
Buttermilk: If you don’t have buttermilk, you can use regular milk or even cream or half and half. You can make a mock buttermilk by adding 2 tsp of lemon juice or white vinegar to 3/4 cup of regular milk and letting it stand about 10 minutes before using. To keep it cold for the biscuit making, place in the refrigerator while standing.
I haven’t tested this recipe with nut or soy milk, but I have no reason to believe it wouldn’t work. The quantity you will need to add may vary slightly, so add a bit at a time and as much as necessary in that case.
Salt: The recipe specifies kosher salt. The more coarse grains of kosher salt don’t dissolve completely during baking, so they leave behind a subtle, but distinct salty note here and there, which is a great balance with the sweet and fruit. If you don’t have kosher salt, use slightly less fine salt, about 1/2 tsp.
Sugar: I used regular white sugar for the biscuit dough, but went with turbinado sugar for the topping. Regular white sugar is fine for the topping, as well as coarse sanding sugar. Use whichever you prefer.
Flour: I have not tried this recipe with gluten-free flour. If you have had success with 1 for 1 gluten-free flour for biscuits before, there is no reason it won’t work here.
Step-by-step photos
Recipe tips!
- The roasted rhubarb mixture can be made ahead and refrigerated for up to 5 days. If using immediately, be sure to allow it to cool completely and ideally, refrigerate a bit so it is cool, to avoid melting the butter in the biscuit dough before baking.
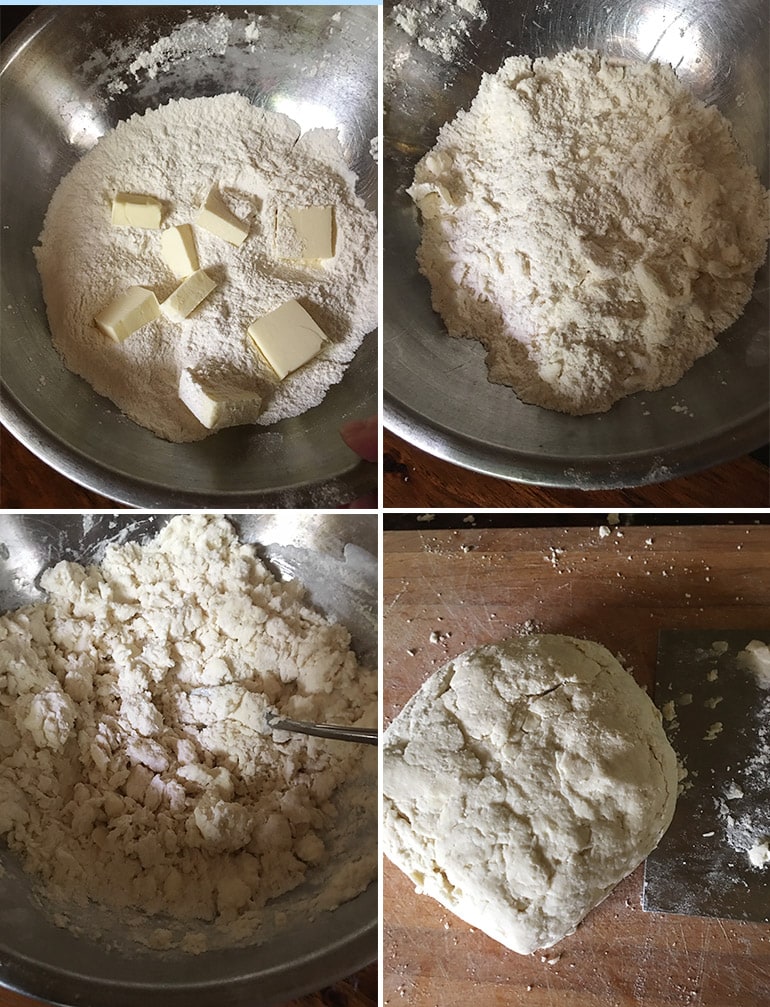
- As with most biscuits, it is important to use both cold buttermilk and cold butter. You’ll want to work fairly quickly and have only as much contact between your hands and the dough as necessary, as your warm hands will begin to soften the butter. It is “ready” when the mixture is coarse, with only pea-sized pieces of butter.
- After removing the dough to a well-floured surface, I used a bench scraper to fold the dough over and lightly press it down on itself. You don’t want to overwork it, but you do want to make sure it is evenly moist and not too crumbly.
- If you find the dough difficult to roll, gather it up, wrap it tightly and refrigerate for 15-20 minutes, then try again. A dusting of flour as needed, both underneath and on top, if the dough seems sticky.
- Be sure to check the bake at about 25 minutes in and if the top seems dark enough already, lay a sheet of aluminum foil loosely over top, then continue baking closer to the 35-40 minutes mark.
Making ahead, storing and freezing
As noted above, the rhubarb filling can be made ahead. The finished roll is best enjoyed the day it is baked, but will keep at room temperature for another day or so.
Leftovers can be frozen for up to 3 months.
Want to Save This Recipe?
Enter your email & I’ll send it to your inbox. Plus, get great new recipes from me every week!
By submitting this form, you consent to receive emails from Seasons and Suppers.
Get the Recipe: Rhubarb Buttermilk Biscuit Jelly Roll
Ingredients
Roasted Rhubarb:
- 3 cups rhubarb, fresh or frozen, trimmed and cut into 1/2-inch pieces
- 1 1/2 cups strawberries, quartered, about 5 large strawberries
- 1/3 cup granulated white sugar
- 1 teaspoon vanilla, extract or vanilla bean paste
Biscuit Dough:
- 2 cups all-purpose flour, plus more for dusting
- 1 teaspoon baking powder
- 1/2 teaspoon baking soda
- 2 Tablespoons granulated white sugar
- 3/4 teaspoon kosher salt, or about 1/2 tsp fine salt
- 1/2 cup unsalted butter, cold, cut into 1/2-inch pieces
- 3/4 cup buttermilk, cold
Topping before baking:
- 2 Tablespoons buttermilk, for brushing
- 2 Tablespoon sugar, coarse sanding or turbinado or regular white sugar
Instructions
- Preheat oven to 350F. (regular bake setting/not convection or fan-assisted)
- In a large bowl, toss the prepared rhubarb and strawberries with 1/3 cup white sugar and the vanilla. Spread in a single layer onto a baking sheet. Bake stirring 2-3 times, until juices have thickened but are not beginning to brown, about 45-50 minutes (may take longer if starting with frozen rhubarb). You should have about 1 cup of roasted fruit. Immediately remove roasted fruit to a bowl and allow to cool completely before proceeding and ideally, cover and pop the bowl of fruit in the fridge for a bit, so it will be cold when using. *Roasted fruit can be made several days ahead and refrigerated.
- Increase oven temperature to 400F. Prepare a baking pan with a sheet of parchment paper. Set aside.
- In a large bowl, whisk together the flour, baking powder, baking soda, the remaining 2 Tbsp white sugar and the salt. Add the cubed, cold butter to the mixture and working quickly, press the butter between your fingers and into the flour mixture, until the mix is even, with about pea-sized pieces of butter. Add the cold buttermilk. Using a for, stir the mixture just until it comes together.
- Turn dough out onto a floured work surface and gather into a rough round. Using a bench scraper or spatula, fold the edges up and over the round, pressing down slightly. Repeat a few times, until the dough seems evenly moist and not crumbly or sticky (if sticky, dust with a bit more flour).
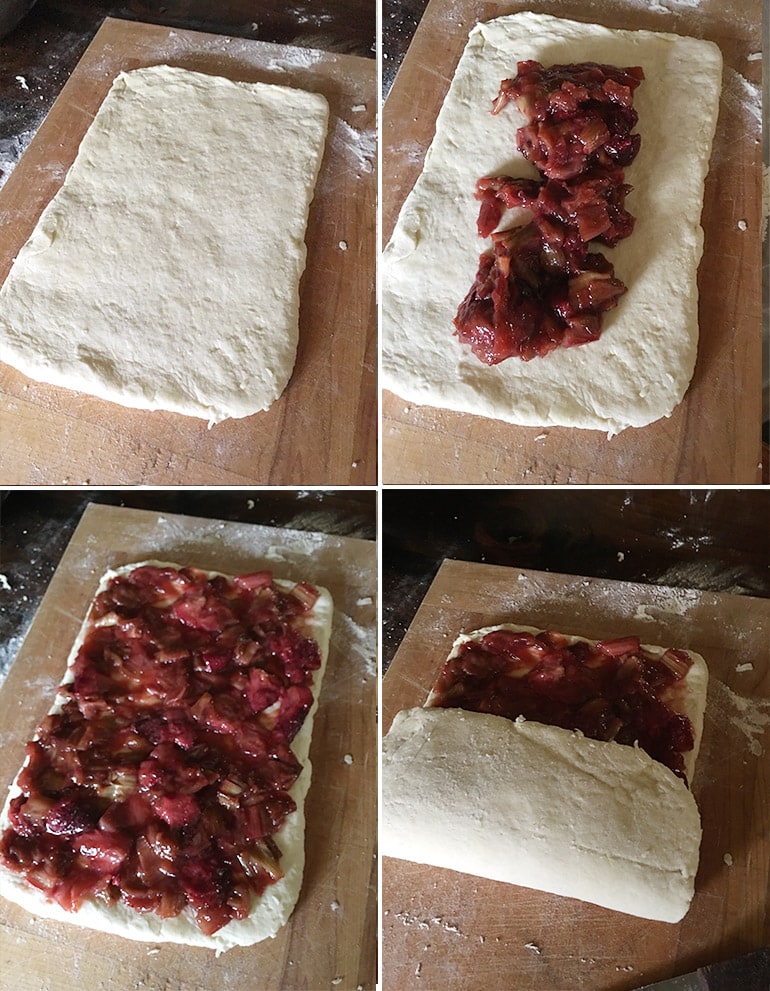
- Dust work flour with flour (especially underneath) and lightly on top of the dough. Using a rolling pin, roll dough out to an 8×10-inch rectangle, about 1/2-inch thick.
- With the shorter, 8-inch edge closest to you, spread the cooled rhubarb mixture over the dough, spreading right to the edges. Fold the bottom up 1/3 of the way, then fold the top down to cover the bottom, making a rectangle. Gently transfer to the prepared parchment-lined baking sheet. Brush the top of the dough with buttermilk, then sprinkle the top generously with coarse sanding sugar, turbinado sugar or white sugar.
- Baking until puffed and golden brown, about 35-40 minutes. *Check bake at about 25 minutes and if the top is dark enough, lay a sheet of aluminum foil loosely over the top and continue baking. It may look done on the outside, but the inside needs more time to cook.
- Remove from oven and immediately transfer to a cooling rack on the parchment. After a few minutes, you can slice the parchment out from underneath. Allow to cool for about 30 minutes before serving.
Notes
Adapted from a Martha Stewart Recipe
More Rhubarb Recipes to Love!
Hi! I’m Jennifer, a home cook schooled by trial and error and almost 40 years of getting dinner on the table! I love to share my favourite recipes, both old and new, together with lots of tips and tricks to hopefully help make your home cooking enjoyable, stress free, rewarding and of course, delicious!



This recipe looks delicious! And I look forward to making it as soon as I get my hands on some rhubarb. But I have a question. Which kosher salt brand did you use? I understand the two most popular brands here in the states Diamond Crystal and Morton are not exactly interchangeable measure for measure.
Hi Carmen, I use Windsor Coarse Kosher Salt, which is a popular grocery store brand here in Canada. I’m not sure how it compares to Diamond or Morton.
Ah, the magic of the internet…I discovered that Windsor Coarse Kosher Salt is commonly sold in the USA under the brand “Morton”. Thank you…looking forward to making this!
I did not know that! Thanks for letting me know, Carmen. Very helpful :)
Wish a had a big slice with my coffee this morning! This looks delicious, my friend! Pinned!
Thanks so much, Annie :)
It’s like one big old biscuit Jennifer! It looks totally delicious. I love that filling. Can’t wait to give the recipe a whirl!
It is Mary Ann :) It was a fun bake and of course, a lovely sweet treat!
All I want to do is indulge in rhubarb lately, I’m obsessed! This will feed my craving, it looks so luscious!
Thanks Sue and yes, rhubarb is a fleeting treat, so best enjoyed while we can :)
First of all, ‘jelly roll’ is so fun to say, isn’t it?? Secondly, yes please!! I need a big slice of this in my life with a big cuppa coffee! Delish, Jennifer!
It is Dawn! Thanks so much :)
Oh my goodness, this definitely calls my name! That sugary, crusty top, and all that wonderful jam-like filling sealed the deal for me. I’m certain everyone will love this recipe. Great post and photos – thanks for sharing Jennifer!
Thanks Tricia :) I loved the texture of the crusty top. It was a pleasant surprise!
Love this! I make biscuit rolls all the time. Savoury or sweet, I’ve made so many kinds, and I’m always looking for new stuffing ideas! Roasted rhubarb with strawberries is definitely one I’ll be trying!
I honestly didn’t know biscuit rolls were a thing, but now that I do, I think I’ll be making all manner of sweet and savoury ones, too :) Thanks!
This is such a cozy looking baked creation that I am literally hoping for a rainy day soon! Would totally indulge – both making and enjoying the results:) Pinned.
This is definitely a worthy, rainy day baking project! Thanks Milena :)
This is beautiful and so delicious looking. I bet with that biscuit dough, it just melts in your mouth! Brilliant idea, 5-stars!
Thanks so much, Chris! I loved the two textures of this one. Crispy on the outside, tender on the inside :)