Get the Recipe: Roasted Butternut Squash Casserole
This is a perfect dish for holiday entertaining, but also easy enough for every day. The sweet squash and crunchy topping mean even kids will like this one!
Ingredients
- 4 cup roasted butternut squash puree, from 2 small/medium or 1 large butternut squash (approximately)
For the casserole:
- 1 large egg
- 2 Tablespoon heavy whipping cream (35% b.f.), or lighter cream such as 10% half and half cream
- 1 Tablespoon real maple syrup, or substitute 1 tsp. vanilla
- 1 Tablespoon salted butter, melted
- 1/2 teaspoon fine sea salt, or to taste
Topping:
- 1/4 cup light brown sugar
- 1/4 cup all purpose flour
- 1 1/2 Tablespoon salted butter, melted
- 1/4 cup pecans, chopped (you can chop coarsely or finely, as you like)
Instructions
Roast the Butternut Squash:
- Preheat oven to 375° F. (not fan-assisted)
- Cut the squash in half lengthwise and remove the seeds. Place the squash cut side down on a baking sheet and cook in the preheated oven until the squash is soft, about 50 - 70 minutes, depending on the size of the squash. (Test doneness by pressing on the top of the squash, it should feel soft and yield to light pressure.)
- When the squash is cooked, remove from oven, flip over the squash so the cut side is up and let cool slightly. With a large spoon, scoop out the squash into a large bowl. If making ahead, cover and refrigerate or if making immediately, allow to cool to almost room temperature before mixing.
To Make the Casserole:
- Preheat oven to 350F. (not fan-assisted)
- Lightly grease a baking pan or casserole dish - approximately 8 x 8-inch-ish baking dish (for a single recipe) or a 9x13-inch-ish dish (for a double recipe). Exact size or shape isn't too important. If the squash fits into the dish and is about 1 1/2 - 2 inches high, it's good. (You can also use several smaller dishes, ramekins or even mason jars).
- In a large bowl with an electric mixer (or food processor) or in the bowl of a stand mixer, fitted with the paddle attachment, add the roasted butternut squash. Mix at low speed for 1-2 minutes, or until nice and smooth. Add the egg, cream, maple syrup, melted butter and salt and mix until well combined and smooth.
- Spoon squash mixture into prepared pan(s). Ideally, it will be about 1 1/2-2-inches thick. You can fill it right up. The squash won't expand or shrink as it cooks, so as long as it fits nicely in the pan, it fine. *If very full, be sure to bake the dish on top of a baking sheet in case some of the liquid in the squash bubbles over.
- **You can cover and refrigerate or freeze the uncooked, un-topped casserole at this point, if you like. Refrigerate covered for up to 24 hours or freeze up to 1 month.
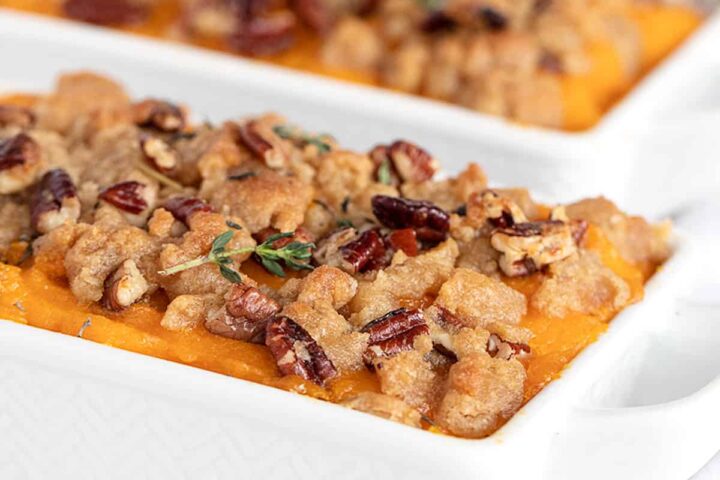
- Prepare the crunchy topping by stirring together the brown sugar and flour. Pour in the melted butter and stir to combine. Stir in the pecans.
- Sprinkle the brown sugar/pecan topping mixture evenly over the squash mixture. *Depending on your size pan/shape, if you feel there isn't enough of the topping, you can double the topping recipe and add more. That said, you don't want too much, as butternut squash is sweet itself, so you don't want too much additional sweet on top.
- Bake in preheated 350° oven until squash is bubbling around the edges and the topping is lightly golden, about 40 minutes. Add additional time (5-10 minutes) if the casserole was cold when it went in the oven or is very large/deep.
- Remove from oven and let stand a few minutes, before serving.
- Baked casserole can be frozen up to 1 month. Left-overs should be refrigerated. Reheat in a 350F oven, loosely covered with a sheet of aluminum foil, to prevent over-browning of the topping. Heat until warmed through.
Notes
A single batch recipe will make a roughly 8x8 pan or several smaller dishes. If you want to feed a crowd, double or triple the recipe and bake up in a 9x13 or larger casserole. The pan you use to bake it isn't critical. If it fits in the pan, it's fine (it won't increase in size as it bakes, but won't decrease either). I like a little thicker casserole, so I aim for about 1 1/2-2 inches for the squash layer.
Be sure to read the notes above this Recipe Card for more tips on making this recipe. You will also find step-by-step photos there, as well.
Serving: 1serving, Calories: 162kcal, Carbohydrates: 16g, Protein: 2g, Fat: 10g, Saturated Fat: 5g, Polyunsaturated Fat: 1g, Monounsaturated Fat: 4g, Trans Fat: 1g, Cholesterol: 50mg, Sodium: 252mg, Potassium: 59mg, Fiber: 1g, Sugar: 11g, Vitamin A: 267IU, Vitamin C: 1mg, Calcium: 24mg, Iron: 1mg
Tried this recipe?If you enjoyed this recipe, please leave a star rating and comment. It helps others to find it!
