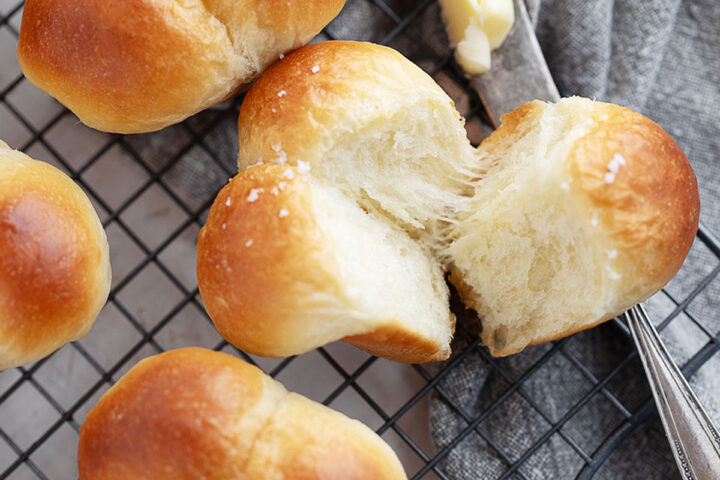
Get the Recipe: Cloverleaf Dinner Rolls
Buttery, golden cloverleaf rolls start with 3 dough balls that bake up in muffin tins to resemble a 3-leaf clover. The distinctive shape of cloverleaf rolls makes them pull-apart perfect!
Ingredients
- 3 1/2 cups (420 g) bread flour, spooned and levelled *see Note 1 below
- 3/4 cup (42 g) unseasoned instant potato flakes, *see Note 2 below
- 1/4 cup (50 g) white granulated sugar
- 1 1/2 teaspoons (9 g) fine table salt, reduce by 1/4 teaspoon if using salted butter below
- 2 teaspoons (6 g) instant yeast, *see tip below for using Active Dry yeast
- 5 Tablespoons (71 g) unsalted butter, at room temperature, cut into 8 pieces
- 1 large egg, at room temperature
- 1 1/4 cups (284 g) whole milk, lukewarm, about 105F
For brushing after baking:
- 2 Tablespoons (28 g) butter, melted
For sprinkling after baking:
- flaky finishing salt, such as Maldon's, optional
Equipment
- 12-cup muffin tin
Instructions
- In the bowl of a stand mixer fitted with the kneading hook, add the 3 1/2 cups bread flour (spooned and levelled *see Note 1 below), 3/4 cup unseasoned instant potato flakes (*see Note 2 below), 1/4 cup white granulated sugar, 1 1/2 teaspoons fine table salt (reduce by 1/4 teaspoon if using salted butter below) and 2 teaspoons instant yeast (*see tip below for using Active Dry yeast). Mix briefly to combine.
- Heat the 1 1/4 cups whole milk (lukewarm, about 105F) in the microwave or a saucepan just to lukewarm, about 105F. Be sure that the milk is not too hot, or it can kill the yeast. (If using Active Dry yeast, stir it into the lukewarm milk and let stand 5-10 minutes.)
- Add the 5 Tablespoons unsalted butter (at room temperature, cut into 8 pieces), 1 large egg (at room temperature) and the lukewarm milk to the bowl and mix on Speed 2 until the dough comes together, about 1 minute.
- Increase the speed of the mixer to Speed 3 and knead for 8-10 minutes. The dough should wrap the kneading hook, but it may be sticky. (See the step-by-step photos above this Recipe Card to see the consistency of my finished dough. If your dough seems stickier, add a bit more flour to the bowl until it looks the same.)
- Scrape the dough onto a floured work surface and knead by hand for 2-3 minutes, adding more flour only if the dough is sticking to your hands or the work surface.
- Form the dough into a ball and place it into a greased bowl or an 8-cup measuring cup. Cover with plastic wrap and let stand at room temperature until doubled in size, about 1 1/2 hours. (Your rising time may vary depending on the temperature of your kitchen. Let the dough rise just until doubled, however long that takes. It may take more or less time than specified.)
- Turn the dough out onto a clean work surface. Use a kitchen scale to weigh the total weight of the dough, then divide that number by 36 to arrive at a weight for each dough piece. (Mine was 919g total weight, and each dough piece was 26g). Weigh out 36 individual dough pieces.
- Take one dough piece and form it into a ball by stretching to form a smooth top, then pinching together underneath (see the step-by-step photos above this Recipe Card to see this process). Repeat with the remaining dough pieces.
- Grease a 12-cup muffin tin with cooking spray or brush with softened butter. Set aside.
- Take 3 of the dough balls and bring them together into a triangle shape, with the dough pieces just touching each other. (Again, refer to the step-by-step photos above this Recipe Card to see what this looks like.) Gently transfer the 3-ball unit into the well of a muffin cup, placing it seam-side down and with each of the 3 balls sitting evenly on the bottom of the muffin cup. Repeat until you have 12 rolls in all the muffin cups.
- Spray a large piece of plastic wrap with cooking spray and place it over the muffin tin with the sprayed side down. Allow the rolls to rise until puffy and just cresting the top of the muffin cups, about 35-45 minutes.
- Preheat the oven to 350F (regular bake setting - not convection or fan-assisted) with the rack in the centre of the oven.
- Once the rolls are ready to bake, place them in the preheated oven and bake for 16-20 minutes, rotating the pan front to back halfway through baking to create even browning. Bake until the rolls are deep golden and the internal temperature of the rolls, when tested with an instant-read thermometer, is 185-190F. (If the rolls are sufficiently browned before the rolls are fully baked, cover the top of the rolls loosely with a sheet of aluminum foil to prevent over-browning while the rolls finish baking.
- Remove from the oven and immediately brush with 2 Tablespoons butter (melted). If desired, sprinkle the tops with flaky finishing salt (such as Maldon's, optional) while the butter is still wet.
- Once brushed with butter, gently remove the rolls from the muffin cups onto a wire cooling rack to cool completely for storage or to cool to just warm if serving immediately. Transfer cooled rolls to an airtight container and store at room temperature for up to 8 hours for best quality if enjoying on the same day. Store leftover rolls in an airtight container at room temperature for up to 2-3 days. If making well ahead or for longer storage, wrap well and freeze as soon as they are cool for up to 1 month (for best quality) or up to 3 months. Thaw frozen rolls, still wrapped, on the counter for 1 hour before serving or warming.
- To rewarm the rolls, wrap in foil and place in a 350F oven until warmed, about 8-10 minutes. Alternatively, you can wrap in a clean tea towel and microwave for about 30 seconds to warm.
If using Active Dry yeast, do not add it with the flour. Instead, add it to the lukewarm milk to proof for 5-10 minutes and add it to the dough when adding the milk.
If you don't have a kitchen scale to divide the dough into 36 equal pieces, cut the dough into 3 equal-sized pieces. Cut each piece into 4 equal-sized pieces. You should have 12 dough pieces at this point. Cut each of the 12 dough pieces into 3 equal-sized pieces, for a total of 36 equal-sized pieces.
It is important that the 3-ball dough unit sits evenly on the bottom of the muffin cup. If one ball sits higher than the others, it won't rise or bake evenly, resulting in lopsided buns with one ball larger than the others.
Notes
Note 1: Bread flour is highly recommended for best roll consistency. While all-purpose flour will technically work for these rolls, you will probably need to add a bit more overall to get the dough to the proper consistency. The finished rolls may be slightly less tender.
Note 2: Look for instant mashed potato flakes that are unseasoned, such as Bob's Red Mill. Check the ingredient list to be sure. If only seasoned instant mashed potato flakes are available, they can be used, but slightly reduce the added salt in the rolls to accommodate any salt in the potato flakes, to avoid overly salty rolls.
Tips for success!
- Use a kitchen scale to weigh the ingredients for best consistency and to avoid adding too much flour to the dough, which can result in heavy rolls.
- Don't add too much flour to the dough in the bowl. The dough should be quite moist and tacky in the bowl. If a bit more flour is needed to create a kneadable dough, do it on the counter after removing it from the bowl, adding only as much flour as is needed to remove any sticking.
- Rise the dough only until doubled, no more or no less. While it took 1 1/2 hours in my kitchen, it may take as little as an hour in yours or as much as 2 hours. Watch the dough and not the clock. When it has doubled, proceed with the recipe.
- Exact baking time will vary from oven to oven and even based on the colour of your muffin tin. Dark metal muffin tins will bake more quickly.
- An instant-read thermometer takes the guesswork out of knowing when your rolls are done and is highly recommended. When you've invested the time to make the rolls, you don't want to be disappointed at the end if the rolls are under- or overbaked.
Serving: 1roll, Calories: 247kcal, Carbohydrates: 36g, Protein: 7g, Fat: 9g, Saturated Fat: 5g, Polyunsaturated Fat: 1g, Monounsaturated Fat: 2g, Trans Fat: 0.3g, Cholesterol: 36mg, Sodium: 328mg, Potassium: 143mg, Fiber: 2g, Sugar: 6g, Vitamin A: 269IU, Vitamin C: 3mg, Calcium: 43mg, Iron: 0.5mg
Tried this recipe?If you enjoyed this recipe, please consider leaving a star rating and comment.
