These classic, yeast-raised apple fritters are just like the ones from your favourite bakery or doughnut shop. Make them at home to enjoy anytime (and they freeze beautifully!).

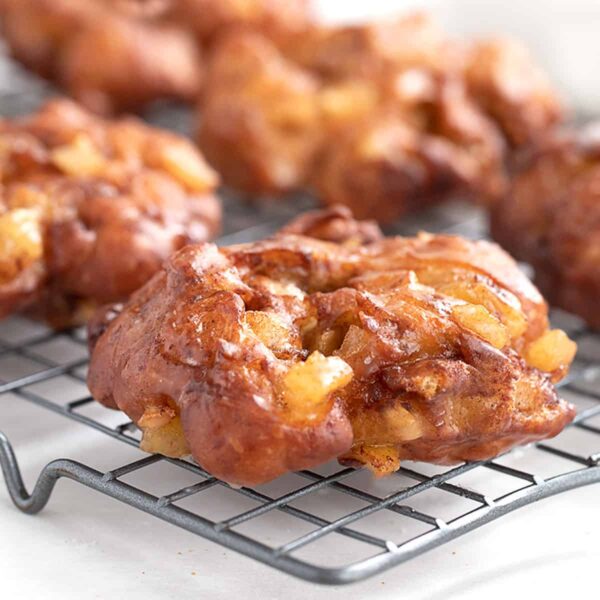
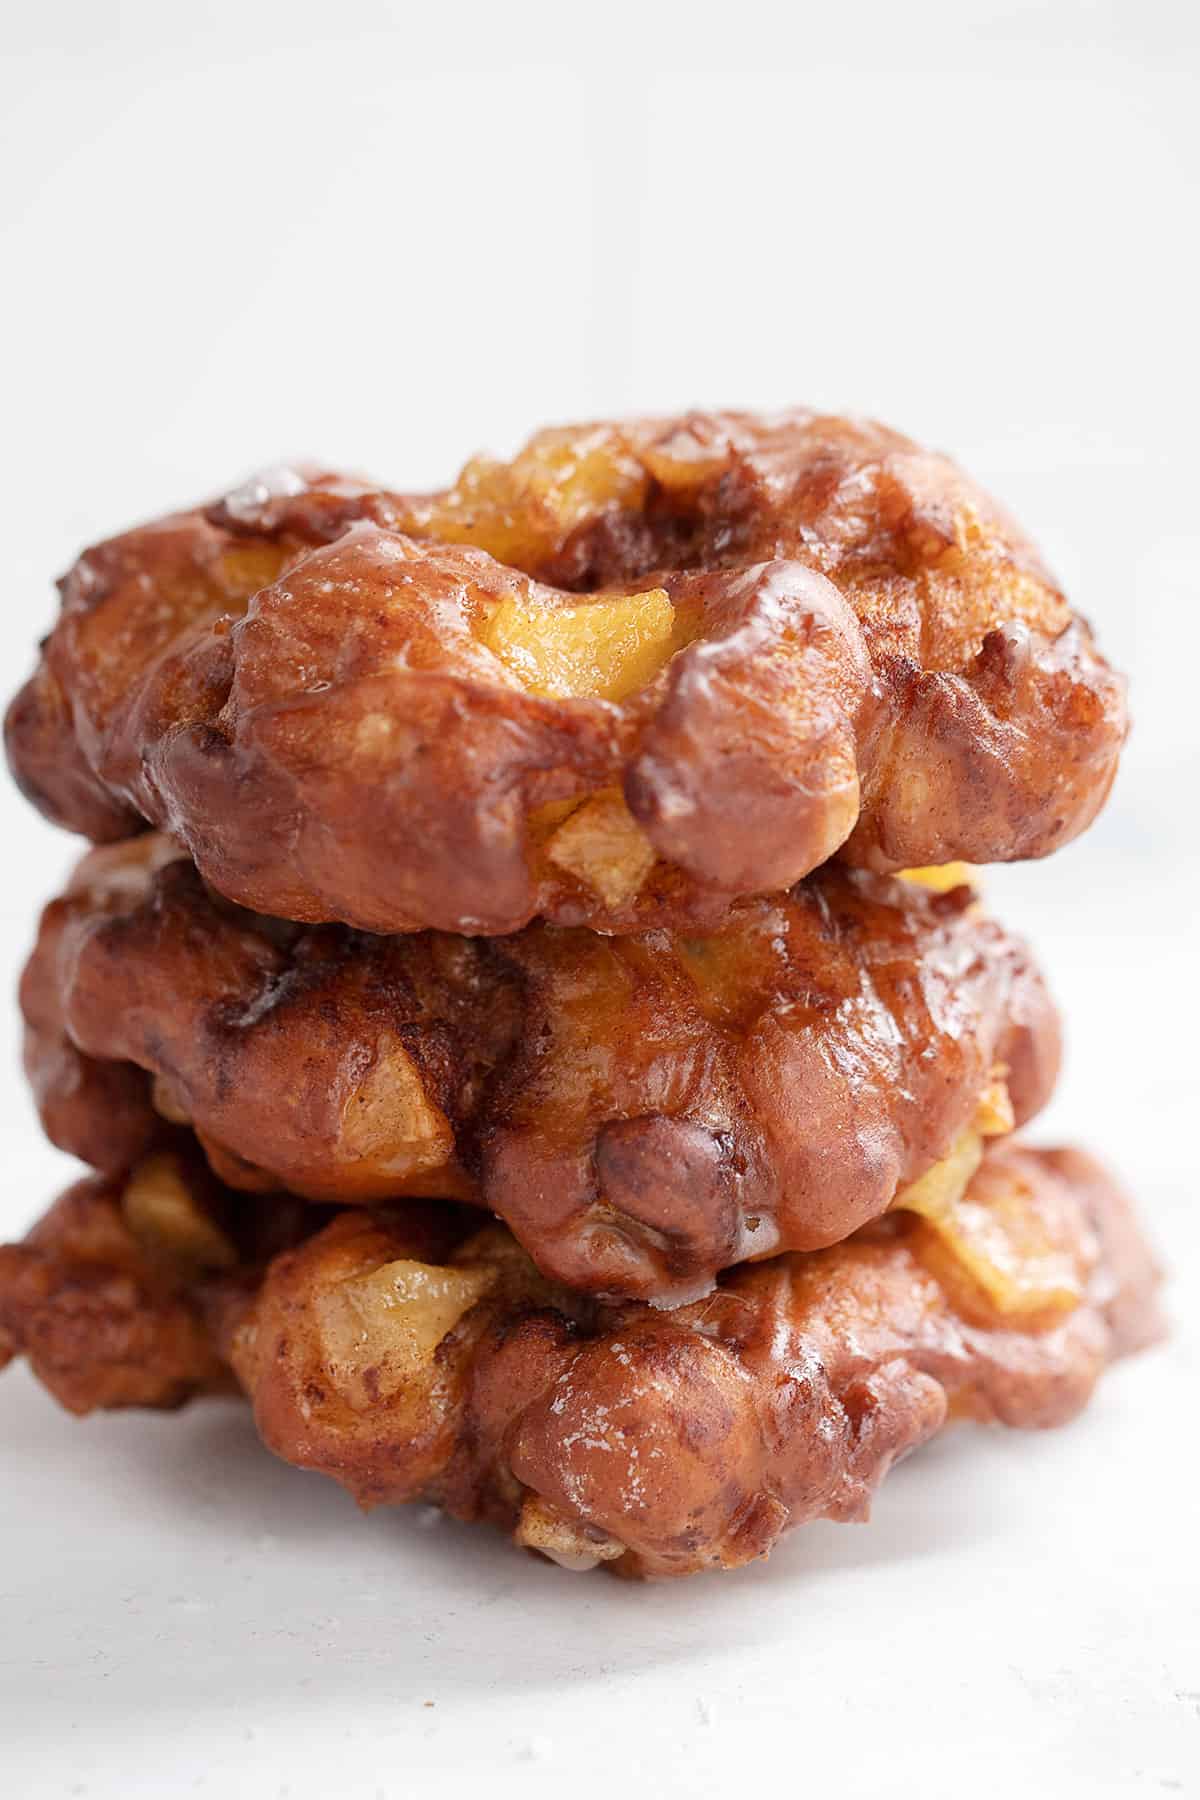
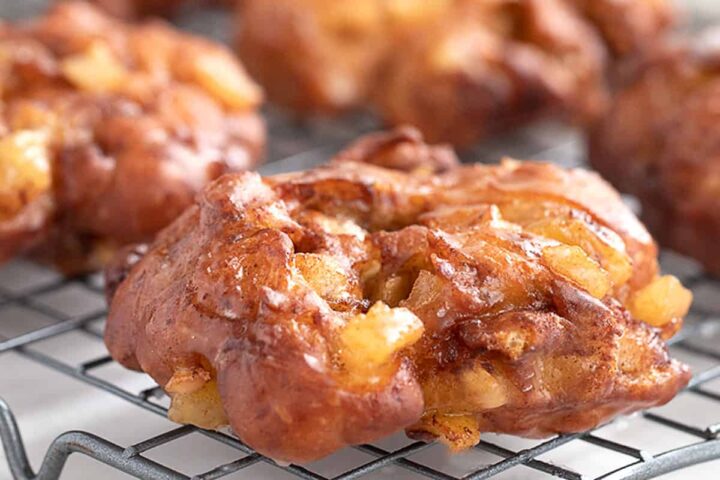
Let me just say first off – these are the real deal apple fritters. They are made with a great yeast-raised dough, which is chopped together with cooked apple chunks and perfectly speckled with cinnamon. Once they are cooked up, they are lovely and browned on the outside and light and fluffy on the inside. The glaze adds a thin layer of sweetness and makes these beautiful donuts sparkle.
I don’t do a lot of deep frying, but in my world, it just isn’t really a doughnut if it isn’t fried, so it has to be! (with all due respect to anyone who bakes doughnuts out there :). That said, if you’re careful to keep your oil at the right temperature, you’ll find that these donuts will absorb very little oil and won’t be at all greasy.
Ingredient Notes
Apples – a medium-sized, tart apple is recommended, so you could go with the super-tart Granny Smith, but I prefer a red-skinned tart apple. I’ve used Pink Lady here. Other tart apples would be Empire or Cortland, Northern Spy, Braeburn or any apple you might use for an apple pie.
Yeast – you’ll need to start with either Active Dry yeast or regular Instant Yeast (such as SAF Brand). Quick or rapid-rise yeast is not recommended for these fritters.
Bread Flour – yeast doughnuts such as these apple fritters, benefit from higher-protein bread flour, which gives the dough a bit more elasticity, so it can trap more air pockets and create a lighter texture to the doughnut. For best results, start with bread flour. If you really can’t wait to stock up on bread flour, you can use all purpose flour, though the texture of the finished fritters might not be quite a light. (You may also find you need to use a bit more flour in the dough to get the moist, smooth dough when using all purpose flour).
Shortening or Lard – solid shortening (such as Crisco™) or Lard (such as TenderFlake™) is recommended for the best and lightest texture of your finished fritters. If you really can’t wait to pick up some shortening, you can use vegetable oil in the same amount, though the texture of your finished fritters will be slightly heavier.
Vegetable Oil, for frying – I like to use vegetable oil, but other neutral-tasting and high smoke point oils such as Canola also work well.
Step-by-Step Photos
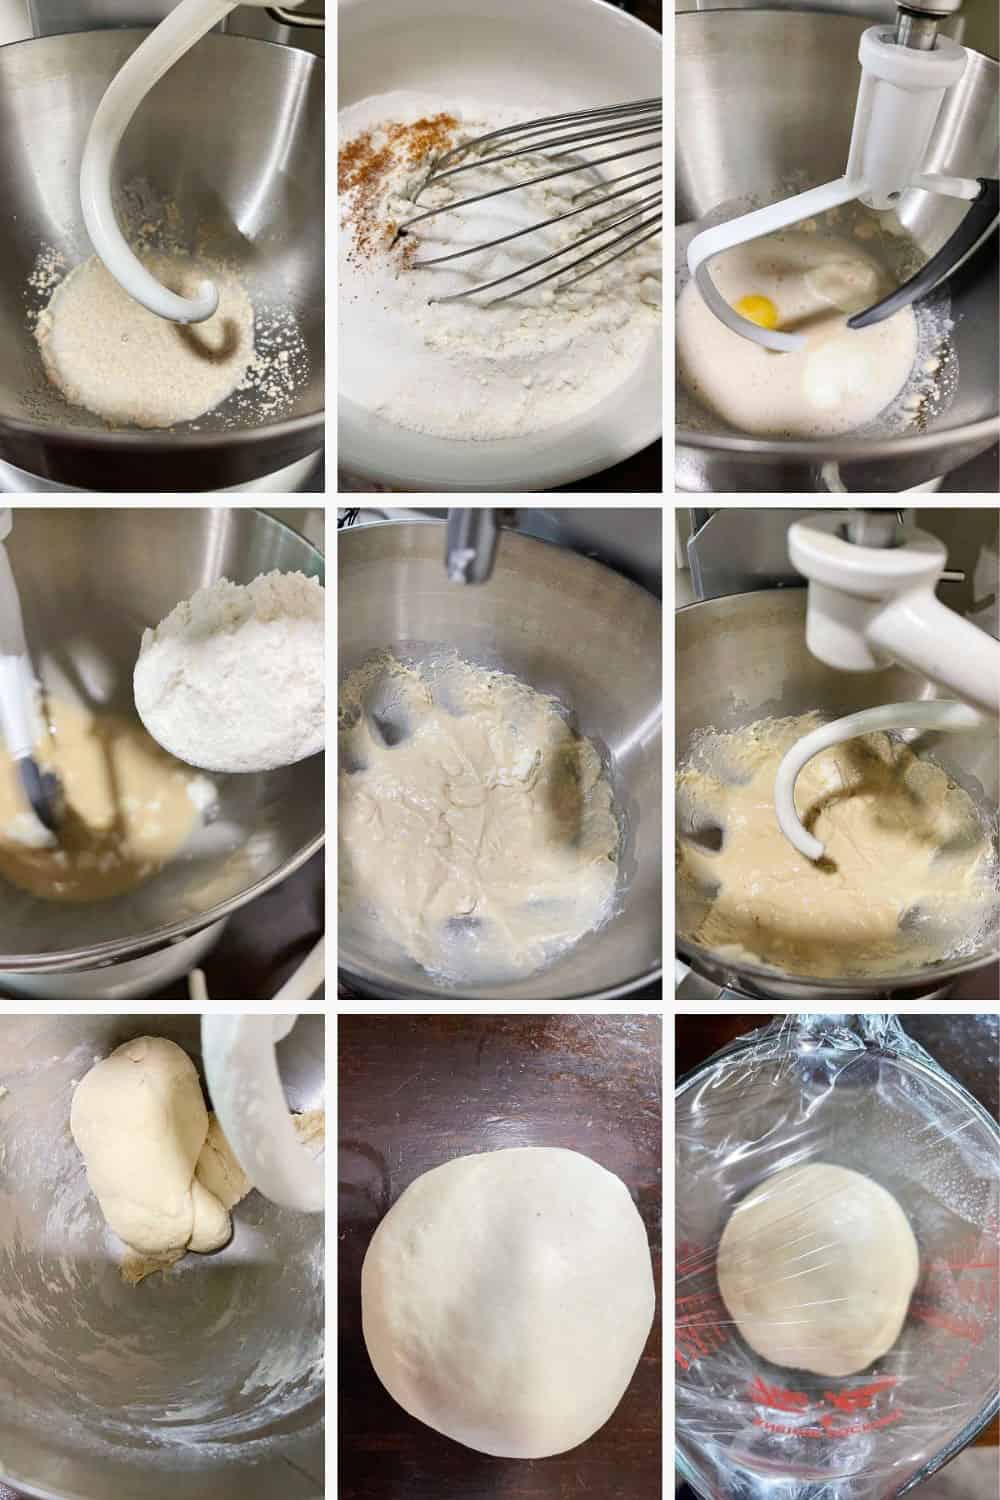
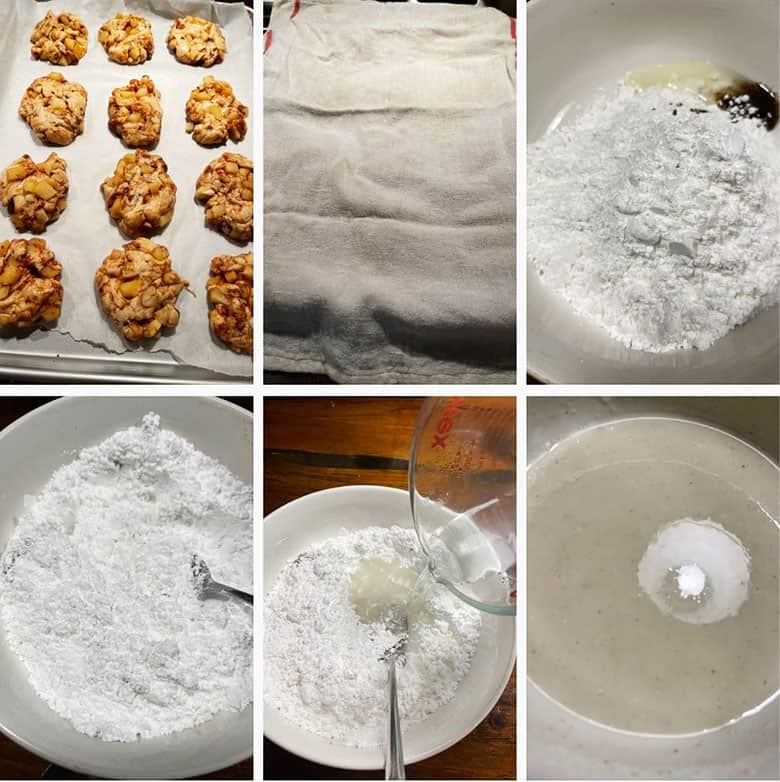
Step 1: Make the Dough – Start by proofing the yeast in warm water and a bit of sugar. Meanwhile, whisk together the flour, white sugar, baking powder, mace and salt and et aside for a moment.
Add the egg, shortening and vanilla to the yeast mixture and mix together using the paddle attachment, to break down the shortening a bit. Mix in about 2/3 of the flour mixture with the paddle attachment, then switch to the kneading hook and mix in the remaining flour mixture, a bit at a time, until you have a smooth, moist (but not sticky) dough, that cleans the bowl.
You may not need every bit of the flour mixture OR you may need to add a few more tablespoons of bread flour over and above the original mixture to get your dough to that point. Remove dough to the counter and knead a bit. It shouldn’t need any extra flour at this point, but if it’s sticky, add a bit as needed. Form into a ball, place into a greased bowl, cover with plastic wrap and let rise until doubled.
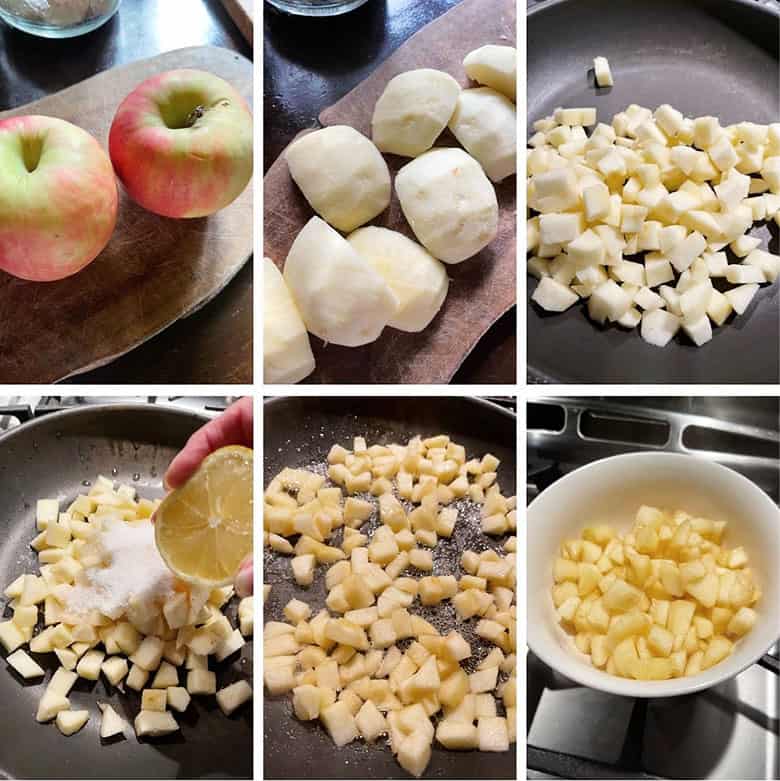
Step 2: Cook the apples – start with two medium sized tart apples. I’m using Pink Lady here. Peel, core and quarters, then diced into 1/2-inch pieces. Place into a skillet with some white sugar and lemon juice. Stir to combine, then heat over medium heat until apples are softened and most of the moisture disappears, about 5 minutes. Remove the apples to a bowl, to cool for a bit.
Step 3: Shaping the Fritters – I know some people like to see a process, rather than reading it. The process of shaping the apple fritters, from risen dough, to filling, to cutting and finally to shaping the fritters and setting them out for the 2nd rise, is illustrated below. From start to finish :)
Step 4: Set to rise and make the glaze – place your shaped fritters onto a parchment-lined baking sheet and cover with plastic wrap or a clean tea towel to rise until doubled (30-45 minutes). Just before the fritters are ready, mix up the glaze, cover and set aside until needed.
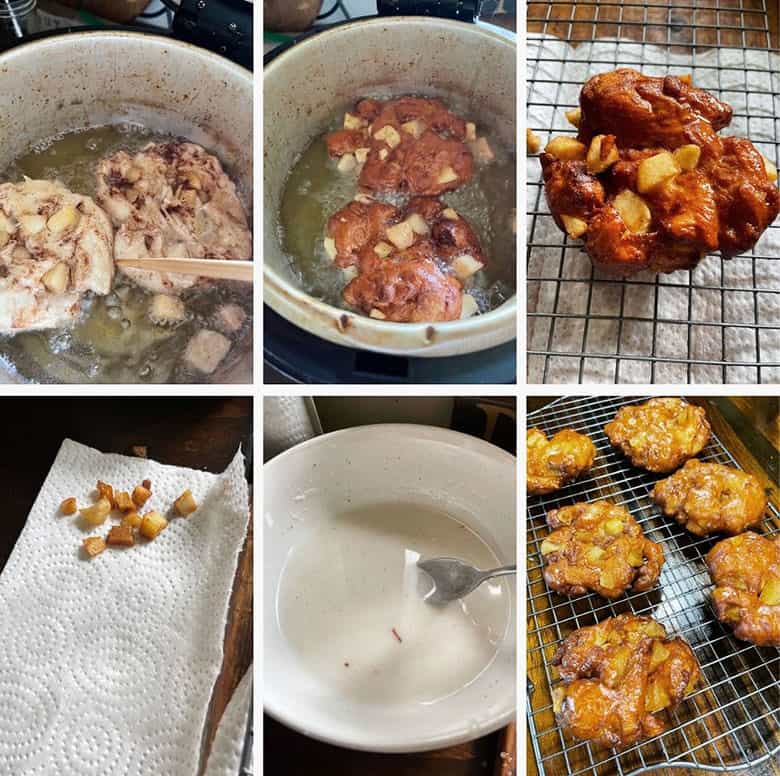
Step 5: Fry and glaze – heat the oil and fry the fritters in oil heated to about 370F. Avoid over-crowding the fryer and too many at one time will lower the oil temperature. Tweak the oil temperature up or down if the fritters are browning too quickly or too slowly. Aim for 1 1/2 – 2 minutes per side.
Make sure they are fried to deep golden colour, to ensure the fritters are cooked through. The fritters should be in the oil 3-4 minutes. Remove to a cooling/draining rack. Scoop out any loose pieces of apple from the frying oil and remove between batches. Once the fried fritters are cool enough to handle, give the glaze and stir and dip the fritters into the glaze to coat completely. Return to the cooling rack to cool completely.
Repeat with remaining fritters until they are all fried and dipped in the glaze.
Cook’s Notes
- I really recommend a deep fryer, for best results. I have a small one, which I love, because it doesn’t take gallons of oil to fill it. It also keeps the oil at the perfect temperature throughout the frying process, so there’s no fiddling around. One less thing to worry about. Alternately, you can use a heavy, deep pot with a thermometer to monitor oil temperature.
- Always take great care when deep-frying, as the oil is hot. Keep children well away (out of the room!) during the frying process. If using oil in a large pot and not a deep fryer, always have the pot lid handy while frying. In the very unlikely even of flames, simply plate the lid on the pot to quickly extinguish. NEVER attempt to transfer hot oil to a sink. Allow to cool completely after frying before draining. You can refrigerate used oil for a short time to re-use.
- Be sure not to over-crowd your deep fryer, as it will lower the temperature of the oil and cook inefficiently. In my small fryer, I cook only two at a time (though I could probably fit 3 in).
- Cook your fritters until they are a darkish golden colour. They’ll look lovely and you’ll ensure that the dough is well cooked, as well.
- I chopstick makes a perfect tool for flipping your fritters in the oil and a spider strainer makes a perfect tool for scooping the cooked fritters out of the oil.
- Be sure to scoop any loose apple pieces out of the frying oil between batches, so they don’t burn in the oil and introduce a bitter flavour to the oil and fritters.
Top Tip
Apple fritters traditionally have large chunks of apple visible from the outside of the fritters. That’s why they are made this way, rather than trying to somehow encase the apples inside the fritters. As such, some amount of apple “attrition” (apples coming loose from the fritter while frying) is to be expected and is built-in. (That’s why we start with lots of apple). Don’t sweat it. It’s how it is and you didn’t do anything wrong. There will still be plenty of apple left in the fritters when you’re done :)
Storing your Apple Fritters
Allow the fritters to cool completely, then either enjoy, or store in an air-tight container. These are best on the day they are cooked, but if you can’t eat them all on the first day, they freeze beautifully, so don’t hesitate to pop any extras into the freezer to enjoy later.

Want to save this recipe?
Enter your email and I'll send it to your inbox. Plus, you'll get great new recipes from me every week!
By submitting this form, you consent to receive emails from Seasons and Suppers.
You can unsubscribe at any time.
Get the Recipe: Classic Apple Fritters Doughnuts
Ingredients
Dough:
- 1 1/2 Tablespoons (14 g) active dry or instant yeast
- 1/2 cup (120 ml) warm water
- 2 teaspoons white granulated sugar
- 2 cups (250 g) bread flour, spooned and levelled, plus more, as needed (can use all purpose flour. See Note 1)
- 1/4 cup (50 g) white granulated sugar
- 1/4 teaspoon baking powder
- 1/4 teaspoon mace, (can substitute nutmeg)
- 1 teaspoon (6 g) salt
- 2 Tablespoons (30 g) shortening or lard, (can use vegetable oil. See Note 2)
- 1 large egg
- 1/4 teaspoon vanilla extract, or vanilla bean paste
For the apples:
- 2 medium tart apples, peeled, cored and chopped into 1/2-inch pieces *see Note 3
- 1/4 cup (50 g) white sugar
- 2 teaspoons freshly squeezed lemon juice
For assembling:
- 4 teaspoons cinnamon
- 1 Tablespoon bread flour
Glaze:
- 2 cups (280 g) confectioners/icing sugar
- 1 1/2 teaspoons light corn sryup, or golden syrup
- 1/4 teaspoon salt
- 1/4 teaspoon vanilla extract
- 1 Tablespoon white sugar
- 1/3 cup (80 ml) water
For frying:
- vegetable oil, for frying (or similar, neutral-tasting oil)
Instructions
- For the dough: In a large bowl or the bowl of a stand mixer fitted with the paddle attachment, add the yeast to the warm water. Add the sugar, stir and let stand 5 minutes.
- Meanwhile, in a large bowl, whisk together the flour, sugar, baking powder, mace and salt. Set aside.
- When yeast is ready, add the shortening, egg and vanilla and mix with the PADDLE attachment on low speed for 1 minute (to break up the shortening). Add about 1/3 of the flour mixture and mix until combined. Add a second third of the flour mixture and again, mix until combined. Switch to the dough hook and add the remaining flour mixture. Knead with the hook until all that flour is incorporated. If dough is sticky, start adding flour in 1 Tbsp. increments, until the dough comes together, clears the bottom of the bowl and is becoming smooth. Knead on medium for about 2 minutes more. The dough should be smooth and but still a bit moist (but not sticky).
- Place the dough in an oiled bowl, cover with plastic wrap and set-aside to rise until doubled in size (about 1 hour).
- Meanwhile, make the apple filling. Place the diced apples, sugar and lemon juice into a skillet over medium heat. Cook, stirring often, until all the liquid has evaporated and the apples are softened, about 5 minutes. Remove to a bowl to cool completely before using.
- *See the video above this Recipe Card for a complete demonstration of the following shaping and cutting process.
- When bread has finished it's first rise, remove to a lightly floured surface and roll into a 10-inch x 10-inch square. Sprinkle the apples over one half of the dough. Sprinkle all the cinnamon evenly over the apples and then sprinkle with the 1 Tbsp. flour. Fold the empty side of the dough over the side with the apples. Using a sharp knife or a bench scraper, cut the dough into 1/2-inch wide strips from top to bottom. Repeat cutting 1/2-inch strips from side to side, so you end up with small chunks of dough. Gather up the dough bits and cut some more, from different directions, until it is in small chunks and evenly mixed with cinnamon/apples/dough etc.
- Using floured hands, roughly shape into a 12-inch long x 3-inch wide log. Cut the log into 1 inch slices. With each slice, roughly pat into a disc, about the size of your palm (use some additional flour, as needed, if your dough is sticky). Place the dough discs onto a parchment lined or floured baking sheet, leaving a couple of inches of room around each. Repeat with all 12 dough pieces. Cover with plastic wrap or a clean tea towel and set-aside to rise until doubled again, about 30-45 minutes (approximately. Will vary depending on room temperature. The fritters should double in size and look puffy).
- When the fritters are almost risen, prepare the glaze. Add the icing sugar, corn syrup, salt and vanilla in a large bowl. Set aside.
- In a small saucepan, bring the water and white granulated sugar to a boil over high heat then reduce heat to medium and simmer for 1 minute. Add this mixture to the bowl with the icing sugar and whisk until all the sugar and has been incorporated and the mixture is smooth. (You don't want any lumps :) Cover with plastic wrap and set aside until needed.
- When dough is about ready to cook, heat oil in a deep fryer to 370° (alternately, use a heavy deep pot and a thermometer to monitor temperature). Fry each donut until deep golden on the underside (1 1/2 - 2 minutes), flip over and fry the other side. (*time and temperature may need to vary. Watch closely the first few to determine timing. If they seem to be browning too quickly, lower temperature slightly or likewise, if they seem to be taking too long to brown, raise the temperature slightly). Remove to a cooling rack placed over a baking sheet. If there are any loose apples in the frying oil, scoop out between batches so you don't have any apple pieces burning in the oil and causing bitter flavours.
- While the fritters are still quite warm (as soon as they are cool enough to handle), dip into prepared glaze and return to cooling rack to cool completely. *Stir the glaze mixture regularly during the process, to keep it nice and smooth.
Notes
- Bread flour is recommended for best texture, but if you don't have bread flour, you can use all purpose flour. You will probably find you need to use a bit more all-purpose flour to get that smooth, moist dough.
- Solid shortening or lard is recommended for best texture, but if you don't have any on hand, you can use an equal amount of vegetable oil.
- Tart apples include Granny Smith, Pink Lady, Braeburn, Empire, Courtland or any other apple that you might use for an apple pie.
Watch how to make it
Hi! I’m Jennifer, a home cook schooled by trial and error and almost 40 years of getting dinner on the table! I love to share my favourite recipes, both old and new, together with lots of tips and tricks to hopefully help make your home cooking enjoyable, stress free, rewarding and of course, delicious!
How would you go about freezing these? I need to make 2 batches for Thanksgiving dinner tomorrow but I have more time today to prepare it all. Any recommendations?
Hi Natalie, I just let them cool completely, then put into freezer bags (except if they seem they might get mucked up by putting straight into bags. If that’s the case, just set on baking sheets and place into the freezer on the baking sheets until firm, then transfer to freezer bags). To thaw, simply take them out of the freezer and let thaw in the bags on the counter top. Enjoy :)
These things are so good, they should be illegal.
Lol! Glad you enjoyed them :)
My 93 yr. old mother loves a good apple fritter and doesn’t treat herself to one very often. I thought I’d make your recipe. I bake with yeast quite often, but after reading your directions over and over, I am slightly confused. So I cut the dough vertically and horizontally until I get small chunks. Then I cut up the chunks a bit? Then, and this is where I’m confused, I pull them together to form a log 3″ by 12″. Am I correct? How do all those chunks stay together without falling apart in the frying? Please advise. I know I sound totally inept, but really I am an experienced baker. Thanks for your help.
Hi Kathleen, I can understand how it sounds like it would all fall apart throughout the end part when reading it. In reality, you’re going to find that it will stick together just fine. It’s going to be a bit of a sticky mess, so there will be looks of stickiness to keep it all together! I hope your mother enjoys them (I am sure she will :)
Superb!
So glad! Thanks :)
I just finished making these and well I am already on my second one. What yumminess! Better than any coffee shop apple fritter I have ever tried. It was my first time making a donut and read through a couple of recipes before deciding on this one. I am so glad that I did, so easy to understand and follow and the end results are so good! Corn syrup is not usually an ingredient that I have on hand so I just did a basic glaze of milk, icing sugar and vanilla worked out really well. Will definitely be making these again. No more coffee shop fritters for me. Thank you so much!
Thanks Melissa and so glad to hear! I really enjoy these, too and you’ve reminded me that I’m overdue to baking up a batch :)
Made these with a cooked glaze because I had no confectioner’s sugar and fried in peanut oil and they turned out fantastic! Close to a donut shops fritters! I recommend this recipe!
Sounds perfect, Hattie! So glad you enjoyed these :) Thanks!
Hello Jennifer I have a question , I want to try your recipe next week but I wonder if I could make The dough in a bread machine instead of doing it handmade. It would be easier for us so if you can give us your advice if it can be done that way. Thank you !
Hi! I don’t have any experience with bread machines, but from what I understand, they really just do the kneading/rising part for you, so if that’s the case, I don’t see any reason why it wouldn’t work.
Hi Jennifer,
The glaze calls for 1/4 tsp of alt? Is this suppose to be salt?
Thanks for your help
Yes it is salt. Sorry. Lost an ‘s’ somewhere. Will fix that :)
WOW! Just made these, they are SO good. Absolutely perfect recipe. I like your glaze too, never made it like that before. BY THE WAY – if you take out the egg (and don’t use lard) , these are completely vegan. Please advertise them as vegan. Vegans will love you for it. 10 stars!
Thanks Gail and so glad you enjoyed these! And yes, they can easily be vegan :)
Hi Jennifer! I’m from Washington State and also eat these at Top Pot so I’m shaking with excitement to make these! I now live in England do it will be a taste of home for me!! So you said I could use vegetable oil instead of shortening-same measurement?
Thanjs again for gnd recipe ?
Hi Juanita and yes, just use the same amount of vegetable oil. Enjoy!
Can these be baked in the oven? ,I try not to fry anything,that’s why I own a air-fryer.but Love apple fritters and such .
Hi Jacquie, While you can technically bake these, they would turn out like buns, rather than doughnuts. It’s the frying part that makes it a fritter doughnut. I do hear you. Frying is a pain :) I own an air fryer too, but when it comes to doughnuts, there’s really no substitute for frying in oil.
I don’t understand 2 inch medium apples. is that supposed to be a measurement or just two apples?
Hi Becky! Sorry, there was a stray “inch” in there. I have fixed it now so yes, it it just two apples. Thanks!
They cooked a lot faster than I was expecting – so I overcooked the first two :( – so sad (but I used a dutch oven with oil and was having trouble keeping the temperature stable, so that may have been the reason why) I cooked the rest for about 1 minute per side, which ended up being perfect. So delicious!!!!
So glad to hear, Patricia :) And yes, it’s tough to maintain temperature in a Dutch oven, for sure. Thanks!
hello jennifer, are you able to substitute butter instead of lard?
Hi Owen, Sorry for the late reply. I was away for a couple of days. Yes, I think you could easily use butter. Or even vegetable oil in place of the lard.
Great recipe. Have made these & this recipe goes into my ‘Tried & Keeper’ file. Thanks for sharing from a fellow Ontarian in Kawartha Lakes area.
Hi Marn and so glad you enjoyed these :) We’re practically neighbours (in Canada terms), which means you are getting this nasty weather, too. Oh well, good for baking!