A classic crab apple jelly recipe, with my best tips, along with step-by-step instructions and photos, to make sure your homemade jelly is perfect!
Equipment you will need
Large pot – for boiling the crab apples.
Cheese cloth – or a large piece of scrap cotton or muslin, for draining. An old pillow case works well! If using cheese cloth, buy enough to at least triple it up.
A candy thermometer – while you can make jelly without a thermometer, you will eliminate most of the guesswork from jelly making if you can accurately monitor the temperature of your jelly as it boils. Jelly needs to reach 220F in order to gel. If you don’t have a thermometer, you can use the “Cold Plate Test”. I have detailed this method in the Recipe Card below.
Clean jars, rings and lids – for canning
How to prepare the crab apples for making jelly
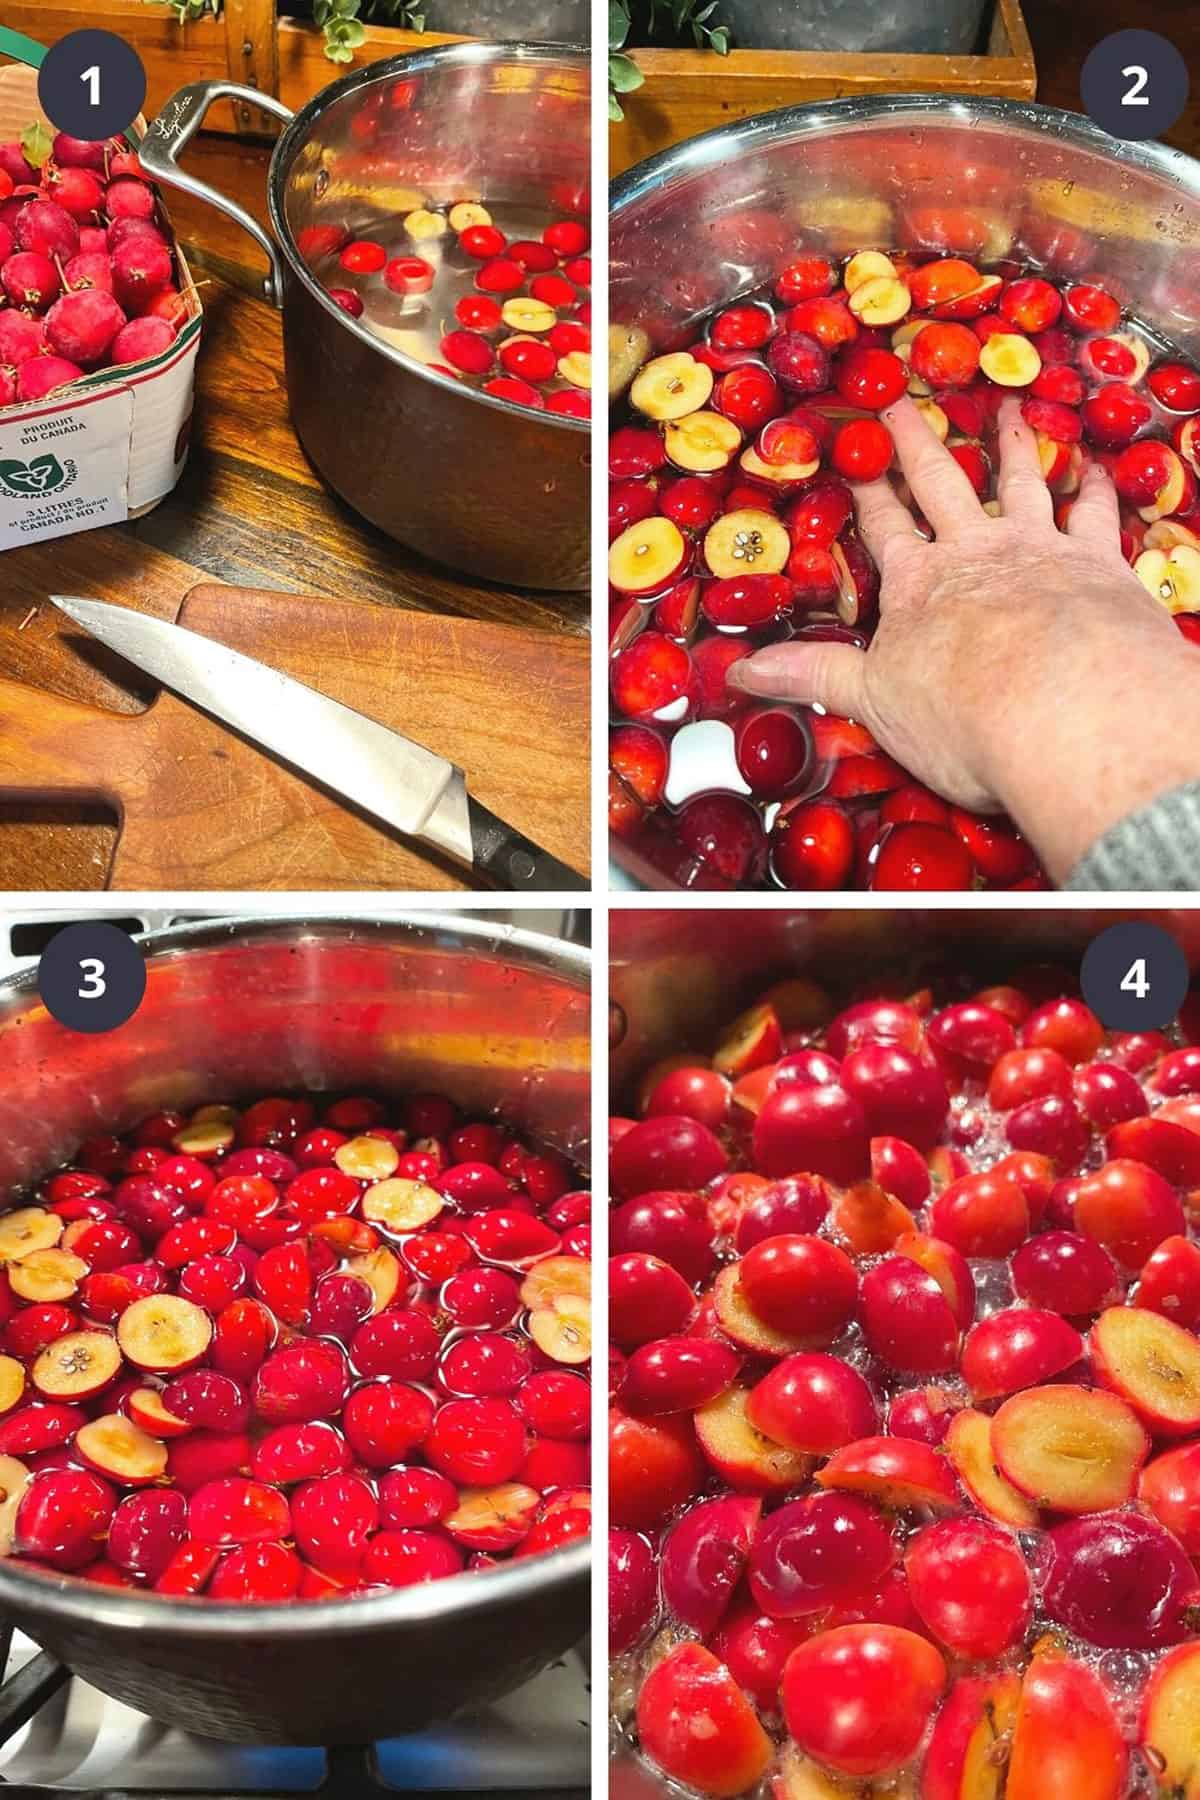
- When you get your crab apples, whether you pick them yourself or you buy a basket from a market, they will probably have stems on most of them. Crab apples will also have a noticeable blossom end.
- My mother has made crab apple jelly for years and she never removes the stems or blossom end. I usually remove the stems and leave the blossom end. You can remove the stems and trim off the blossom end, if you like. It’s all good :)
- I always cut the crab apples in half. Sometimes apples can be wormy and cutting in half just lets you get a look at the inside. I also find they soften in the simmering water more efficiently when cut in half.
Step-by-step photos
- Prepare crabapples.
- Place into large pot with water to prevent browning.
- Bring apples to a boil.
- Reduce heat and simmer 10-15 minutes to soften.

- Prepare draining station with a large colander lined with cheesecloth or cotton.
- Pour into colander to collect the bulk of the liquid, then tie a knot in the top of the cheesecloth and hang it from a kitchen cabinet door knob over the colander to collect the juices for a couple of hours.
- Measure the amount of juice and make a note of it.
- For every 1 cup of juice, measure out 3/4 cup of white granulated sugar and add to a metal baking pan. Set aside.
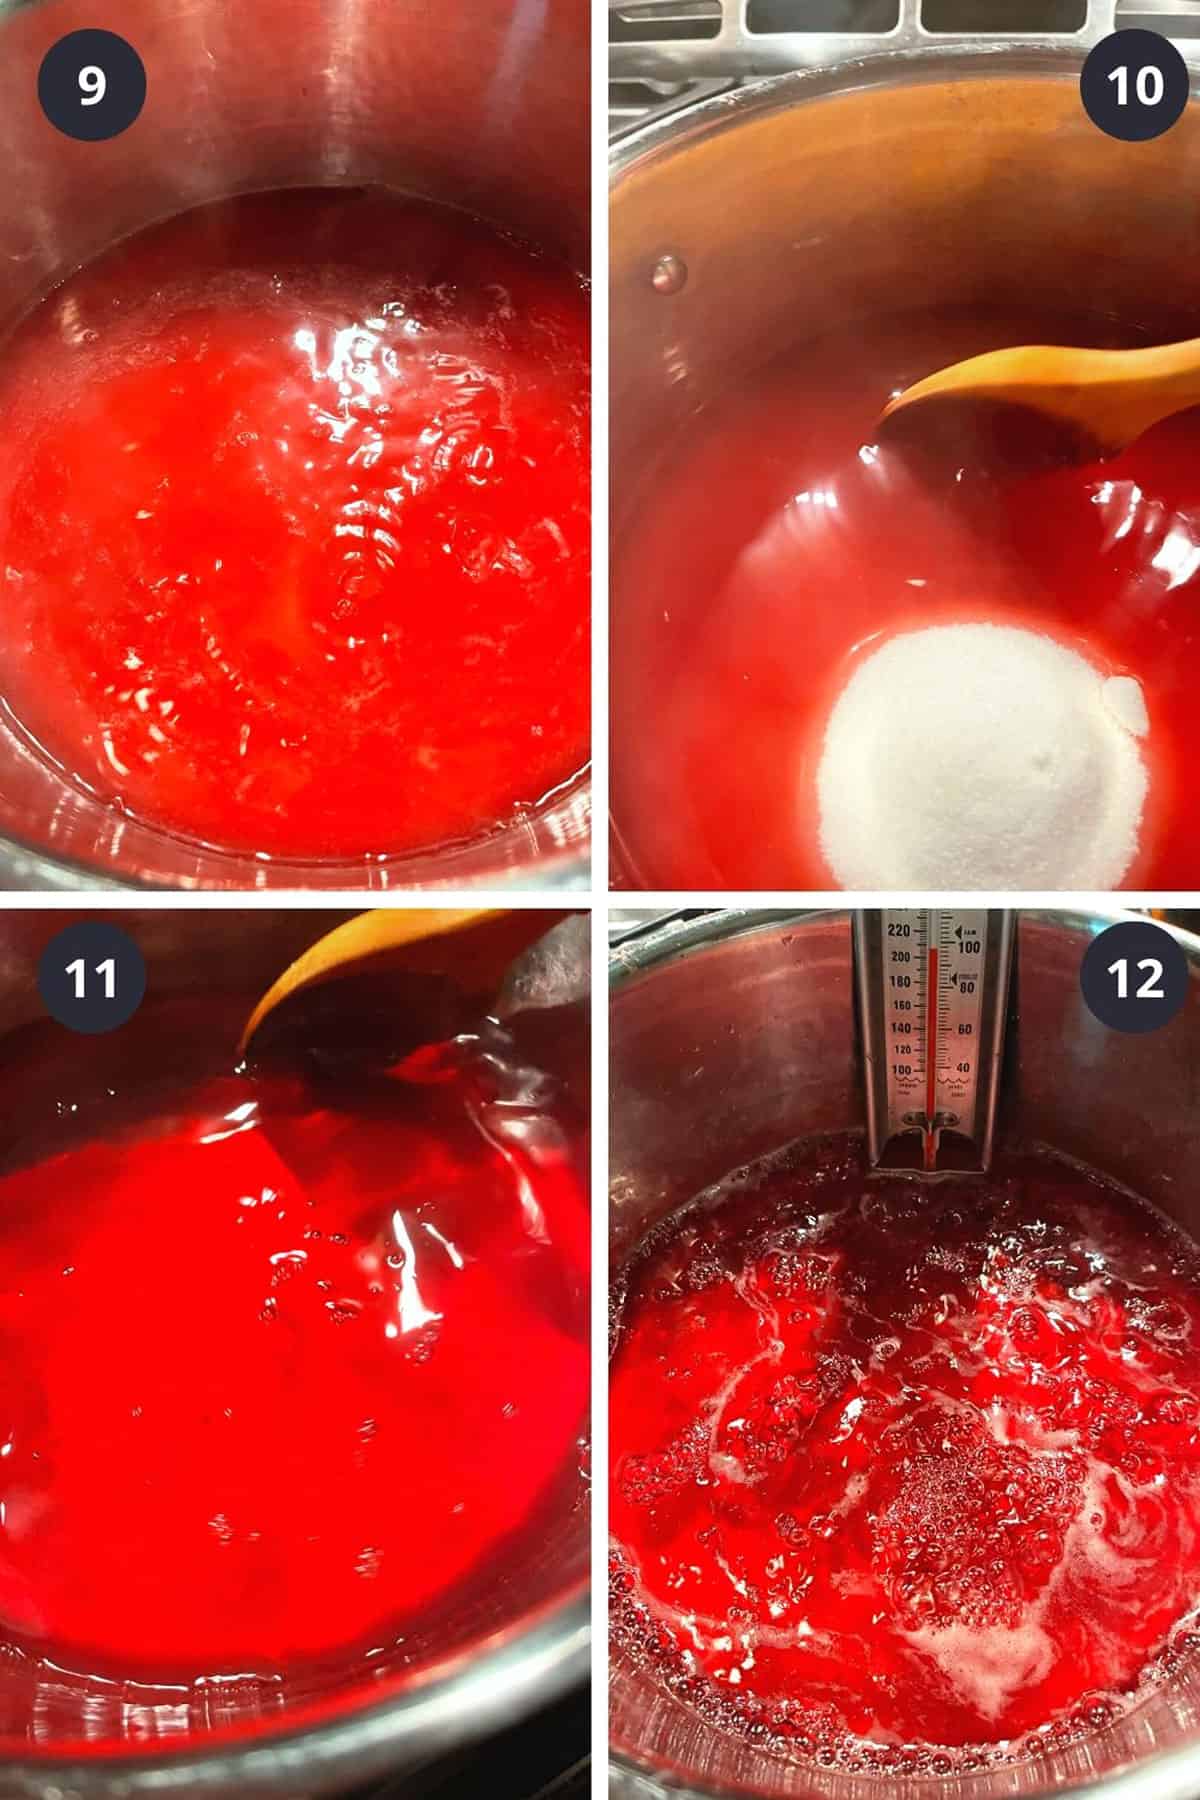
- Boil the juice in a large pot for about 20 minutes. Meanwhile, heat the sugar in the oven until very warm.
- Add hot sugar to the juice and stir just until the sugar is dissolved.
- Bring mixture to a boil and without stirring.
- Cook until the mixture, monitoring the temperature.
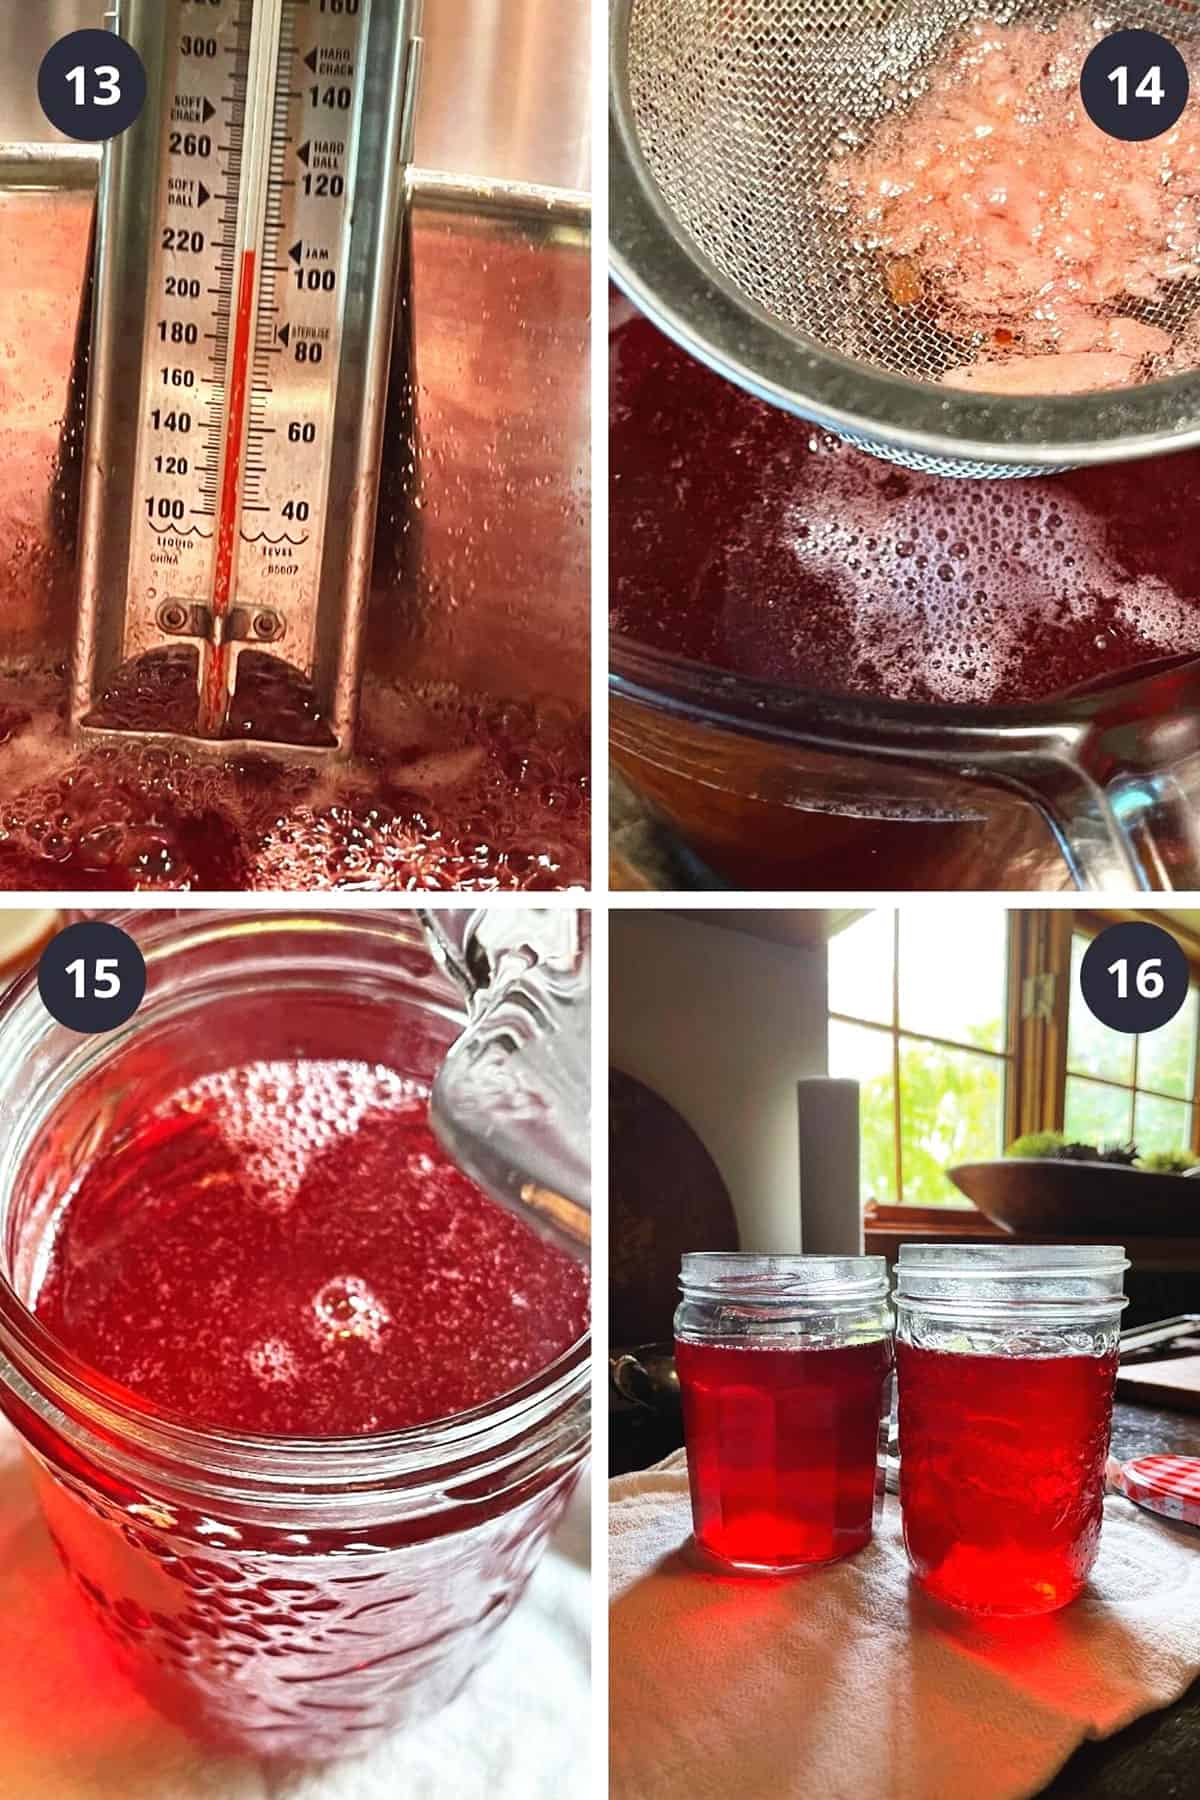
- Boil until the mixture reaches 220F (or passes the Cold Plate Test)
- Pour through a fine strainer to remove any foam.
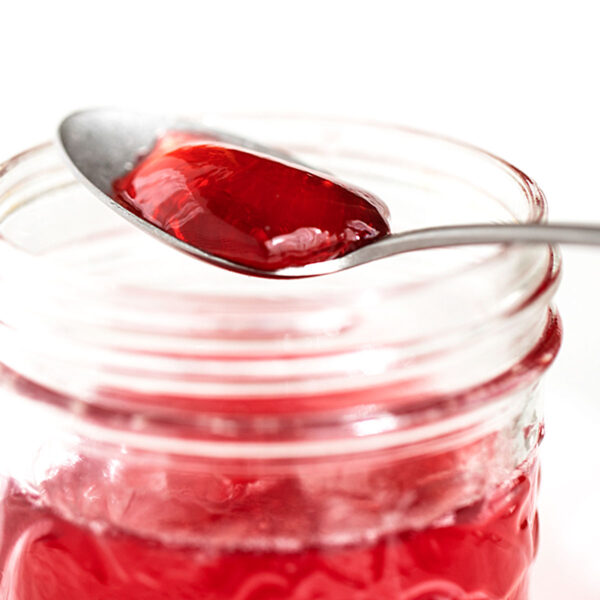
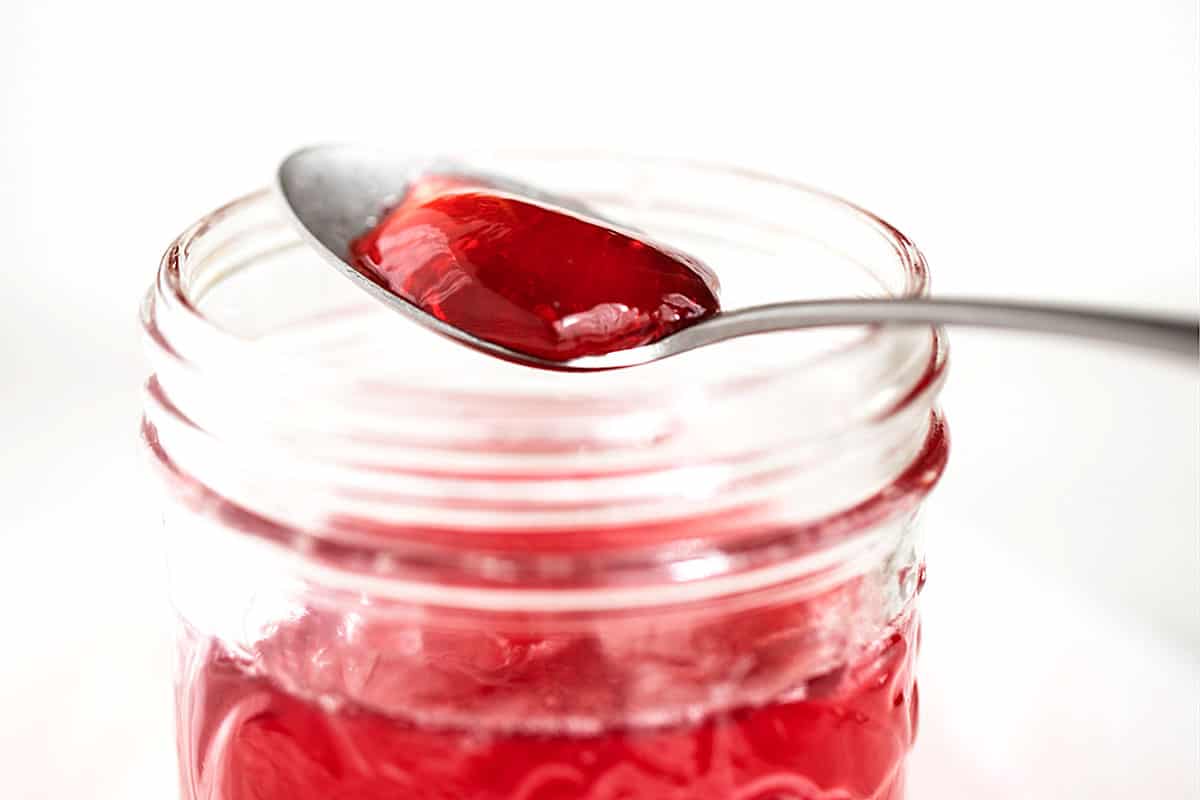
- Pour into sterilized jars.
- Allow to stand without lids and undisturbed until cooled.
Recipe tips!
- The freshest crab apples make the best jelly, so always start with apples as fresh as possible.
- Keeping the ratio of sugar to juice is critical not only to ensure that the jelly sets, but to aid in preservation of the jelly. As such, do not reduce the amount of sugar in jellies and jams.
- Wondering why the sugar is heated? Heating the sugar brings it closer to the temperature of the heating juice, so that when it’s added, it won’t shock the juice and will dissolve more quickly. You won’t have to boil the jelly as long to reach the setting point.
- Do be sure to WATCH THE SUGAR CONSTANTLY while it is heating in the oven, to avoid it over-heating and dissolving!
- Always keep in mind that the boiling time it will take for the jelly to set will vary from kitchen to kitchen. Don’t worry about the time. Boil until it reaches 220F or passes the Cold Plate Test, however long that takes.
Top tip!
Resist the urge to press or poke the apples while they are draining, as doing so will result in cloudy jelly. Just collect and use juice that drains naturally from the apples.
How to test if jelly is set with the “Cold Plate Test”
- Place a glass plate in the freezer for about fifteen minutes before starting to make your jam.
- To test your jam, turn off burner under jam. Spoon a puddle of jam onto the cold plate from the freezer. Run your finger through the jam on the plate. If jam wrinkles along the edges next to your finger line, it is set. If it seeps back in to the space where you ran your finger through, it is not yet set.
- If jam is not set, rinse the plate with cold water and return it to the freezer. Turn the heat back on under the jam and cook for a few minutes longer then test again. Repeat until jam wrinkles when tested.

How to store and preserve crab apple jelly
Homemade crab apple jelly can be refrigerated for several months. For longer storage or room temperature storage, you MUST process the jelly by boiling water canning. You should refer to a reputable resource for canning for guidance.
What to do if the jelly didn’t set
It happens and it can happen for any number of reasons. If you have left your jelly out for 24 hours and it didn’t set, simply dump the contents back in to your pot and re-boil it until it sets (use a thermometer to cook to 220° F. or until it passes the wrinkle test, as above.
Want to save this recipe?
Enter your email and I’ll send it to your inbox. Plus, you’ll get great new recipes from me every week!
By submitting this form, you consent to receive emails from Seasons and Suppers.
You can unsubscribe at any time.
Get the Recipe: Crab Apple Jelly
Ingredients
- 4 cups crab apple juice, from 3L basket of crab apples *See Note 1 below for using different quantities of crab apples
- cheesecloth, muslin or old (clean) cotton pillow case, for draining fruit
- 3 cups white sugar, *See Note 2 below for ratio of sugar to juice to use
- clean jars, rings and lids, sterilized if canning
Instructions
- ** If you don't have a thermometer, place a plate in the freezer before you start making the jelly. ** If you are planning to "can" your jelly for longer, room temperature storage, be sure to sterilize your jars before filling. See the Recipe Notes below for guidance on how to sterilize jars.
- Wash the apples. You can remove the stems and cut off the blossom ends, if you like, though it's not necessary. I generally remove the stems but leave the blossom ends. You can leave the crabapples whole or cut them in half. If your apples come from a wild tree (ie. not sprayed), you may want to cut in half to make sure the inside is good. That's what I generally do.
- Place prepared apples into a large stock pot with a bit of water as you go, to prevent browning. When all the apples are prepared, add additional water, just until the water peeks through the top of the apples (if any of your apples are floating, you've got too much). Bring apples to a boil over high heat, then reduce heat to medium and simmer the apples, without stirring, until the apples are softened, about 10-15 minutes.
- While fruit is simmering, place a large colander over a bowl or large measuring cup and line with tripled-up cheesecloth, a piece of muslin or a cotton pillow case.
- When fruit is softened, pour the apples and the liquid into prepared colander and collect the bulk of the liquid. At this point, I like to knot up the cheesecloth and hang it over an upper cabinet knob to drain for 2-3 hours. *Try not to squeeze the apples by bundling up to tightly when hanging. A "sling" effect works best. RESIST THE URGE TO POKE, PRESS OR SQUEEZE the apples to get more juice. That will make for a cloudy jelly. Just let gravity do its work and when the dripping stops, discard the pulp and the cheesecloth.
- Measure out the amount of juice you have collected and make note of how many cups of juice you have (I got 4 cups of juice out of this 3L basket of apples). Add the juice to a large pot and bring to a boil over high heat. Reduce heat to medium and simmer, stirring, for about 20 minutes, skimming off and discarding any foam, as necessary.
- Meanwhile, measure out the sugar. You'll need 3/4 cup of sugar for every 1 cup of apple juice that you had. (So for my 4 cups of juice, I used 3 cups of sugar). Place the sugar in a metal baking pan or oven-proof bowl (or on a baking sheet, alternately) and pop into a 300° oven anywhere from 5-15 minutes to warm, stirring it around a couple of times (time in the oven will vary depending on how much sugar/oven etc., so WATCH CLOSELY. It should be hot to the touch, but not so hot it starts to melt around the edges.).
- When sugar is hot, remove from oven. Remove pot with apple juice from the heat. Stir in the hot sugar just until it is dissolved (when you can see the bottom of the pot clearly). Place the pot back on the heat and boil, WITHOUT STIRRING, until jelly reaches 220° on a candy thermometer (NOTE: For each 1000 feet of altitude above sea level, subtract 2 degrees F. For instance, at 1,000 feet of altitude, the jelly is done at 218°F; at 2,000 feet, 216°F, etc.) or until the jelly passes the cold plate test (*see Notes below for how to test).
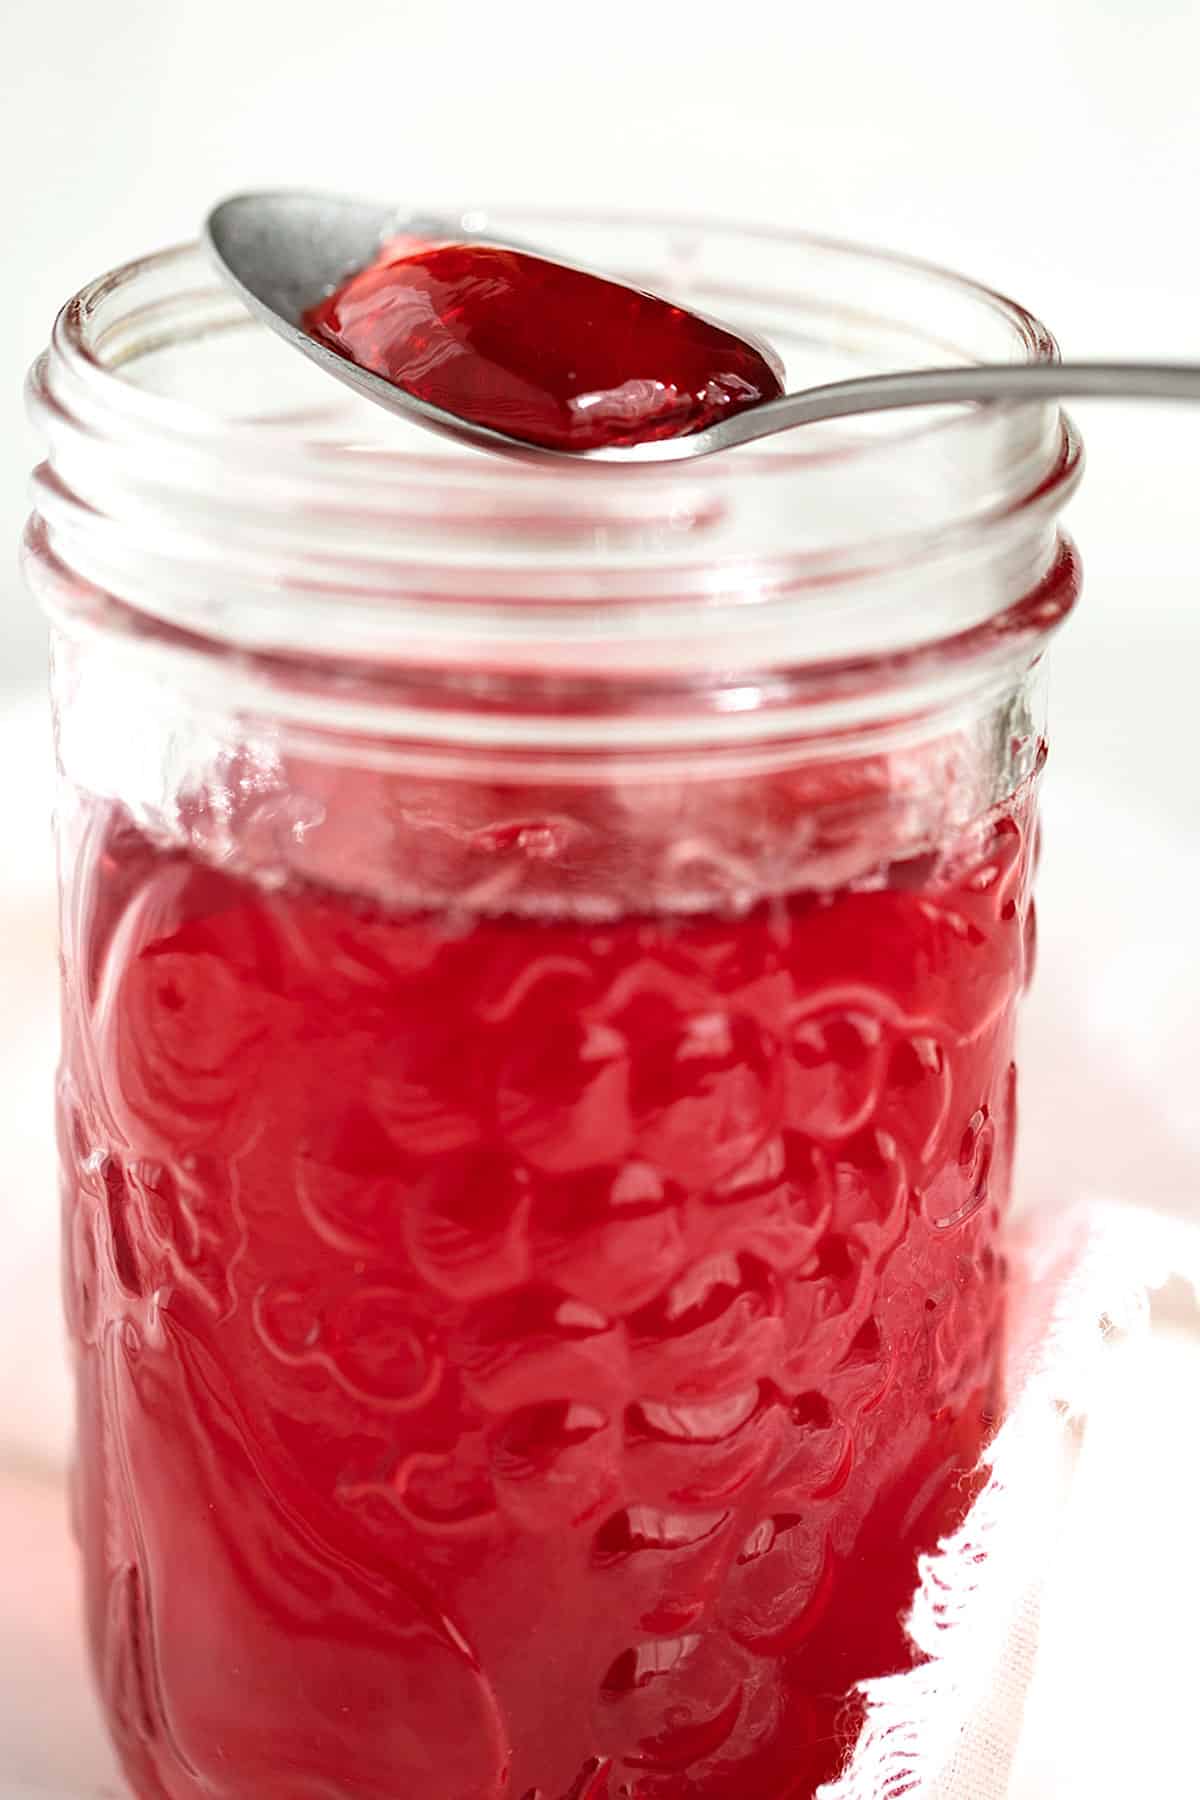
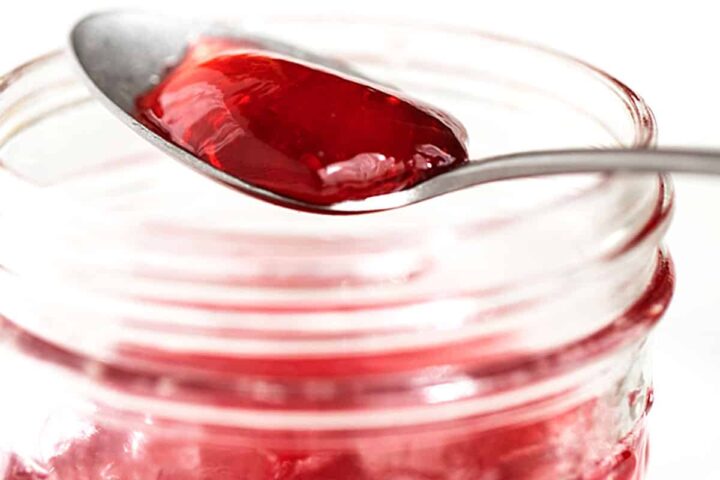
- I like to pour the jelly through a fine sieve to strain off any foam, then pour or ladle jelly into clean or sterilized jars (if canning) and leave with lids off until cool, without moving the jars around. When jelly is almost cool, seal with lids and let stand in a sunny window, undisturbed for 24 hrs. Refrigerate or process in a boiling water canner and store.
Notes
- The amount of crab apples you start with doesn’t need to be precise, as the jelly will be made by measuring out the juice and adding a ratio of sugar. I generally start with a standard 3L or 4 quart basket. I don’t recommend doing too many apples at once. If you have more, do multiple batches.
- The ratio for sugar to juice is 3/4 cups of sugar for every 1 cup of juice.
Hi! I’m Jennifer, a home cook schooled by trial and error and almost 40 years of getting dinner on the table! I love to share my favourite recipes, both old and new, together with lots of tips and tricks to hopefully help make your home cooking enjoyable, stress free, rewarding and of course, delicious!
Great recipe! This is our 3rd year making this recipe and the jelly is lovely.
So glad you’re enjoying it, Jacqueline! Thanks so much :)
Excellent. The best recipe ever
Thanks so much, Betty :)
I have a couple of questions. 1) have you ever used raw cane sugar instead of white? If so, did it still jell as expected? Any other effects? 2) what is the reason for preheating the sugar? Will be making the jelly this afternoon. Love the simplicity
Hi Brian, I have not tried raw sugar and would not recommend experimenting, as it may affect the set. The sugar is preheated so that it dissolves quickly and doesn’t lower the temperature of the liquid when added.
Made your recipe absolutely yummy.will do so again the crab apples with stem s are soogood can’t find my recipe but will post if I find it
So glad you enjoyed it, Helen and yes, would love your whole crab apple recipe if you find it!
Hi do you have a recipe for whole crab apples in sugar syrup
Hi Helen and no, I’m sorry I don’t. I will keep an eye out for one :)
This was my first time making jelly or jam. Your recipe was very easy to follow and make. I made two batches over two days and both turned out perfect using the thermometer method. This will be my go to recipe for next year’s batch where I will be water bath canning for the first time. Thanks Jennifer.
So pleased to hear, Peter! Thanks so much :)
Hello again!
I just made your lovely recipe again – first made it in 2020 when I left a comment about my little Walmart bargain tree – and the jelly is superb! My little crab apple tree which is now a glorious specimen. I made 28 jars of jelly! I shall be sharing it with family and friends and telling them about your wonderful site. Thanks, Jennifer!
I’m so glad you are enjoying this recipe, Heather! Thanks so much :)
I cooked some crabapples down and strained them overnight to get the juices, I havent had time to add sugar, boil and make the jame yet, do you know how long I can keep the juice in the fridge? It has already been in there for 3 days so I think I should just toss the juice and not make any jam. Looking for suggestions.
Hi Tanya, I’m not an expert on that, but I think I would not go much past today. Not just for food safety reasons, but because the pectin will decline as it sits and perhaps affect the set of the jelly.
Next time, if you want to save the juice for jam making at a later date, you can freeze it. I’ve seen that done before.
could I use Stevia or some other sugar substitute?
Hi Susan and no, you couldn’t do a straight substitute of stevia for sugar. You would need to add a no-sugar commercial pectin into the mix in order for the jelly to set.
First time canner here! Was given a crate of crab apples and decided sure let’s do this. Found your recipe and it was so easy to follow. The jars are currently sunbathing, but it looked like it was setting into jelly as I put the lids on. I can’t wait to try this! Going to pick up some wax tonight to wax ‘‘em up tomorrow! Thanks so much for sharing this recipe
Hi Jackie and so glad to hear! I have a basket of crab apples on my counter right now ready to become jelly :) Thanks so much!
Hi Jennifer! My Jelly has set beautifully and is absolutely delicious. I will certainly be making this again. Thanks again!
Yay! Do enjoy. There is nothing like fresh apple jelly this time of year :)
Hi,
I’ve wanted to make crab apple jelly for ages. After foraging some apples from a local tree I reaslised I didn’t have enough apples. I decided to follow the above recipe with the apples I had. Then I followed it again using the hawthorn berries I’d also picked. I mixed the liquids together once I’d strained them, then continued with the recipe. The jars look like jewels! Will be making again before the apple season is over.
So glad to hear! Thanks so much :)
This is a great recipe, I followed it exactly and I ended it with a superb crabapple jelly, just like your pictures! Because I live over 1,000 feet in altitude I used the cold plate method and it was perfect.
I love all of your explanations and tips. Like you said, it has passed the test of time and I will surely pass it on as well. Many thanks again!
So glad to hear, Chantal :) Thanks so much!