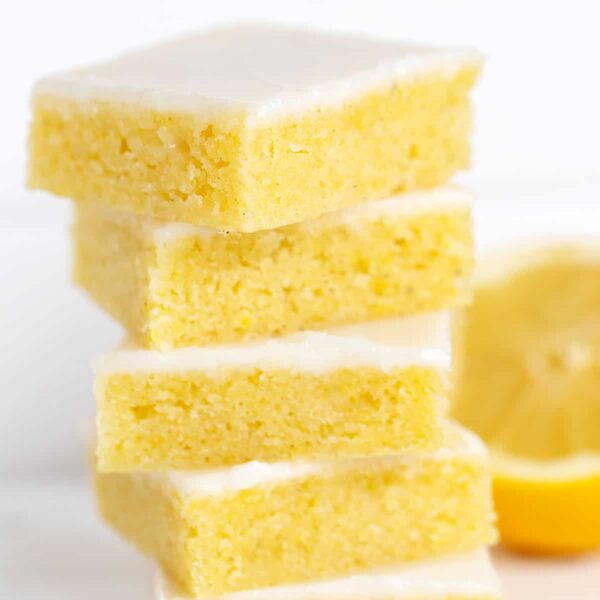
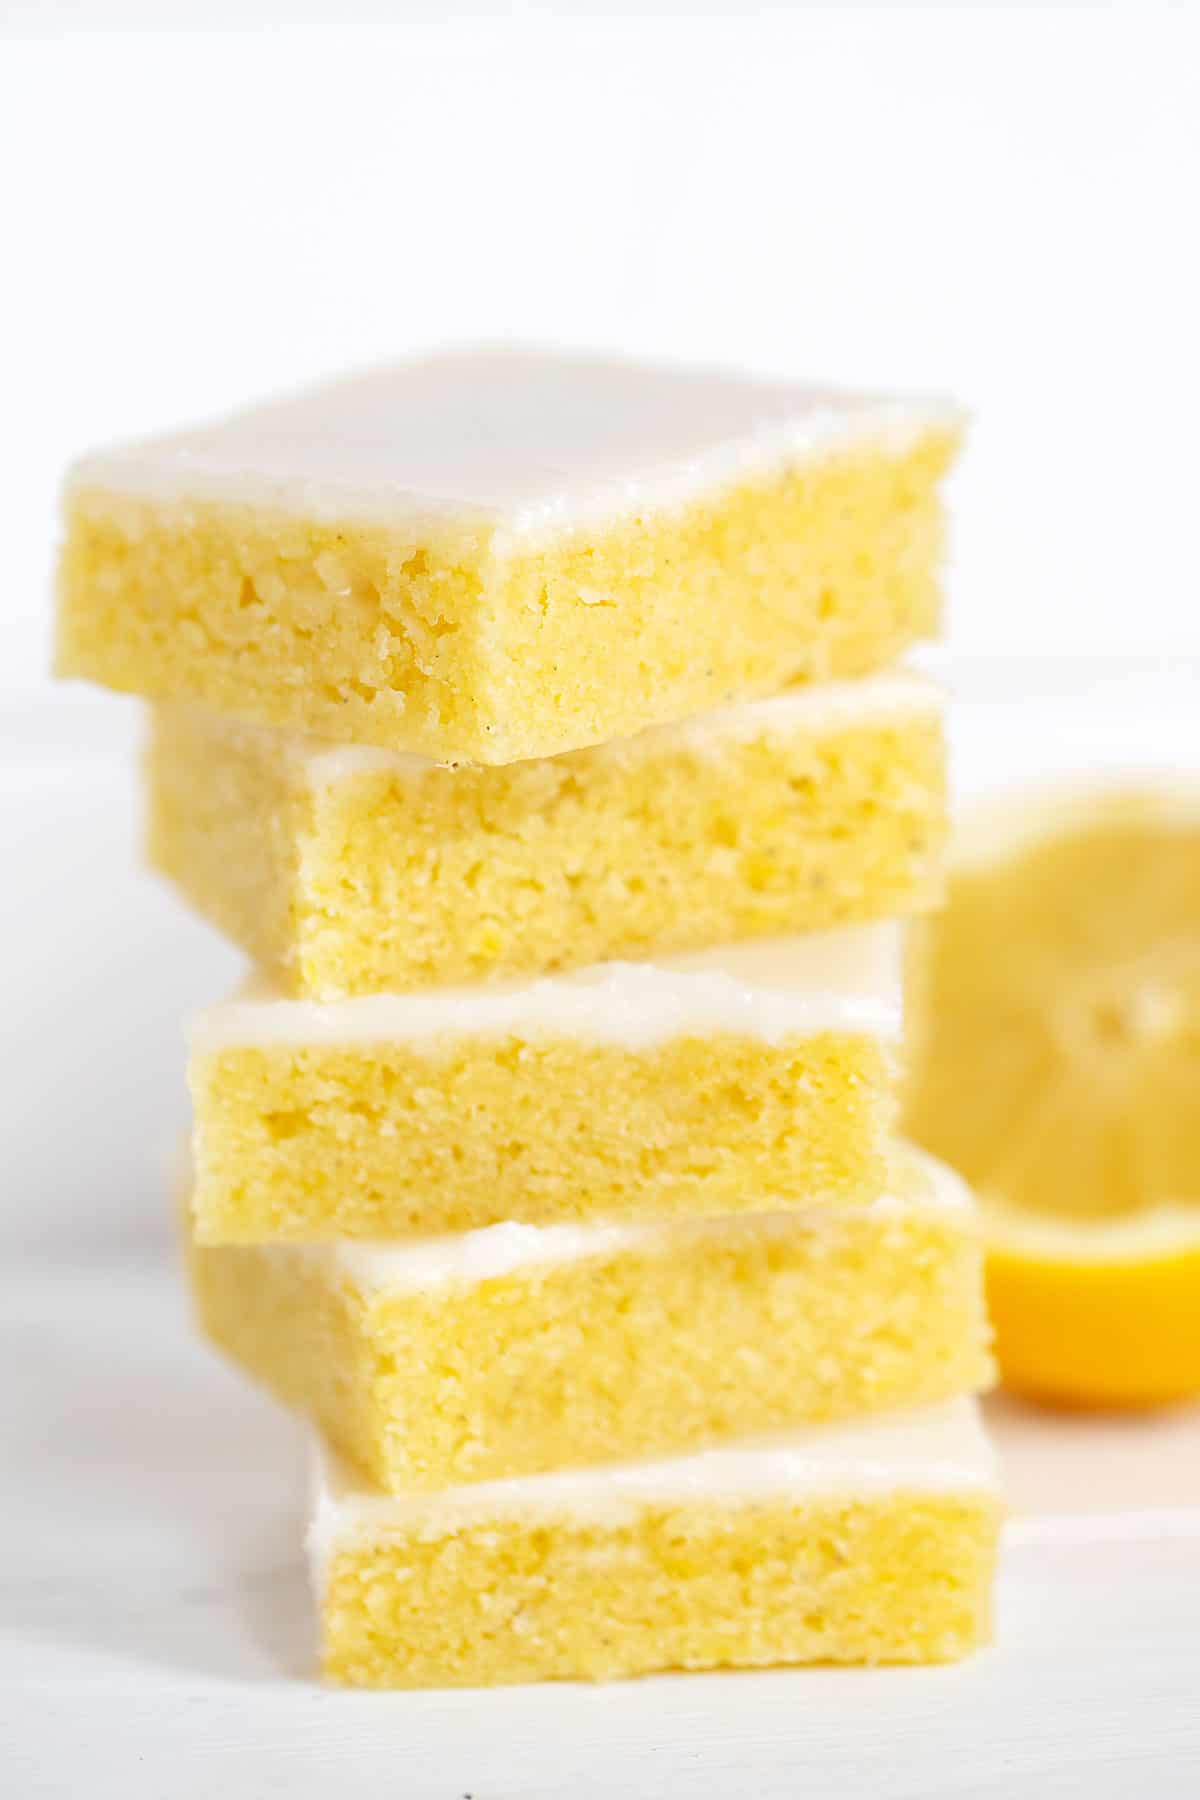
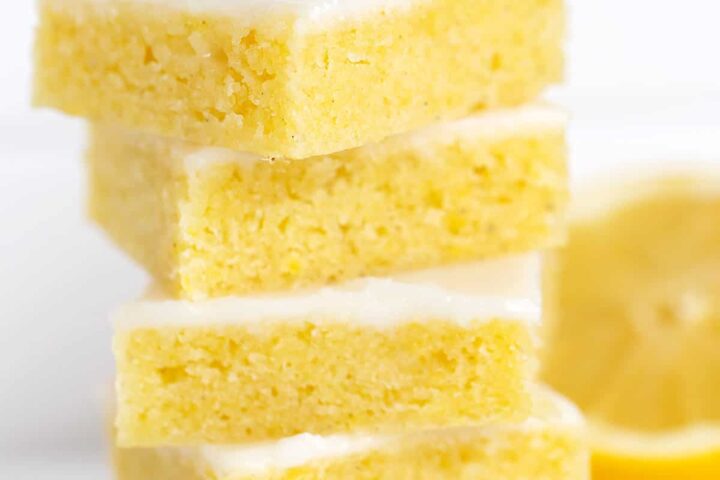
Lemon blondies are the perfect treat for lemon lovers. Thin, moist and full of lemon flavour, with a sweet lemon glaze on top.

I love lemon treats all year round, but these delicious Lemon Blondies are especially suited for Summer enjoyment, as these grab and go treats are perfect for BBQs or picnics.
You’ll love the wonderful moistness of these blondies (and they stay moist for days!). They are also packed full with lemon flavour, so they are wonderfully refreshing and will certainly satisfy any lemon lover.
Ingredients and Substitutions
Lemons – you will probably need 2 large lemons to get the lemon juice you will need for both the blondies batter and the glaze. Remember to zest the lemon before juicing.
Butter – you can use either salted or unsalted butter here. Simply adjust the amount of added salt to the batter as noted in the Ingredients list in the Recipe Card below.
You will also need – all purpose flour, white sugar, eggs (2), vanilla, salt and icing/confectioners’ sugar,
Step-by-Step Photos
This is a visual summary of the steps to make these Lemon Blondies. Always refer to the complete instructions in the Recipe Card below when making the recipe, as all steps may not be reflected here.
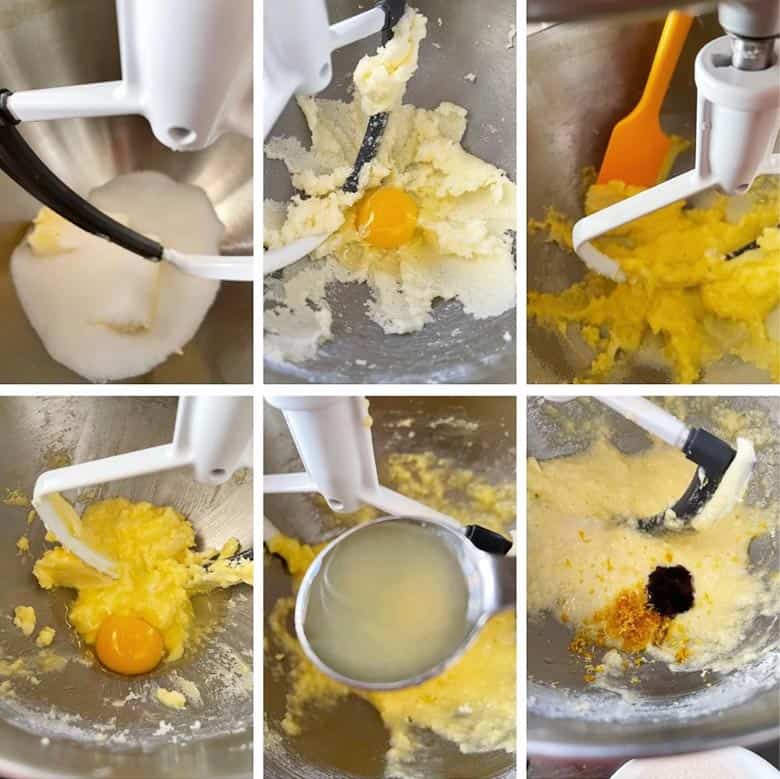
Start by creaming together the sugar and the room temperature butter. Creaming should always be done only on medium speed (about speed 5 on a stand mixer). Add the eggs, one at a time, beating in between additions.
As this is a small amount of batter, be sure to stop and scrape down the bowl a couple of times, being sure to get under the paddle, as well, where unincorporated butter likes to hide. Add the lemon juice, zest and vanilla and mix in.
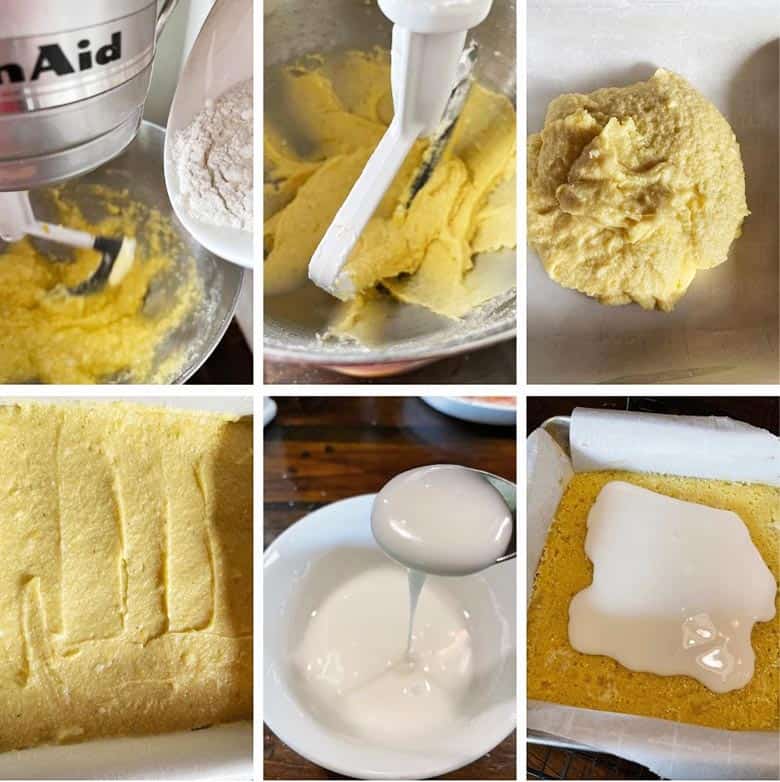
Next you’ll mix in the flour mixture, mixing just until it is combined. Spoon the batter into the prepared 8×8-inch baking pan and spread and smooth. Bake, then allow to cool in the pan.
When the blondies have cooled completely, mix up the glaze, pour over the blondies and use a spatula to spread it until it covers all the top.
Quick Tip! Once you’ve spread the glaze, gently jiggle the pan back and forth a little and the glaze will smooth itself out nicely. Allow the glazed blondies to stand at room temperature until the glaze sets (about 30 minutes or so). Once the glaze has set, remove the blondies from the pan and cut into squares.
Recipe Tips
- I love to line the pans for bakes like this with parchment paper. I use two strips, laid in opposite directions and overhanging the sides slightly. This method avoids the scrunched up corners you get when using just one piece of parchment. The parchment also makes it super easy to lift the finished blondies out of the pan without issue.
- Baking time can be affected by the colour of your baking pan. Darker pans will bake more quickly, so always check early. That said, always check through the oven window first. Opening the oven door and testing when they are visibly not ready can cause cakes to fall after baking. The centre of the blondies should be higher than the sides when it is nearing ready. If it looks pale and sunken still, it needs to bake longer.
- You’ll want to cool these in the pan and also glaze in the pan, so the glaze stays neatly on the top and doesn’t run down the sides. Allow the glaze to set at room temperature, then remove the blondies from the pan and cut into squares.
- If you’d like even more lemon, you can add a teaspoon or so of lemon zest to the glaze, as well.
Storage and Freezing
- These blondies keep well stored in an airtight container for several days.
- These should freeze fairly well. The glaze may get moist after thawing, so if you have the option to glaze after freezing and thawing, that might be the best approach.
Want to save this recipe?
Enter your email and I’ll send it to your inbox. Plus, you’ll get great new recipes from me every week!
By submitting this form, you consent to receive emails from Seasons and Suppers.
You can unsubscribe at any time.
Get the Recipe: Lemon Blondies
Ingredients
- 1/2 cup (114 g) unsalted butter, at room temperature (can use salted butter, but reduce added salt below)
- 3/4 cup (150 g) white sugar
- 2 large eggs
- 1 Tablespoon lemon zest
- 2 Tablespoons lemon juice
- 1 teaspoon vanilla
- 3/4 cup (90 g) all purpose flour
- 1/4 teaspoon salt, reduce to a pinch if using salted butter
Glaze:
- 1 cup (140 g) icing/confectioners’ sugar
- 2 1/2 Tablespoon lemon juice
Instructions
- Preheat oven to 350F (regular bake setting/non convection).
- Line an 8×8-inch baking pan with parchment paper for easy removal (or greased well). Set aside.
- In a large bowl with an electric mixer or in the bowl of a stand mixer fitted with the paddle attachment, cream together the room temperature butter and white sugar on medium speed until lightened in texture and colour, about 2 minutes. Beat in the eggs, one at a time, mixing well between additions and scraping down the bowl a couple of times, as needed. Mix in the lemon zest, lemon juice and vanilla.
- Mix in the flour, together with the salt, mixing just until combined and smooth. Pour batter into prepared pan and smooth the top.
- Bake 23-25 minutes, or until a tester comes out clean. Remove from oven and allow to cool completely in the pan before glazing.
- To glaze, combine the icing sugar and lemon juice. Stir well until perfectly smooth. The glaze should run off a spoon easily. *You may need to slightly adjust with more lemon juice, if too thick or a touch more icing sugar if too thin. Pour over the cooled blondies and use a spatula to spread it over the top completely. *Tip! Gently jiggle the pan back and forth after spreading, to smooth and even out the glaze. Allow the glaze to set at room temperature, about 30 minutes. Once the glaze is set, remove from pan and cut into squares. (I like to cut into 16 squares).
Notes
More Lemon Recipes to Love!
Hi! I’m Jennifer, a home cook schooled by trial and error and almost 40 years of getting dinner on the table! I love to share my favourite recipes, both old and new, together with lots of tips and tricks to hopefully help make your home cooking enjoyable, stress-free, rewarding and of course, delicious!
Where can I find lemon zest & where would it be located in grocery isle?
Hi Martha, lemon zest is obtained from grating the peel of a fresh lemon, so you’ll just need to get a fresh lemon.
I made these today and I baked them for 30 minutes but the middle of the pan was still very gooey and when I took them out they sunk in the middle. Is there anything I can do to fix this? I followed the recipe very closely
Hi Emily, are you baking at elevation? If not, did you make any substitutions at all?
How come the recipe calls for no baking powder?
Hi Kaleigh, these are blondies, which are typically short and more dense than a baking powder raised cake. These rise by beating air into the egg and sugar mixture instead.
Made these lemon blondies recently – easy! And yummy!!
Your base appears to be thicker (ours measured 5/8 inch). Considering your receipe was followed thoroughly, can you offer some thoughts?
Hi Irene and glad you enjoyed them :) Did you use the 8×8-inch pan for yours? Otherwise, it may go back to the mixing – creaming the butter and sugar long enough and beating in the eggs thoroughly.
Thanks for your prompt reply!
My husband is doing the cooking – under supervision! He’s doing a fantastic job! And he’s pretty meticulous – more so than me!
Will be making the blondies again & will see if the batter can be improved on!
I absolutely love lemon desserts Jennifer. Even more so than chocolate actually! I have got to try these!
Thanks Mary Ann and I’m the same :) It’s always a close call for me between lemon and chocolate!
Lemon desserts are one of my faves!! These blondies look absolutely delicious! I would love to grab a couple to have with a cuppa tea right about now. :)
Thanks Dawn and yes, these are a wonderful treat to have around and perfect with a cuppa :)