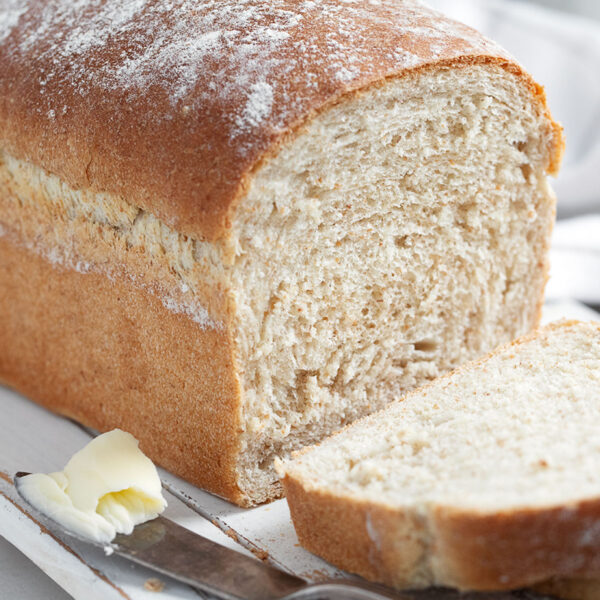
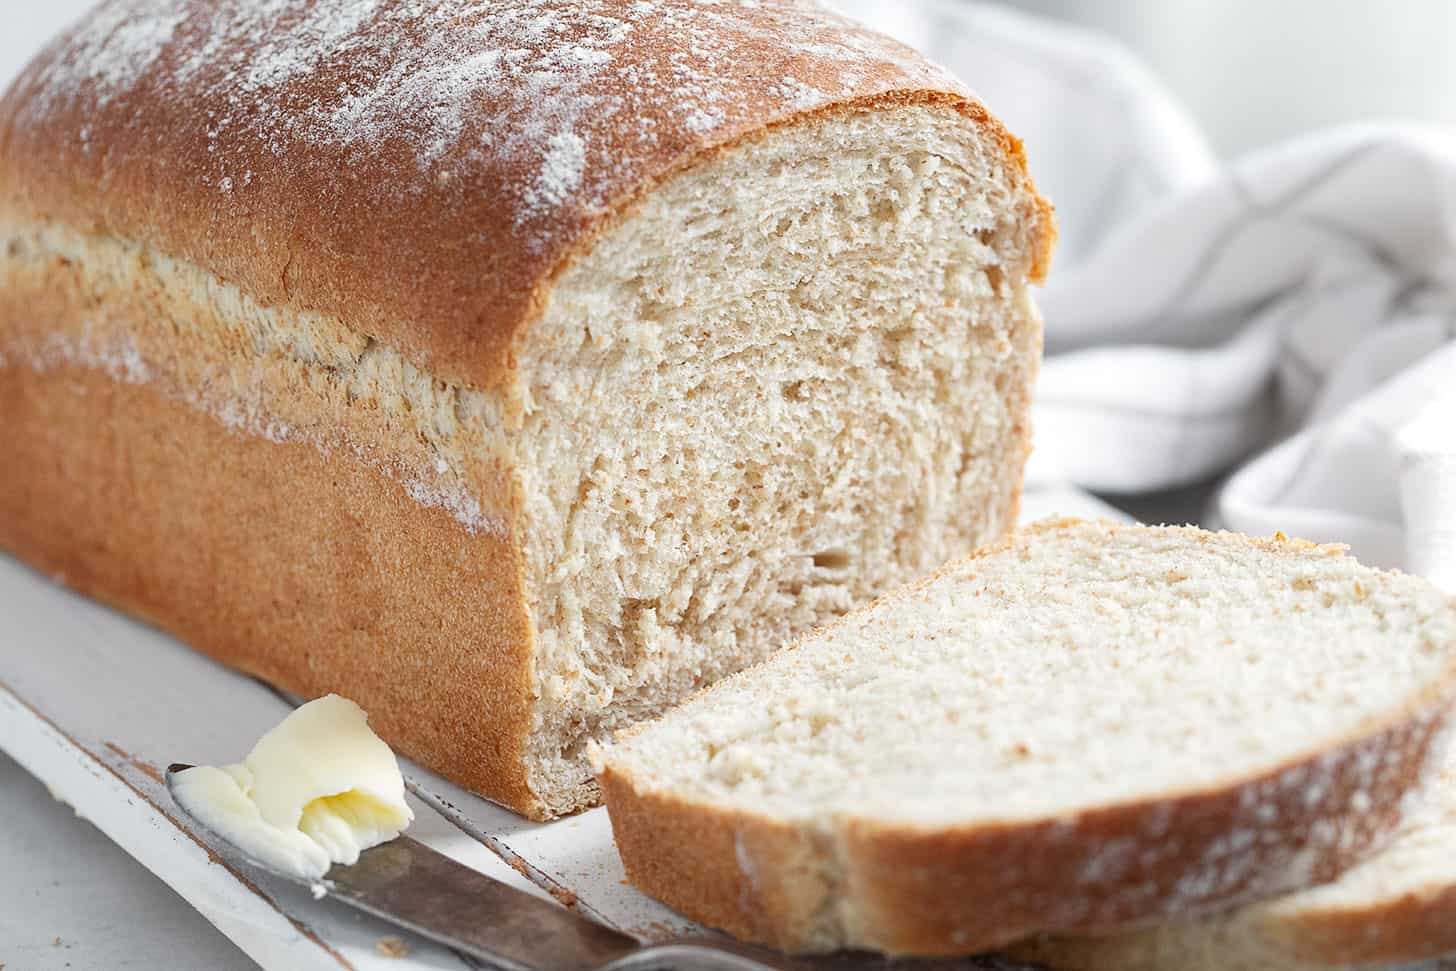
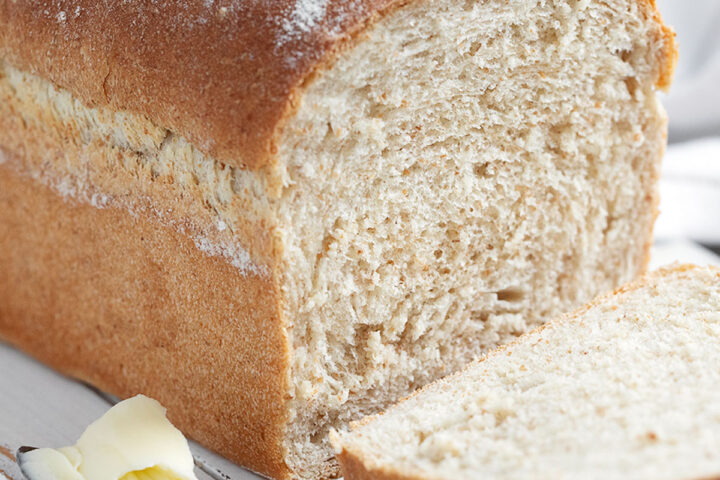
A delicious honey wheat bread recipe, that uses both whole wheat flour and all purpose flour, for a lighter loaf, with whole wheat goodness. Sweetened with honey, this bread makes a great everyday bread! Perfect for sandwiches and toasts well, too.
Why you’ll love this great everyday bread!
- I bake some sandwich bread pretty much every week, but some loaves I come back to over and over. This is one of them. This honey whole wheat bread is a great everyday bread, perfect for sandwiches and toast.
- This is a great beginner bread baker bread, too, as the dough is easy to handle and a fast riser.
- I love this loaf because it is a nice blend of whole wheat and all-purpose. It doesn’t have so much whole wheat that it is heavy or that the kids won’t eat it, but it does have enough to make me feel a little better about eating it.
- The touch of honey makes for a slightly sweet bread (but not overly so) with a subtle honey flavour.
What you’ll need
Active dry or instant yeast – You can use either active dry yeast or regular Instant yeast, such as SAF Brand. If you are new to bread baking, you might like to read my resource articles How to Know Which Yeast to Use and Getting Started with Yeast Bread Baking.
Honey – A nice neutral-flavoured honey works just fine, but you can use what you have or enjoy. You can adjust the amount of honey up or down, to your taste. If you don’t have honey, you can substitute maple syrup in the same amount. If you don’t have either, use 1/4 cup of white sugar, instead.
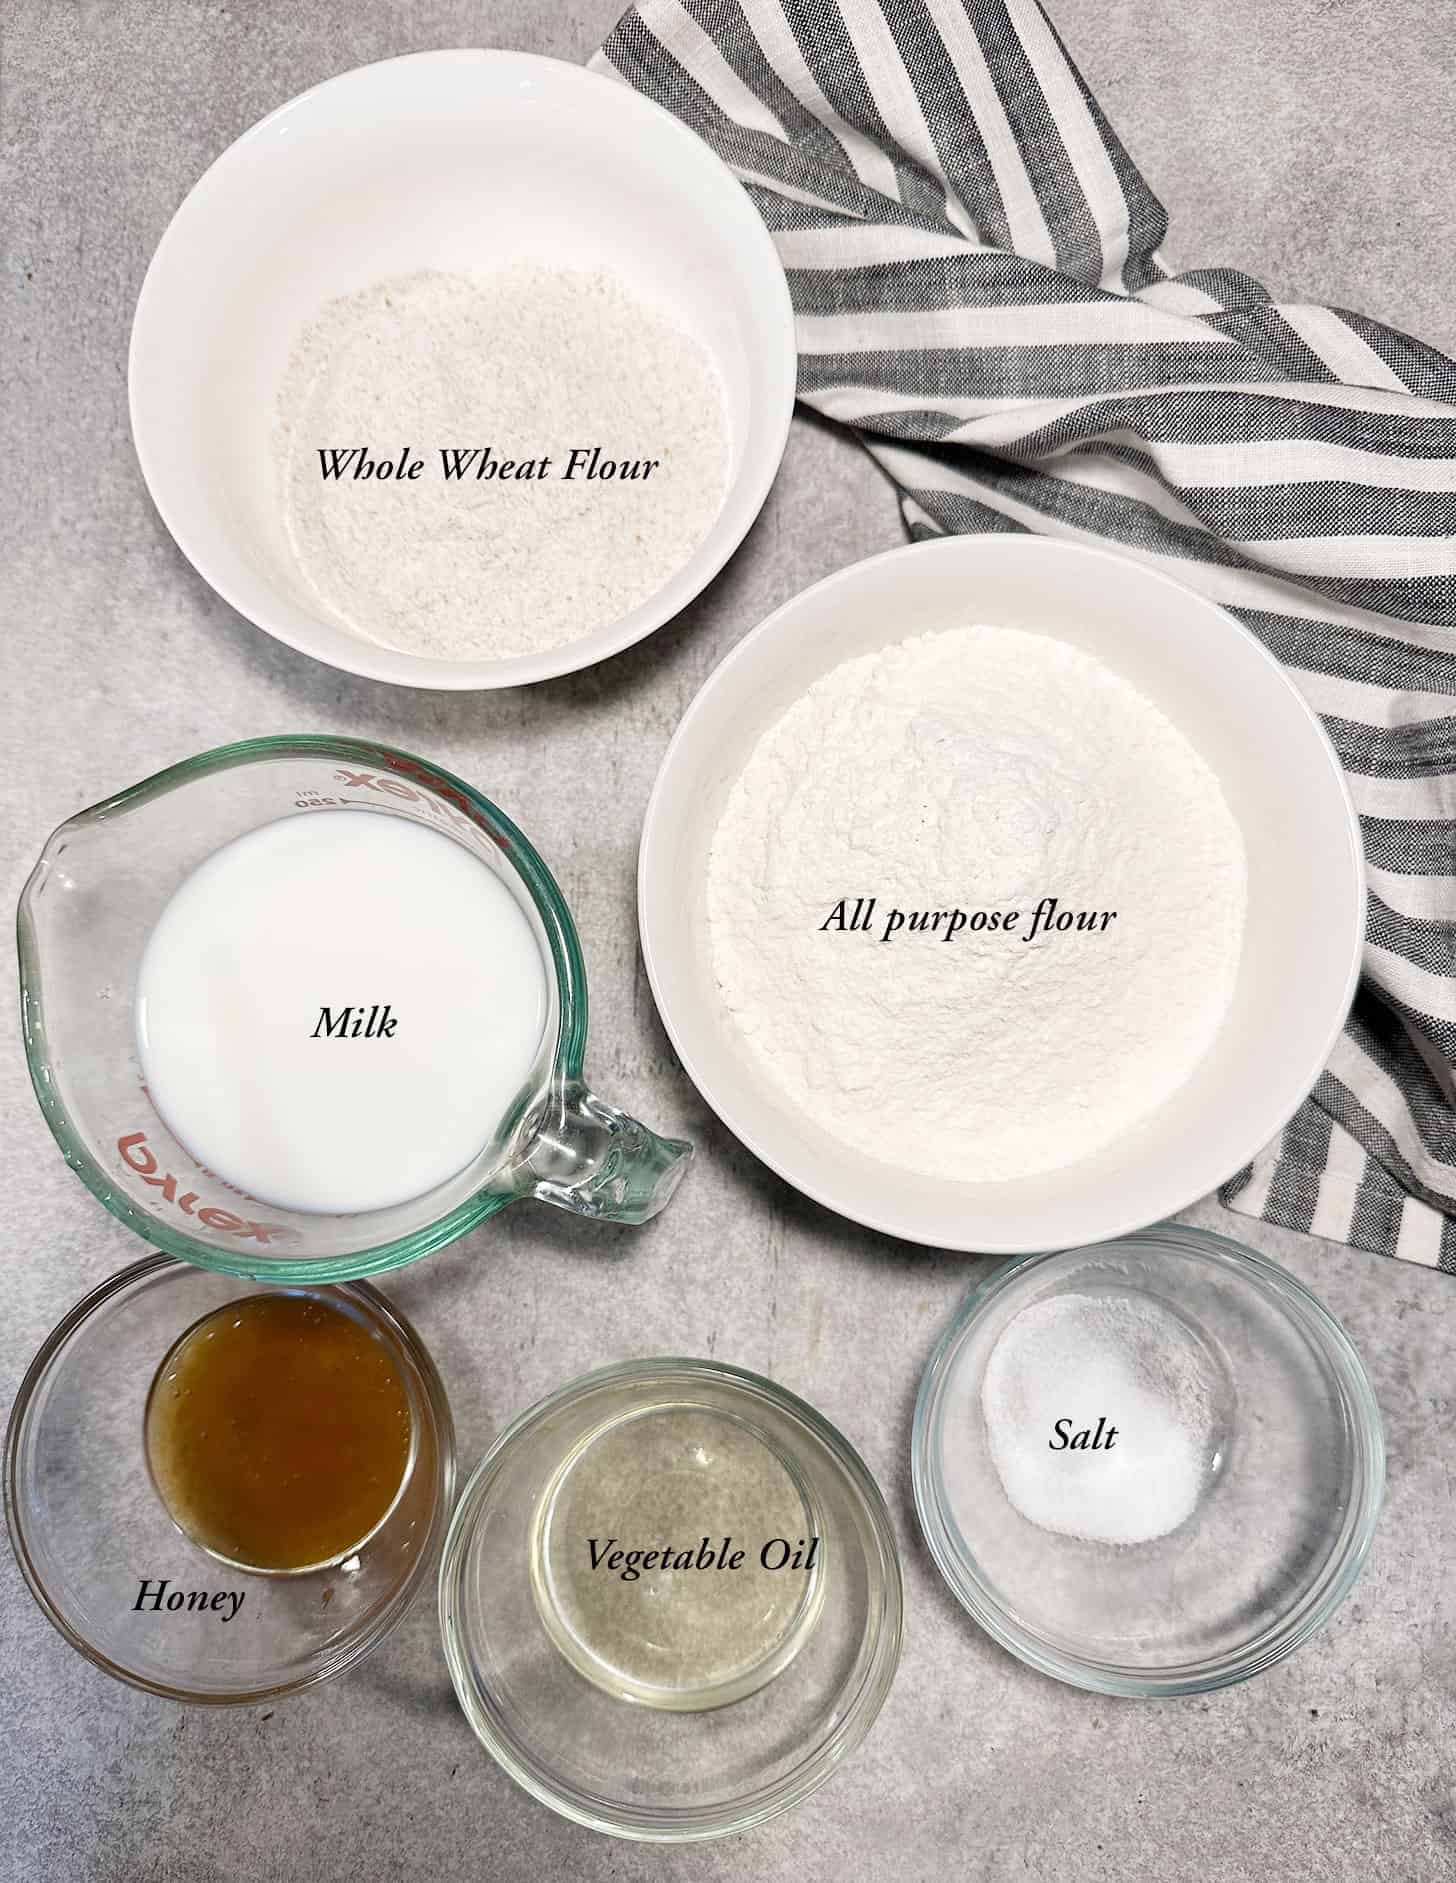
All purpose flour – This loaf combines whole wheat flour with all-purpose flour, for a lighter loaf. Unbleached all purpose flour is best for bread baking, but regular all purpose flour is fine, too.
Whole Wheat Flour – It is best to stick to the specified amount of whole wheat flour and resist the temptation to “add more”. Whole wheat flour absorbs more liquid than all purpose flour, so adding more will throw off the proportions for this recipe unless you know how to adapt it and make those adjustments. Adding more whole wheat flour will also slow up the rise and produce a heavier, more dense loaf.
Milk and/or water – I love to use half water and half milk, but you can just as easily use all water if that’s your preference.
Vegetable or Canola Oil – I think a neutral-tasting oil is best in bread, so I suggest vegetable or canola oil. Other oils will work, if you prefer. You could also use an equal amount of melted butter in place of oil.
Salt – Salt in bread is used as both a seasoning and as a bit of a yeast suppressant, so that the bread doesn’t rise too quickly. You can tweak the salt amount if you like or to your taste, but keep the rising thing in mind.
How to make honey whole wheat bread
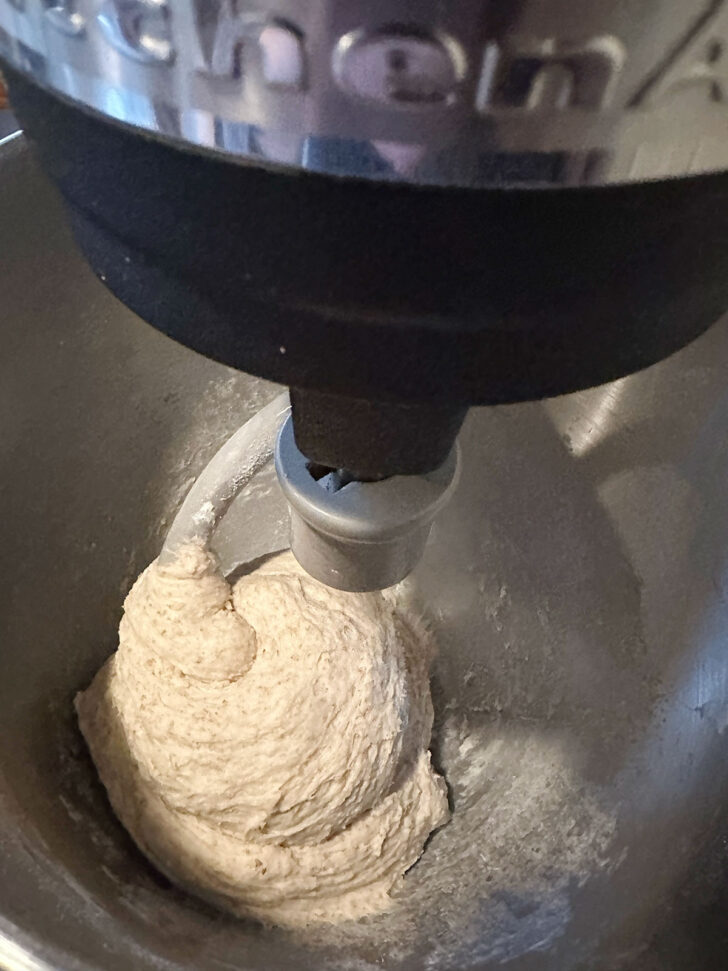
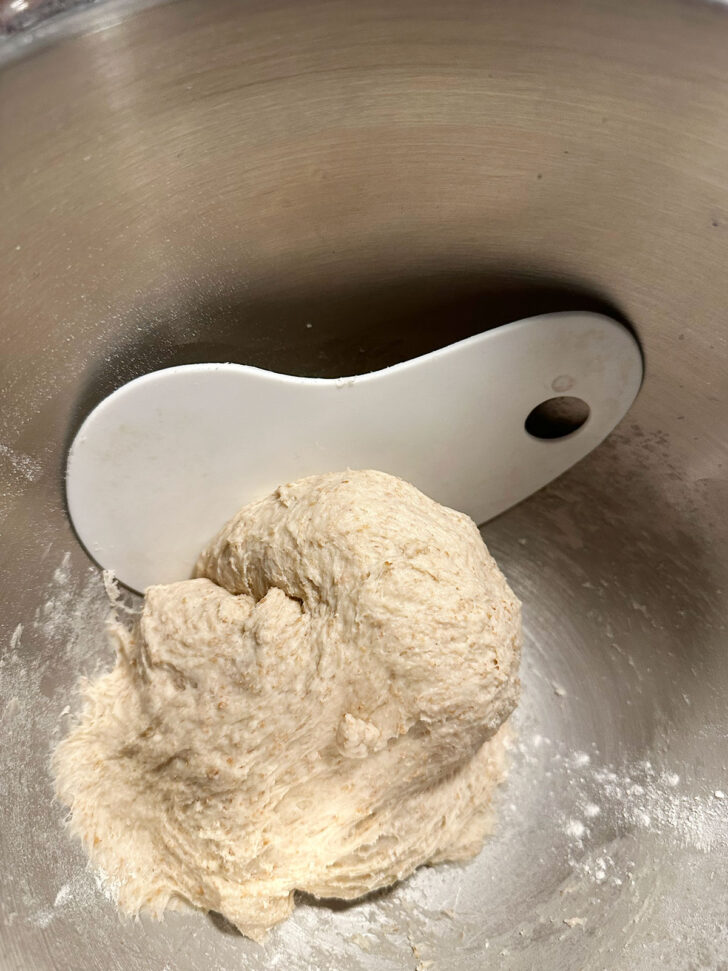
- Mix together the dough as detailed in the Recipe Card. The finished dough should clean the bowl well and wrap the kneading hook, but will still have a sticky bit at the bottom of the bowl, roughly as wide as the dough ball on the hook.
- Remove the dough to a floured work surface (a silicone scraper works well for sticky dough) and knead briefly, adding a bit more flour only if the dough is sticking to your hands or the work surface. Set to rise in a greased, covered bowl until doubled, about 45 minutes.
I thought the loaf shaping was best illustrated in video, so refer to the Recipe Video below for the loaf shaping if you are new to shaping yeast loaf bread.
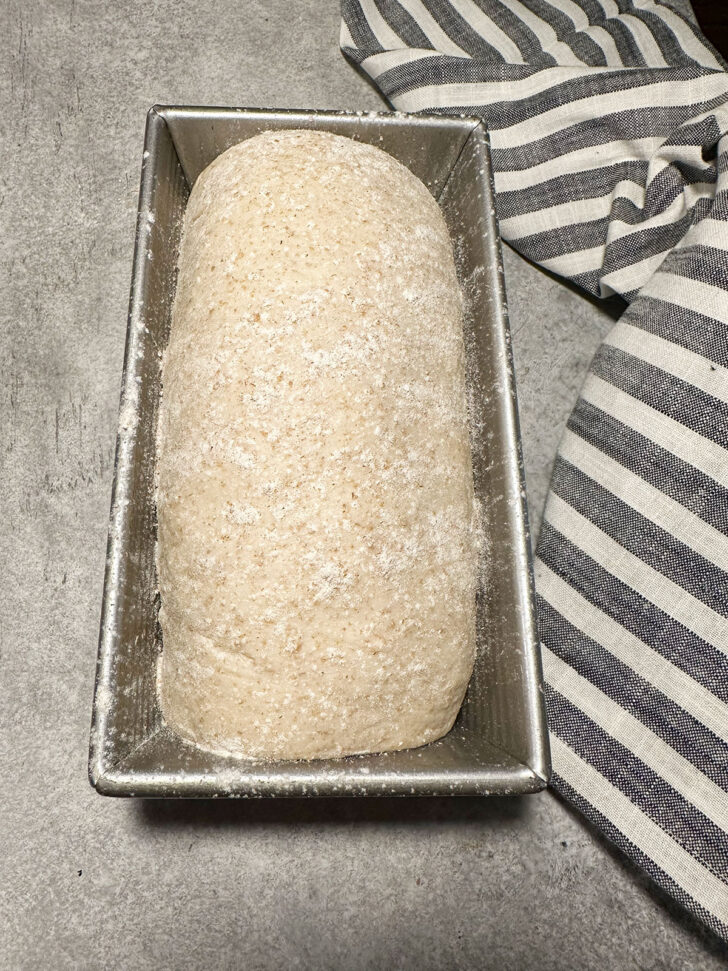
- Let the shaped dough rise in the loaf pan, covered with greased plastic wrap until doubled, about 30 minutes.
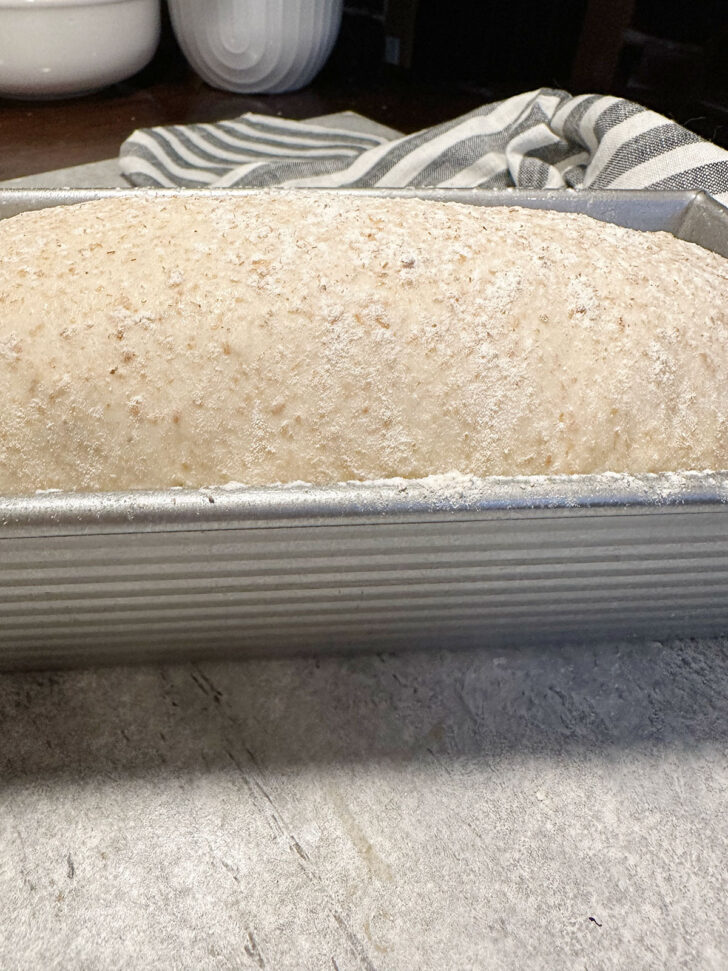
- The dough should crest the pan by about 1-inch in the centre of the pan. When ready to bake, dust lightly with whole wheat flour, if you like, then bake.
Recipe video
Recipe Tips
- Like all bread recipes, only add as much flour as needed to make a dough that mostly cleans the bowl, but with a bit sticking to the bottom of the bowl (refer to the photos or the recipe video to see how the finished dough should look). You may not need all of the flour specified. Or you may need a bit more.
- Likewise, rising times are estimates only, and will vary depending on the time of year and temperature in your kitchen. Let the dough rise just until doubled, however long that takes. That said, do note that this bread is an especially fast riser, so don’t wander far.
- The recipe as written makes one loaf, but you can easily double or triple the recipe to make more. Simply use the 2X or 3X buttons in the Recipe Card to double or triple the ingredients automatically.
Storing and freezing
Store bread in an airtight container at room temperature for 3-4 days. If you’d like to extend the shelf-life, you can pop it in the refrigerator after the first day, where it will keep well for up to a week.
This bread freezes beautifully for longer storage. To freeze, wrap well and freeze for up to 3 months.
Want to save this recipe?
Enter your email and I’ll send it to your inbox. Plus, you’ll get great new recipes from me every week!
By submitting this form, you consent to receive emails from Seasons and Suppers.
You can unsubscribe at any time.
Get the Recipe: Honey Wheat Bread
Ingredients
- 1/2 cup (125 ml) lukewarm water, warmed to about 105F
- 1/2 cup (125) milk, warmed to about 105F, or replace milk with more water
- 1 cup (125 g) whole wheat flour, spooned and levelled
- 2 1/4 teaspoons active dry or instant yeast
- 1/2 teaspoon fine sea salt
- 3 Tablespoons honey
- 3 Tablespoons vegetable oil, or canola oil or other neutral tasting oil
- 2 cups (250-280 g) all-purpose flour, spooned and levelled, plus more as needed
Instructions
- This recipe makes one 8 1/2 x 4 1/2-inch loaf. You can double or triple as needed. I highly recommend using a metal loaf pan in the size specified, for best results.
- Warm the water and milk in the microwave or in a small saucepan, just until lukewarm (test with a thermometer if possible, to ensure the liquid isn't too hot, which may kill the yeast. Let cool, if necessary) Add the lukewarm water and the honey to a large bowl or the bowl of a stand mixer fitted with the kneading hook. Sprinkle in the yeast, stir and let stand 5-10 minutes. (Mixture should be foaming a bit after 5 minutes)
- Tip! Be sure to measure the flour by first stirring the flour, then spooning it into the measuring cups, then levelling off with a knife. This will ensure that you don't add too much flour and end up with a dry, crumbly dough. Better yet, use a kitchen scale and weigh out the flour to be sure.
- Add the whole wheat flour, the salt and the vegetable oil and mix until combined. Gradually begin adding the all-purpose flour, adding about 1/2 cup at a time to start and mixing in between additions. As the dough starts to come together, decrease the size of the flour additions, adding just a bit at a time, adding only until the dough cleans the bowl and wraps the dough hook, with just a small sticky spot at the bottom of the bowl. You may not need to add all the flour specified. With the mixer on Speed 2, knead the dough for about 5 minutes
- Tip! There is a video above this Recipe Card which shows what the finished dough should look like, which you might find helpful.
- If kneading by hand, turn dough out onto a lightly floured surface and knead for about 10 minutes. Add in only enough additional flour to stop the dough from sticking.
- Remove the dough to a floured work surface and knead briefly, adding additional flour only if the dough is sticking to your hands or the work surface. When dough is smooth and elastic, place it in a well oiled bowl or large measuring cup. Turn it several times in the bowl to coat the surface of the dough, and cover with a plastic wrap. Let rise in a warm place until doubled, about 45 – 60 minutes.
- Grease an 8 1/2 x4 1/2-inch loaf pan and set aside.
- Remove the dough from the bowl to a lightly floured surface. (If making more than one loaf, divide the dough into equal sized pieces at this point). Press dough down to deflate, while moving and shaping it into a rectangle shape, about 8-inches wide and 12-inches long. Roll up the dough from the short side, pinching it together with each roll. Pinch together the seam when finished and place seam side down into greased loaf pan(s).
- Tip! If you'd like to see how I like to shape a sandwich loaf, refer to the Recipe Video above this Recipe Card.
- Spray a piece of plastic wrap and place over the loaf pan, with the greased side down. Allow the loaf to rise until dough doubles and crests about 1-inch above the edge of the baking pan in the middle, about 30 minutes. If desired, just before baking, lightly sprinkle the top of the loaf with some whole wheat flour.
- Preheat oven to 375F (regular bake setting/not fan assisted) when dough is almost risen.
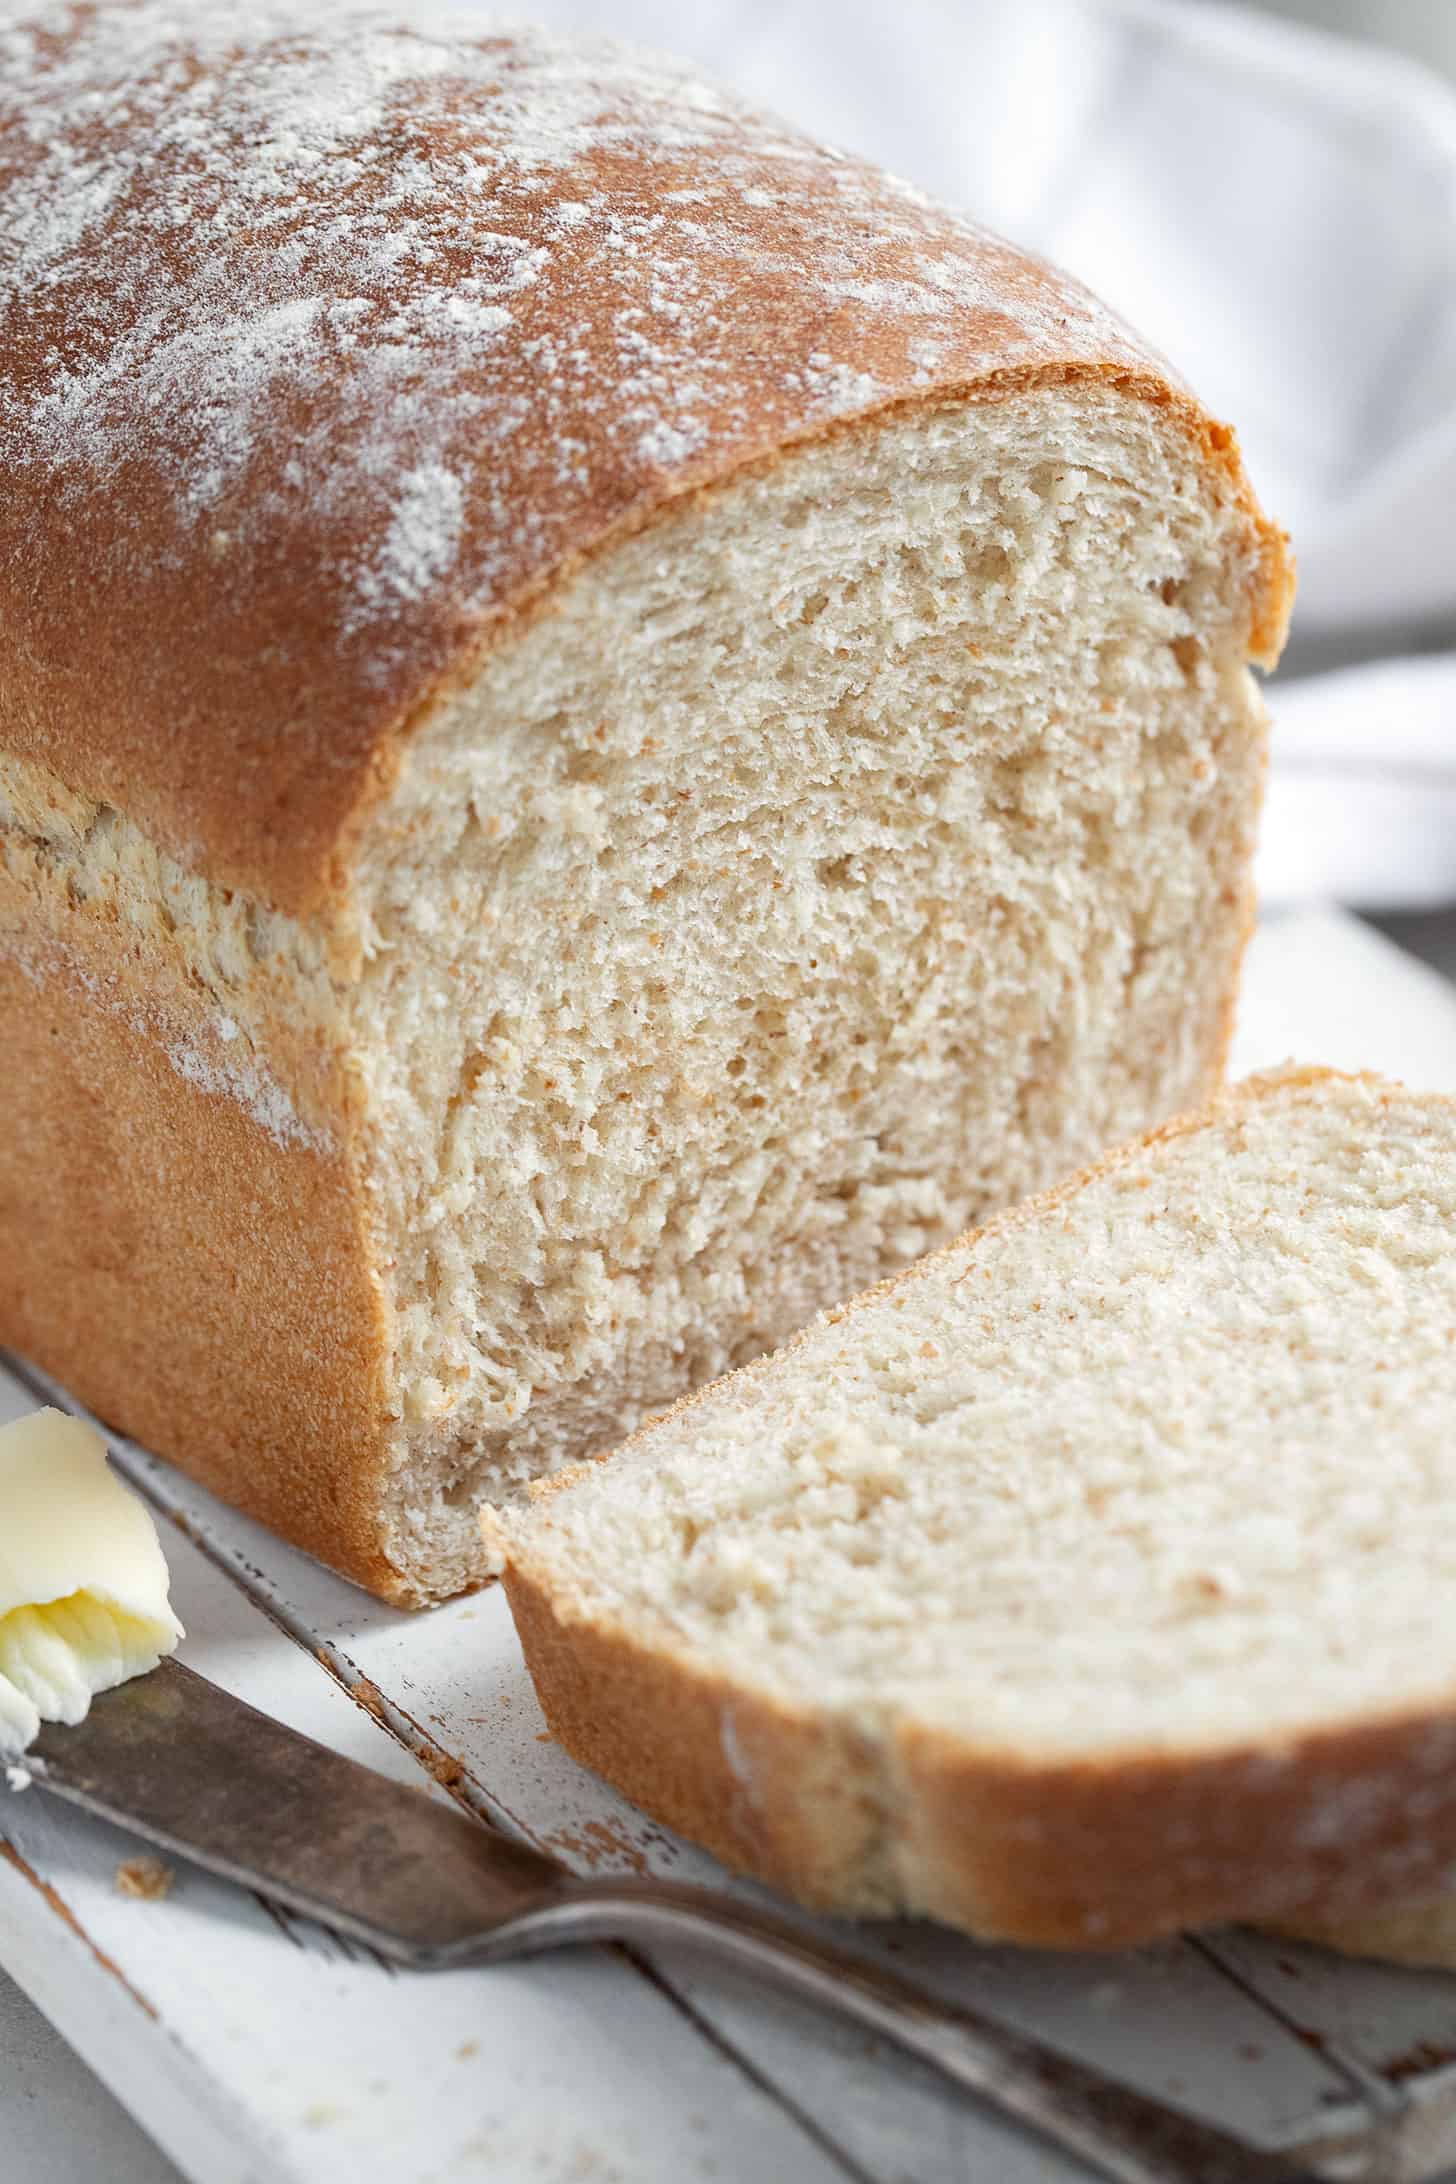
- Bake at 375° F for 30 – 40 minutes or until thermometer inserted in the bottom of the bread reads 195-200° F. (Mine generally needs about 35 minutes). Immediately remove bread from pans and cool completely on a cooling rack before slicing. (Slicing a yeast bread loaf while hot can make for a gummy loaf.)
- Once cooled completely, store in an airtight container or bag at room temperature for about 3 days or wrap well and freeze up to 3 months.
Notes
More Yeast Bread Recipes to Love!
Hi! I’m Jennifer, a home cook schooled by trial and error and almost 40 years of getting dinner on the table! I love to share my favourite recipes, both old and new, together with lots of tips and tricks to hopefully help make your home cooking enjoyable, stress free, rewarding and of course, delicious!
This looks like a great recipe and can’t wait to try it. I’d like to make subrolls – any suggestions? Long sticks/no loaf pan? And how to make without a crust? Foil the whole cooking time?
Thanks
Hi Stacey, you might want to have a look at my sub rolls recipe for some ideas on shaping etc. As for the crust, I don’t think you want to foil it the whole time, or the rolls will have no colour at all. You could certainly cover for the last part of baking, once the rolls have some colour. Also, I have had success with wrapping the rolls in a tea towel after baking to prevent the crust from hardening.
Hi Jennifer! We’ve now baked 3 loaves of this delicious bread. The first time, we just made one loaf. The second time, we knew we had to double the recipe! I’m on the hunt for a recipe to make weekly, to replace store-bought sandwich bread. This might be our winner! That said, the only issue I’m running into is the top of the loaf coming out very dark, almost burnt. The rest of the loaf is PERFECT. Any suggestions? Thank you, and happy new year!
Hi Tina, so glad you are enjoying the bread. As for the dark top, you can loosely lay a sheet of aluminum foil overtop of the loaf for the last part of baking. Simply check on it after 20 minutes of baking or so and when it is dark enough, place the foil for the last part of baking. This should prevent the over-browning for you.
I decided to try your recipe homemade white bread on the weekend instead of a recipe I had been using for a long time. Delicious and now my go to recipe! I would like to make this honey wheat bread recipe, in place of the recipe I have been using from a different food blog. I prefer to make two loaves at a time, but I am wondering if doubling the yeast will be too much yeast? Has anyone made two loaves with 4 1/2 teaspoons dry active yeast? Or would 1 Tablespoon active dry yeast be sufficient?
As an aside, I also use KAF white whole wheat flour.
I sure do agree that using 8 1/2 x 4 1/2 bread pans makes for nicer loaves of bread!
Hi Deb, I usually double everything, including the yeast. Using KAF white whole wheat flour is fine, just be prepared that it might behave slightly differently than regular whole wheat flour. The white whole wheat may absorb less water, which means you may need to add a bit more flour to get the dough to the consistency you need.
Jennifer,
Thank you for getting back to me so quickly. I will go ahead and double the yeast, so a total of 4 1/2 teaspoons of active dry yeast.
I have been using KA white whole wheat flour for a good while now, but I really do appreciate the heads up and tips. I will let you know how it goes 😊
Hello Jennifer – I a 72 have been making bread for a very long time but not too old or stubborn to learn something new! I have had such a hard time with anything that calls for wheat flour! I am going to try your recipe this tomorrow. It looks wonderful! My issue is the only size pans I have are 9×5. Will this recipe work in those sizes? Looking forward to trying all of your bread recipes! Cheers…
Hi Jo and I’m so glad you are going to give this bread a try. To be honest, I would suggest you pick up an 8 1/2 x 4 1/2 inch metal loaf pan. Many bread recipes use the smaller pan these days, so you will get good use out of it. I feel like you will be disappointed in any loaf baked in a too-large pan, as it is at best, short and wide (and not nice and tall) and the different size introduces other issues that my frustrate a beginner bread baker.
Really excellent and fun to make. I wondered if my KAF white whole wheat would be high enough in protein and it was perfect. Thank you for the wonderful recipe and the faster rise. Because it was 8” pan I knew it would not be large and it was just perfect for a couple. A lovely light and tender, easily sliced bead with a nice crumb for butter or a sandwich. A great flavor. The right amount of salt for the whole wheat.
So glad you enjoyed it! Thanks so much :)
This looks like a lovely bread. I was just looking at your Amish stew recipe and then found this. Both look very comforting. Can you tell me what size bread pan you are using-8×4 or 5×9? Thanks. I will try making this soon-as the weather cools down a little.
Hi Karen, sorry, I left that out. It would be an 8×4 loaf pan. I’ve added it now. Thanks :)
This is a wonderful recipe! I am looking forward to toasting some in the morning. Many thanks!
Glad you are enjoying it! It’s one of my favourite breads :) Thanks so much.
This bread has become a staple in our house! It’s great with a quarter cup each of pumpkin, sunflower, and flax seeds mixed into the dough. I have also found that doing an egg white wash and sprinkling rolled oats over the top before spritzing it with water makes for a great crust. Also doing one more water spritz halfway through baking helps that golden brown color. Yum!!
Great tips and so glad you are enjoying this bred. It’s one of my favourites, too :)
This bread is wonderful, thank you!
Thanks Aneta. Glad you enjoyed it :)
Just made these tonight and they were great! My first loaf didn’t rise as well as the second, but they are so good and I’m so excited to make sandwiches tomorrow :)
Enjoy Ruosi. Makes great sandwiches :)
Just made two loaves of this today! It was Fantastic! Thank you Jennifer for sharing this great recipe!
Thanks so much, Krystal. So glad you enjoyed it!