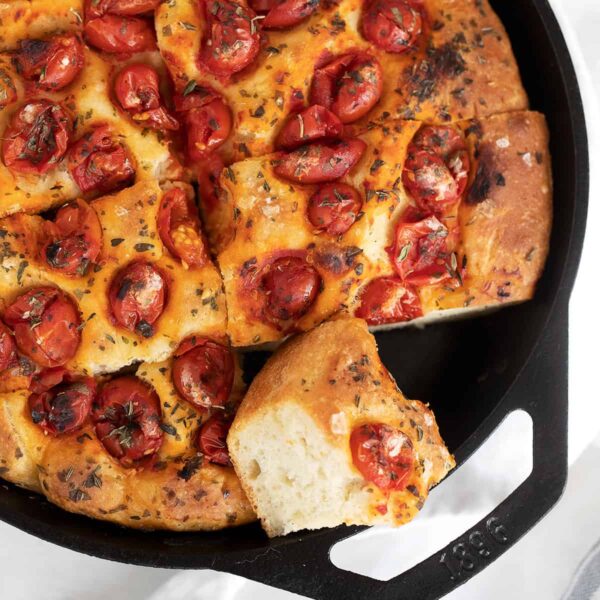
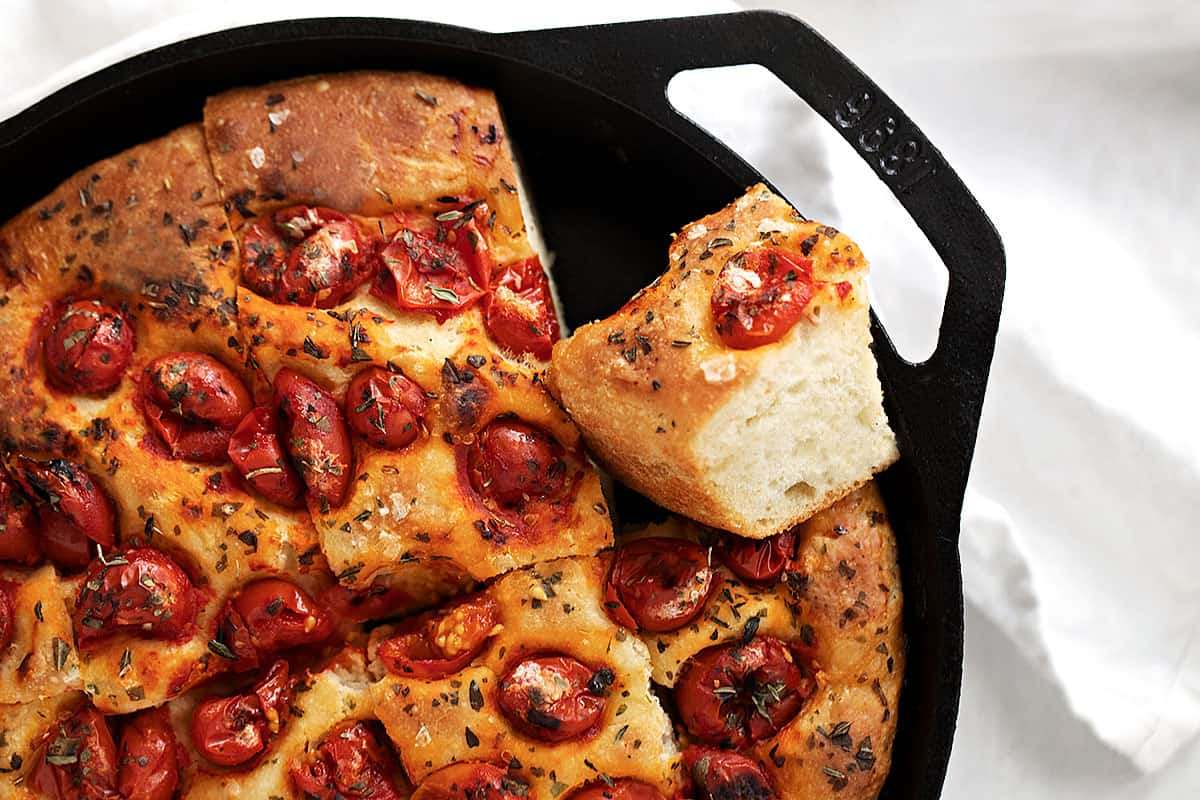
Easy and delicious cast iron skillet focaccia. Makes a wonderful side or appetizer and is perfect for dipping in olive oil and balsamic. Offering a variety of topping options, too.
Why you’ll love this cast iron skillet focaccia
- This focaccia makes a great addition to any meal!
- Focaccia also makes a great appetizer, served with a nice balsamic for dipping.
- This skillet focaccia is ready in just a couple of hours and mostly hands-off.
- This focaccia can be assembled ahead and refrigerated for up to 6 hours, so you can make it ahead and bake it fresh for dinner.
- Focaccia bakes up beautifully in a cast iron skillet and it always makes for a pretty presentation.
What type of flour to use for focaccia
A hard flour is best for focaccia, so either double zero flour (aka Tipo 00) flour or bread flour is best. You can also use half 00 and half bread flour.
If you only have all-purpose flour on hand, you can give it a try. You will probably find that you need to add more flour and the texture of the finished focaccia will be slightly less chewy, but it will work.
Step-by-step photos
My skillet is 10-inches top diameter (8-inches bottom diameter). For a larger skillet, focaccia will be thinner and may bake more quickly.
Weight measures are highly recommended, for best accuracy. If using cups, be sure to use the spoon and level method to fill your cups.
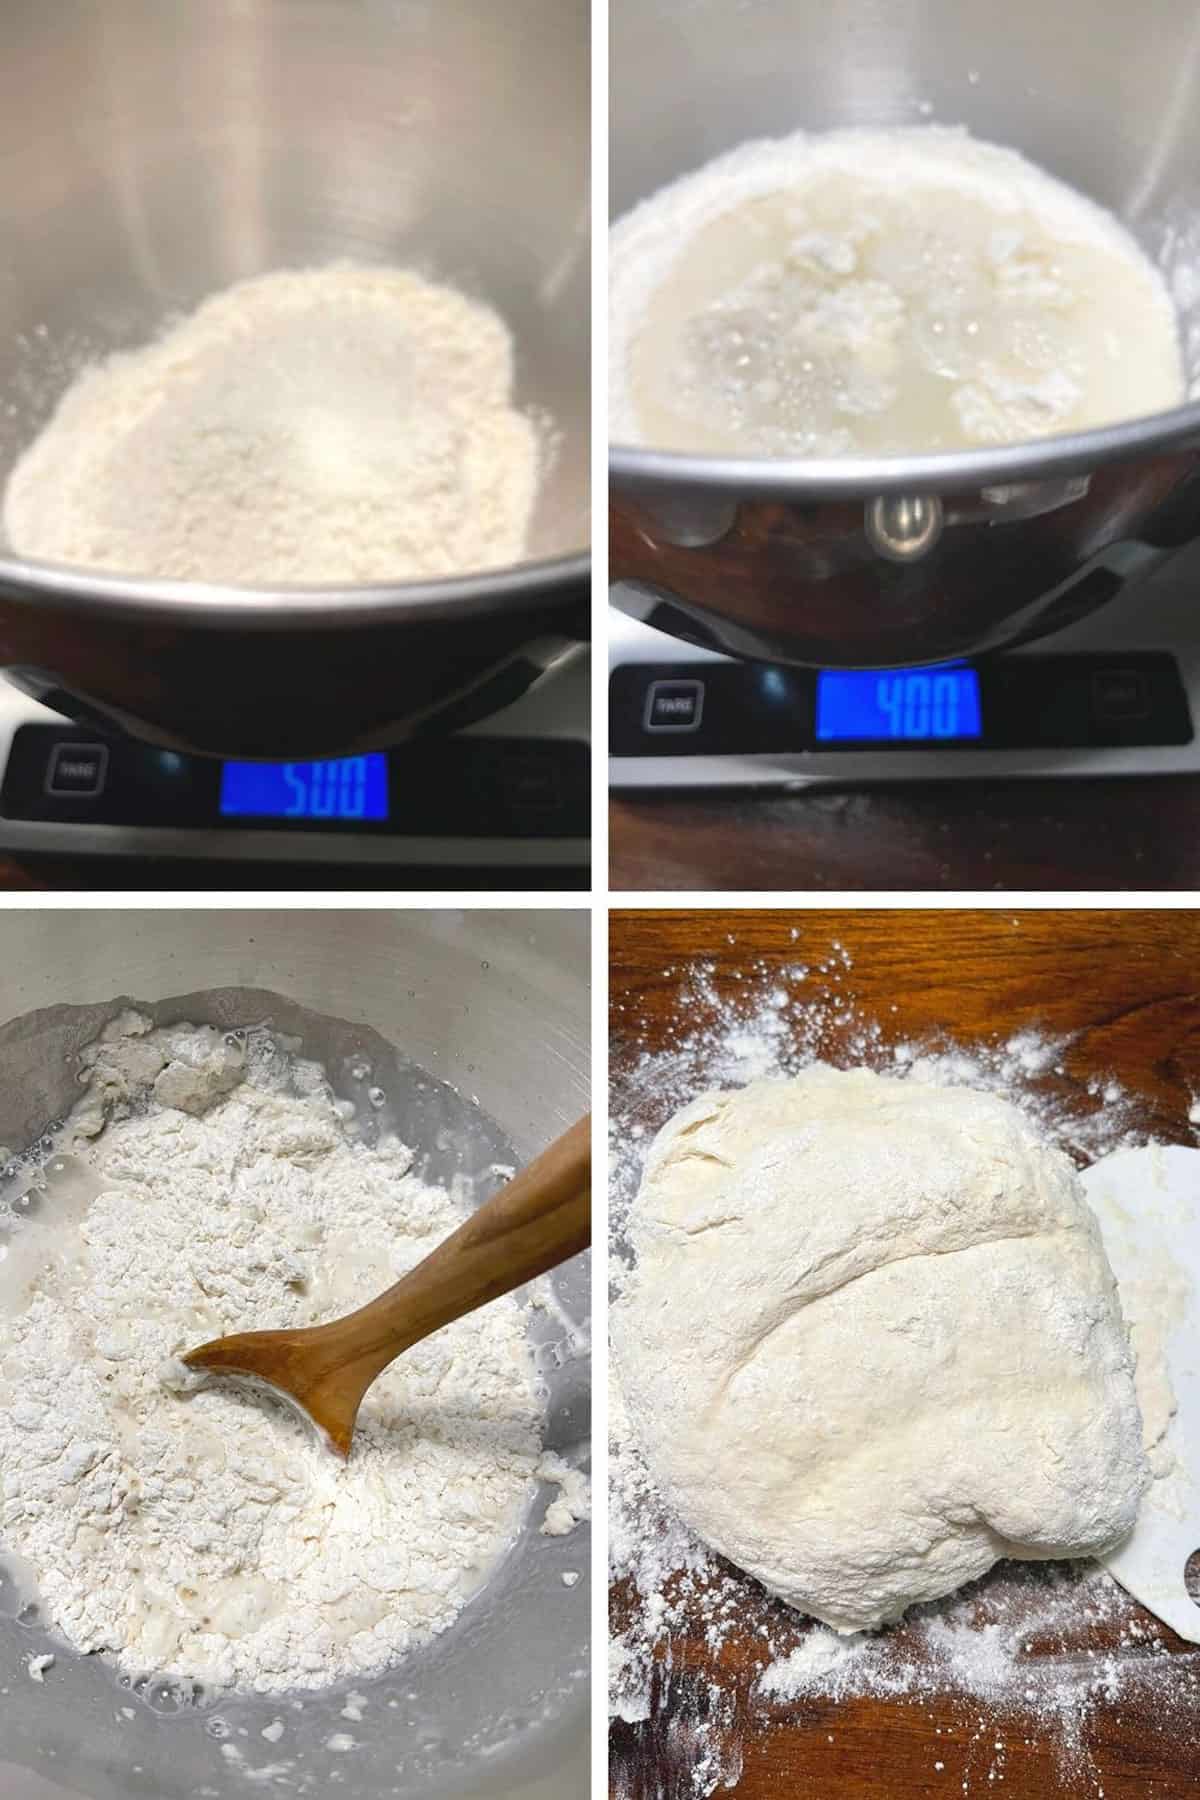
Step 1: Mix the dough – I highly recommend weighing the flour and water! After that, simply stir them together. Remove the dough to a well-floured work surface. If it’s sticky, use a silicone bowl scraper to move the dough through the flour to remove the stickiness.
Be sure not to add too much flour. The dough should be very moist. At this point, do a few stretches of the dough by pushing and stretching it away from you then folding it back and repeating. As the dough is very moist, conventional “kneading” won’t work well.
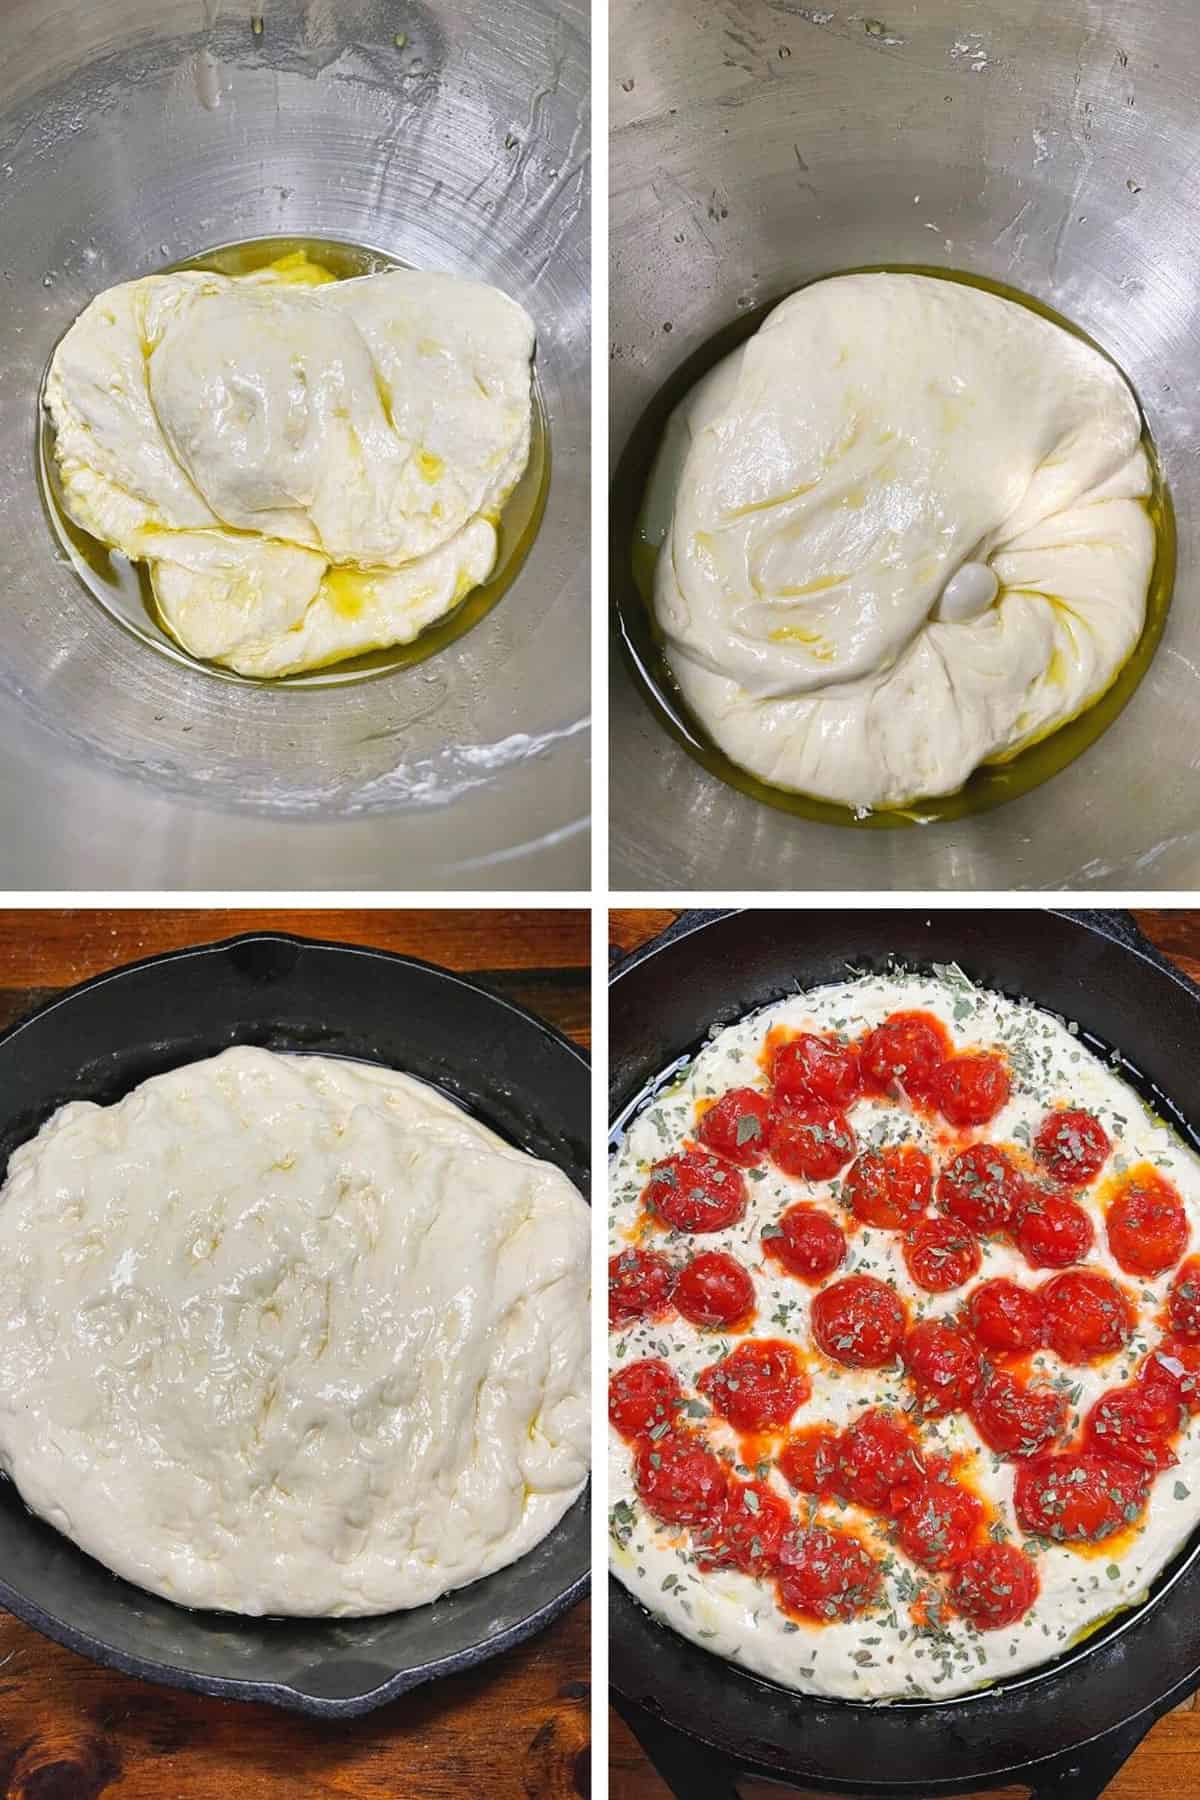
Step 2: Rising, stretching and folding the dough – Place the dough in a bowl with the olive oil. You’ll do a series of stretches and folds (explained in detail in the Recipe Card below!), followed by a rest period. Just before adding to the skillet, the dough will go into the fridge for 10 minutes.
Add some oil to the skillet, then shape the focaccia, adding more oil to the top. Add your toppings, then let rise before baking.
Focaccia popping ideas
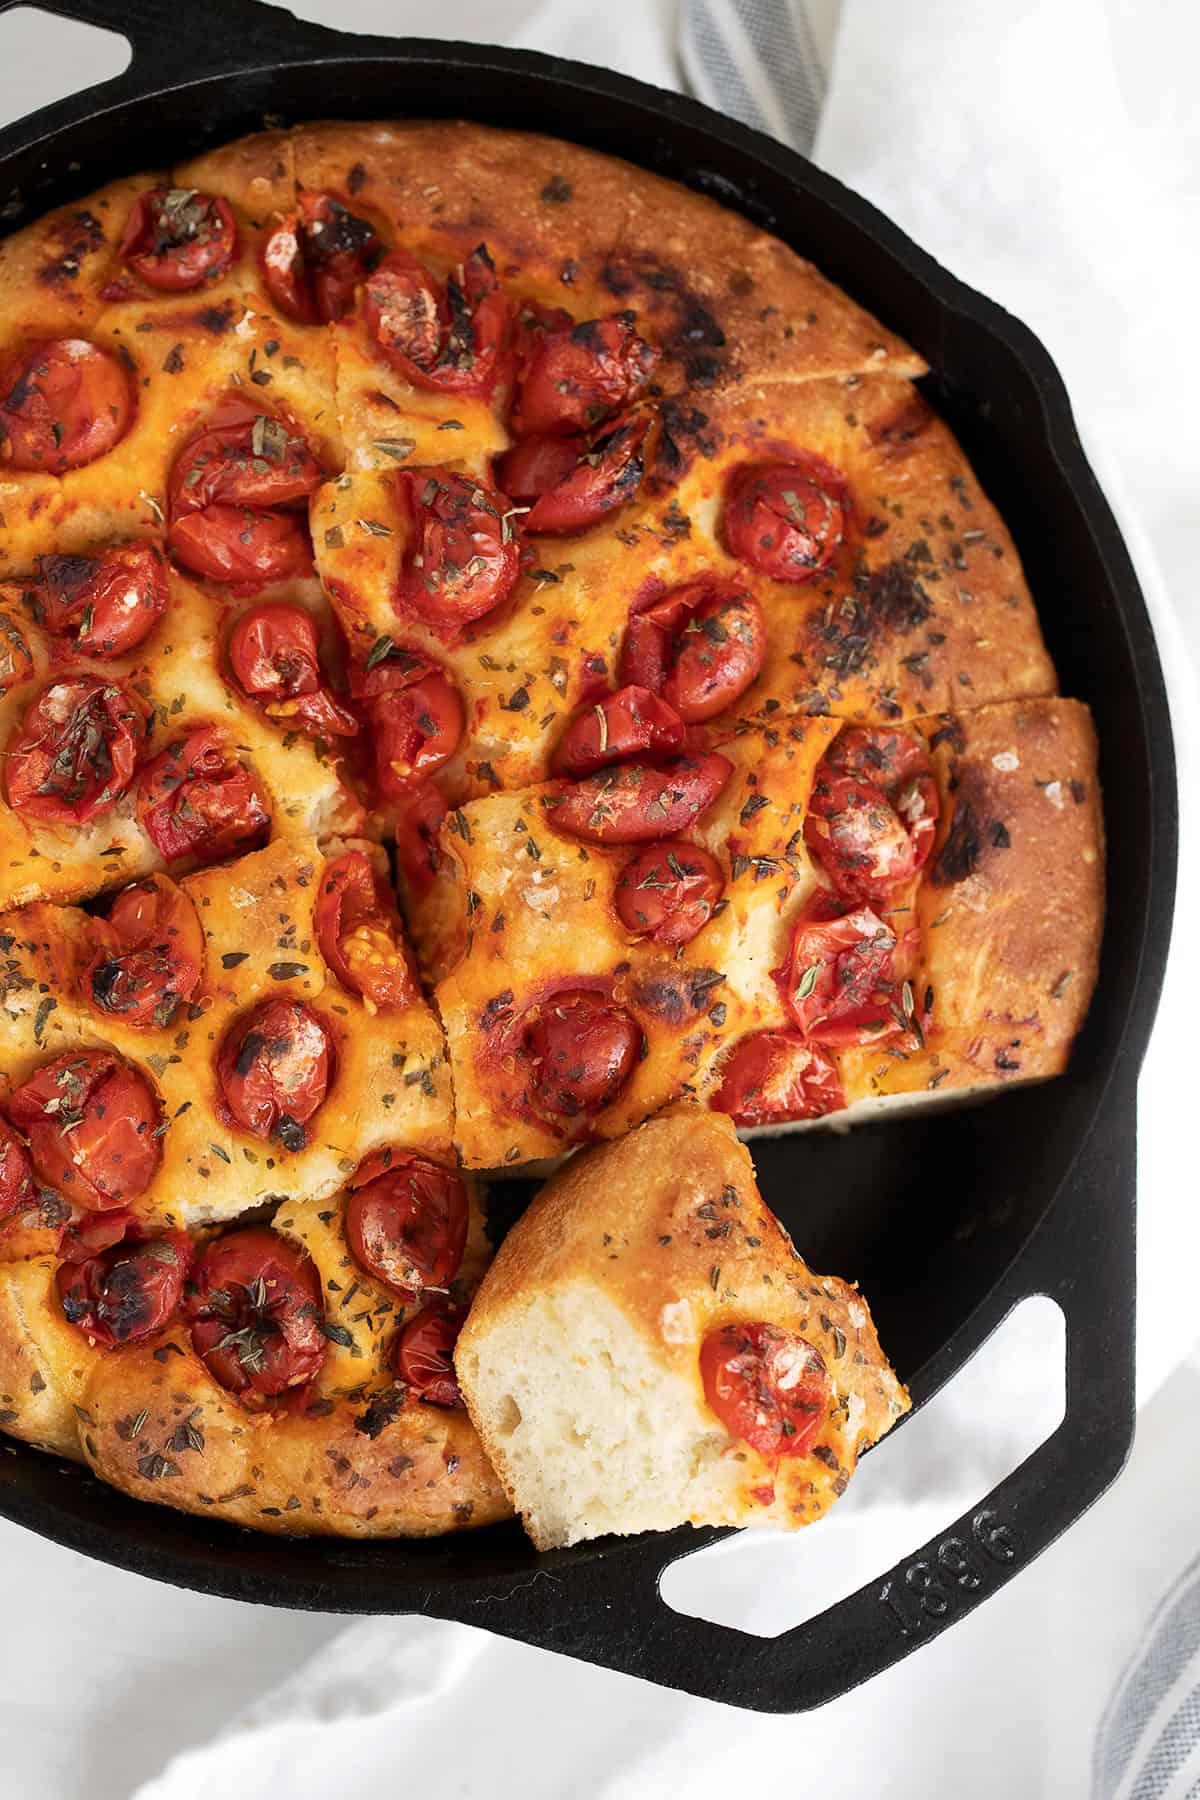
- I’ve used canned cherry tomatoes here, as I love the rich tomato flavour from the canned tomatoes. You can also use fresh cherry or grape tomatoes if you like.
- Onions, either raw or caramelized are also nice.
- Pitted olives are a popular choice.
- Try some thinly sliced pear or apple.
- Add some cheese to the topping. Parmesan, cheddar, blue, feat or goat cheese are good options.
- Add some herbs as well, but be careful that they don’t burn. I like to stick with dried herbs for that reason.
How to serve focaccia
If baking in the skillet, simply slice right in the skillet. Slice diagonally to cut into small squares.
For an appetizer or snack, serve with small plates of good olive oil and balsamic vinegar combination for dipping. Garlic-infused olive oil is another option for dipping.
I really enjoy focaccia with a big salad for a Summer dinner, too.
Can you freeze focaccia?
Yes! Focaccia freezes beautifully for up to 2 months.
How to reheat focaccia in the oven
Wrap baked focaccia loosely in aluminum foil and pop into a 350F oven until warmed, about 8-10 minutes.
Want to save this recipe?
Enter your email and I’ll send it to your inbox. Plus, you’ll get great new recipes from me every week!
By submitting this form, you consent to receive emails from Seasons and Suppers.
You can unsubscribe at any time.

Get the Recipe: Cast Iron Skillet Focaccia
Ingredients
Dough:
- 3 3/4 cups (500 g) bread flour or Tipo 00 flour, spooned and levelled, plus more as needed
- 1 1/2 teaspoons fine salt
- 1 teaspoon instant or Active dry yeast
- 1 2/3 cups (400 g) cold water
For the bowl:
- 3 1/2 Tablespoons (50 g) extra virgin olive oil
For the pan:
- 1 Tablespoons (30 g) extra virgin olive oil
Optional Toppings:
- Canned cherry tomatoes, drained
- Sea salt flakes
- Dried herbs, such as Basil, oregano, rosemary and/or thyme
Instructions
- Weigh out flour in a large bowl. Sprinkle Instant yeast and salt into the bowl and stir together (**If using Active Dry yeast, mix the yeast with a bit of the water that is warmed to lukewarm and let stand a few minutes before adding to the bowl). Make a well in the flour mixture and pour in the water. Stir together with a wooden spoon to form a loose dough.
- Remove the dough to a well-floured work surface, being sure to scrape the bowl clean with a bowl scraper. (Set the bowl aside to use for rising).
- With the heel of your hand, push the dough into the work surface and stretch and tear the dough for 3-4 minutes. If dough is really sticky, work in a bit more flour, as needed, but don't add to too much, as you want the dough to as moist as possible.
- Add the olive oil to the large bowl used to mix the dough initially. Place the dough into the bowl with the olive oil and spread the oil over the top of your dough. Give your dough a fold as follows – Grab the edge of the dough and pull straight up, extending to the top or slightly past the top of the bowl, then fold it over to the other side of the bowl. Turn the bowl 45 degrees and repeat 3 more times, so you've gone around the entire dough.
- Leave the dough to rest 30 minutes (there is no need to cover as it is well coated with oil and won't dry out, but you can cover with a clean kitchen towel, if you like).
- After the 30 minute rest, repeat the "fold" pattern again. Rest another 30 minutes.
- Repeat the fold again and rest a final 30 minutes. (For a total of three 30 minute rest periods).
- After the final rest, pop the bowl with the dough into the fridge for 10 minutes.
- Preheat oven to 450F (regular bake setting/not fan assisted).
- Once dough has chilled 10 minutes, add about half of the final bit of olive oil to the skillet. Slide your dough into the skillet and then add the rest of the oil on top of the dough. Massage the top oil into the surface of the dough while you gently stretch and press your fingers into the top of the dough, making dimples in the dough and stretching it to fill the skillet.
- Top with your desired toppings and leave your dough to rise for 30 minutes (*Or at this point you can cover and refrigerate the skillet for up to six hours).
- Bake for 20-25 minutes, or until golden brown.
- Allow to cool until just warm before slicing and serving.
Notes
More Focaccia Recipes to Love!


Hi! I’m Jennifer, a home cook schooled by trial and error and almost 40 years of getting dinner on the table! I love to share my favourite recipes, both old and new, together with lots of tips and tricks to hopefully help make your home cooking enjoyable, stress-free, rewarding and of course, delicious!
May I assume it is a 10″ or 12″ Cast Iron Skillet?
Hi Gwen, my skillet is a 10”.