
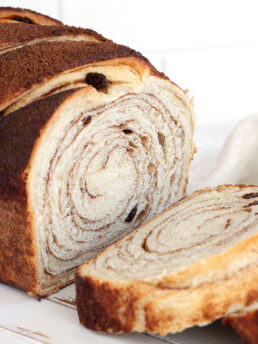
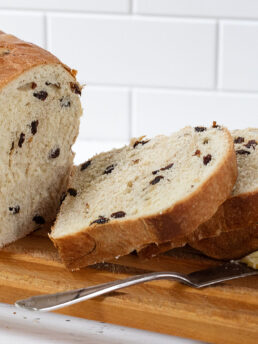
A delicious Brie-topped cranberry raisin bread is honey-sweetened, with a pinch of spice, a touch of orange and Brie cheese placed on the top of the loaf before baking. This yeast bread is perfect for toasting and especially nice with leftover turkey sandwiches, so it’s a fabulous bread to enjoy for Thanksgiving or Christmas.

A local bakery makes a delicious honey raisin bread and a very popular cranberry Brie bread. I love them both, so I thought I’d try my hand at a bread that was a mash-up of the two, with raisins and dried cranberries in a honey-sweetened bread. A bit of Brie cheese is placed on the top before baking.
This is a great bread to enjoy any time of year, but it’s especially nice around the holidays when a bit of extra Brie cheese is likely to be on hand. It’s great toasted to enjoy on the cooler, leisurely mornings and is great for sandwiches too (especially turkey sandwiches!).
If you enjoy Brie and bread, you might want to try my Mini Brie Focaccia!
Ingredients and substitutions
A few notes about the key ingredients …
All-purpose flour – All-purpose flour works perfectly for this bread so is recommended.
Yeast – I love to use instant yeast, but you can use active dry yeast for this loaf as well.
Raisins – I used Thompson raisins here, but any raisin or sultanas will work fine here.
Honey – You can use white sugar in place of honey.
Dried cranberries – Any dried cranberry is fine. I have used standard sweetened dried cranberries.
Brie cheese – I like to remove most of the rind from the Brie. I sometimes leave the bottom rind, but make sure that the rind part is down when placed on the bread.
How to make cranberry raisin Brie bread
This is a visual summary of the steps to make this bread. Always refer to the Recipe Card below for complete ingredients listing and instructions when making the bread.
At a glance … Mix the dough, rise, shape, rise again, top with Brie cheese before baking.


- Mix the dough. It will be very moist and sticky looking in the bowl, but don’t add additional flour. You will only need a bit of flour on the counter to bring the dough to a kneadable consistency.
- Remove the dough to a floured work surface and dust with flour. Knead the dough, adding a bit more flour only if the dough is sticking to your hands or the work surface.
- Form the dough into a ball.


- Place the dough into a greased bowl or large measuring cup. Cover and let rise until doubled, about 60-75 minutes in a 72F kitchen.
- Remove the risen dough to a work surface and gently deflate.
- Press the dough into an 8×16″ rectangle, with the short side closest to you. Scatter the cranberries over the bottom 10″ of the dough (leaving the top 6″ empty). Press them into the dough a bit.


- Roll the dough up jelly-roll style, but stop rolling when you get to the empty dough.
- Use a knife or bench scraper to cut the eight 1″ strips, leaving the dough attached near the rolled part.
- Finish rolling up the dough and pinch together the seam. Flip so the seam is on the bottom.


- Place the pieces of Brie cheese in the grooves created from the sliced pieces, placing 7 pieces of Brie on top.
- Place the loaf into a greased 9×5-inch loaf pan and let rise until it crests the top of the pan, about 1 hour.
- Brush the top of the loaf with an egg wash before baking.
Recipe tips!
- Be sure to plump both the raisins and dried cranberries. I find that if un-plumped, they can rob the dough of moisture instead, leading to a drier loaf.
- The dough will look really sticky in the mixer, but resist the urge to keep adding flour. Remove the dough to a floured work surface, and you’ll be surprised by how little flour is needed to bring it to a kneadable dough.
- This bread is a fast riser. Keep a regular eye on it as it rises.
- Place the loaf pan on a baking sheet just in case any of the cheese bubbles over as it bakes.

Making ahead, storing and freezing
This bread is nicest on the day it is baked, but keeps quite well stored in an airtight container for another 2-3 days.
This bread will freeze beautifully. Wrap well and freeze for up to 3 months. Thaw at room temperature still wrapped.
If you have some ends of the loaf that are past prime, cube it up and make a bread pudding with it. You can also just freeze the cubes and make the bread pudding at a later time.
Want to save this recipe?
Enter your email and I’ll send it to your inbox. Plus, you’ll get great new recipes from me every week!
By submitting this form, you consent to receive emails from Seasons and Suppers.
You can unsubscribe at any time.

Get the Recipe: Cranberry Raisin Brie Bread
Ingredients
Raisin mixture:
- 2/3 cup (80 g) Thompson raisins, or any type of raisin
- 1/3 cup + 1 teaspoon (100 g) hot water
Dough:
- 3 cups + 3 Tablespoons (400 g) all-purpose flour, spooned and levelled
- 2 1/4 teaspoons Instant yeast, *see Note 1 below if using Active Dry yeast
- 1 teaspoon fine salt
- 1/2 teaspoon cinnamon
- 1/4 teaspoon nutmeg
- 3/4 cup (180 g) lukewarm water, about 105F
- 3 Tablespoons honey, or white sugar
- 1 teaspoon orange zest, optional
- 4 Tablespoons butter, at room temperature
Cranberries:
- 1/3 cup (50 g) dried cranberries
- hot water, to soak cranberries
Brie cheese:
- 3 1/2 oz (100 g) Brie cheese
Egg wash:
- 1 large egg
- 1/2 tablespoon water
Sugar glaze after baking (optional):
- 2 Tablespoons white granulated sugar
- 2 Tablespoons water
Instructions
- Tip! This recipe was developed using gram measurements, so I highly recommend using a kitchen scale to weigh out the ingredients, for best accuracy. If you don't have a scale, be sure to spoon and level the flour when measuring.
- 1 Hour before starting the bread, set the raisins to soak in the hot water. Let soak for 1 hour. Don't drain!
- Tip! This is not a complicated bread, but it can sometimes be difficult to visualize the process from the written words. I highly recommend having a look at the step-by-step photos above this Recipe Card before starting this bread so you have a sense of the process. Reading through the entire recipe instructions before starting is also helpful.
- In the bowl of a stand mixer fitted with the kneading hook, add the flour, Instant yeast, salt, cinnamon and nutmeg. Mix briefly to combine. Add the soaked raisins together with any soaking liquid, the water, honey and orange zest, if using. Mix together until a shaggy dough forms. With the mixer running on Speed 2, begin adding the butter in small pieces and mix until the butter is incorporated. Continue kneading the dough at speed 2 for 10 minutes. The dough will be moist and sticky when done, but don't add additional flour to the bowl.
- Use a bowl scraper to remove the dough to a floured work surface and dust the top of the dough with a bit of flour. Gently begin kneading the dough, adding additional flour only if the dough is sticking to your hands or the work surface. Knead for 2 minutes, then form the dough into a ball.
- Spray a bowl or large measuring cup with cooking spray. Place the dough ball into the bowl top-side down, then flip it over so the top is facing up (it will have picked up the oil from the bottom of the bowl that will keep it from drying out). Cover the bowl tightly with plastic wrap and let stand at room temperature to rise until doubled, about 60-75 minutes in a 72F kitchen.
- Tip! Dough rising time can vary from kitchen to kitchen, so always keep an eye on the progress regularly. You want the dough to double, but no more than double, however long that takes. It may take more or less time in your kitchen.
- About 10-15 minutes before the dough has risen, set the dried cranberries into a bowl and cover with hot water. Let stand until the dough has finished rising, then drain the cranberries, pat dry a bit with a paper towel and set aside.
- Prepare the Brie cheese by cutting a round of Brie in half horizontally into two thinner rounds. Working with one round, cut slices about 1/2-inch wide. Remove the rind from the ends, but you can leave the rind on the bottom if you like. Trim the slices to be about 4-inches long, if needed. You'll need 7 slices of Brie 1/2-inch wide and 4" long. Set aside.
- Tip! If you're not clear on the shaping instructions, refer to the step-by-step photos above this recipe card for a visual of this process.
- Remove the dough to a floured work surface and gently deflate. Press the dough into a rectangle 8-inches wide and 16-inches long, with the short side closest to you. Scatter the drained cranberries over the bottom 10-inches of the dough and press into the dough a bit with the palm of your hand.
- Start rolling up the dough, starting from the end closest to you, but stop rolling when you get to the part of the dough that doesn't have cranberries. Using a knife or bench scraper, cut the empty end of the dough into eight 1-inch wide slices, leaving the dough attached nearest the rolled dough. Finish rolling up the loaf and pinch the seam together. Flip the loaf so the seam-side is down.
- Place one slice of Brie with the rind side down in the sliced grooves on the top of the loaf, placing 7 slices of Brie on top of the loaf. Spray a 9×5-inch loaf pan with cooking spray and place the loaf into the pan. Spray a piece of plastic wrap with cooking spray and place over the pan with the sprayed side down towards the loaf. Set the loaf pan on top of a baking sheet and allow the loaf to rise until it crests the pan by about 1/2-inch or so in the centre of the pan, about 1 hour.
- Preheat the oven to 375F (non-convection/not fan-assisted) with the rack in the middle of the oven.
- When the loaf has risen, remove the plastic wrap. Beat together the egg and water and brush the egg wash over the top of the loaf. Be sure to place the loaf pan on top of a baking sheet to catch any bubble-overs from the cheese melting.
- Bake the loaf in the preheated oven for 40-50 minutes, or until deep golden and the internal temperature of the loaf reaches 195F. (My loaves are usually about 45 minutes).
- Remove the loaf from the oven. If you'd like to add a sugar wash to the finished loaf, just before the loaf is done, stir together the water and white sugar in a small bowl. Microwave until boiling (or you can do this in a small saucepan). Brush the loaf with the sugar wash as soon as it comes out of the oven before removing it from the pan. This will give the loaf a lovely shiny finish with just a touch of sweetness.
- Remove the loaf from the pan to a wire cooling rack to cool at least 30 minutes before slicing.
- Store the cooled loaf in an airtight bag or container at room temperature for about 3 days. This bread can also be frozen for up to 3 months. Any leftover, stale bread makes a great bread pudding!
Notes
More bread recipes to love!
Hi! I’m Jennifer, a home cook schooled by trial and error and almost 40 years of getting dinner on the table! I love to share my favourite recipes, both old and new, together with lots of tips and tricks to hopefully help make your home cooking enjoyable, stress-free, rewarding and of course, delicious!
Jennifer, I haven’t tried the recipe yet, but it sounds like a good one for Christmas morning.
I loved that you suggest reading the directions all the way through would be helpful. That’s not usually how I roll, but I am glad that I took a good look at them. Not hard but a lot of necessary steps.
Merry Christmas and Salude!
Hi Mike and yes, it would be perfect at Christmas. And yes, I write recipes and I’m guilty of not always reading through a recipe ahead. That said, I always hate surprises in the middle of the process that have me scrambling :) Merry Christmas to you, as well!