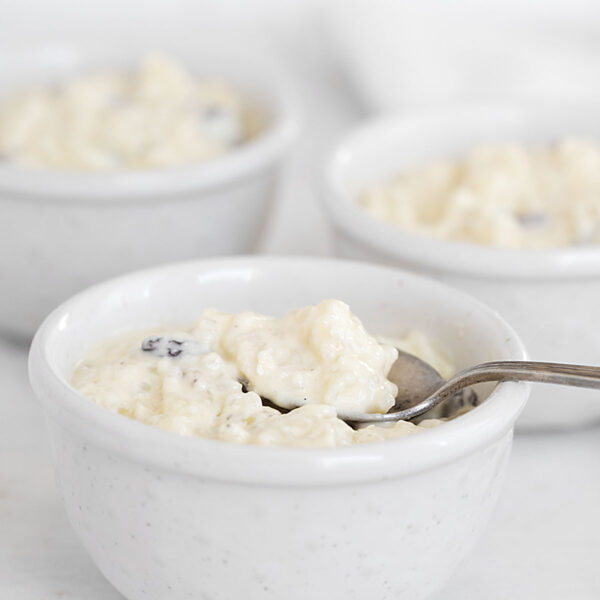
Looking for a creamy rice pudding recipe? This is the rice pudding I have been making for years. It’s a stovetop rice pudding recipe and starts with uncooked rice. It isn’t the quickest to make, but trust me, it’s well worth the bit of extra time!
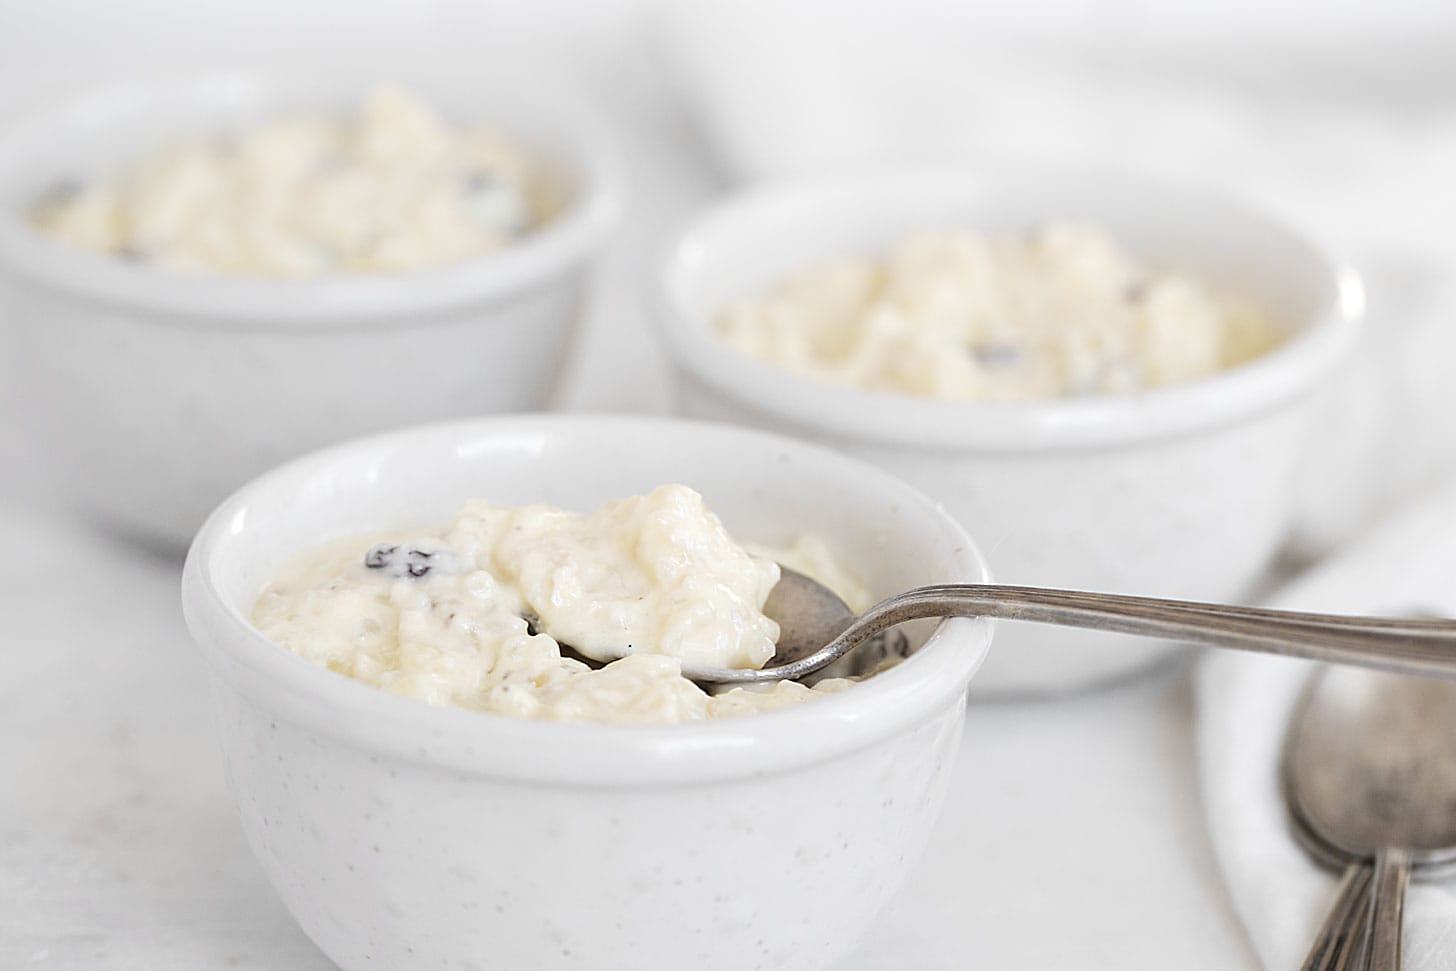
I have been making this stove-top rice pudding for decades! It’s easily my favourite rice pudding recipe. And while it takes a little more time than some other rice pudding recipes, it produces the creamiest and most delicious rice pudding.
If you are looking for the best rice pudding, trust me when I say it’s worth it! And don’t just take my word for it …
Featured reviews
This is, without a doubt, the BEST stovetop rice pudding recipe I have ever tried. I’ve tried several and was always disappointed with the results. Yours is the creamiest and best! Just the right amount of sugar – sweet, but not too sweet. Easy to make as well. Thanks for sharing this recipe, which will be one of my favourites from now on.- Rick
Made this rice pudding recipe for a dear friend who always orders rice pudding if it’s on the menu. She said it is the best rice pudding she has ever tasted. Thanks so much! – Glenda
Ingredients and substitutions
A few notes about the key ingredients …
Rice – This rice pudding is made with uncooked rice. Classic, old-fashioned rice pudding is typically made with converted long-grain rice, such as Uncle Ben’s™, and you certainly can’t go wrong with long-grain rice. That said, I am a fan of using Arborio rice for rice pudding. I love the plump grains of rice, and it cooks up wonderfully in the milk.
Basmati and Jasmine are also long-grain rice, which would be an option. I don’t recommend short-grain or quick-cooking rice for rice pudding, as it tends to result in a mushy pudding with this long-simmering recipe.
Milk – Whole, full-fat 3.5% b.f. milk is best for rice pudding. You can use 2%, if that’s all you have, though the resulting pudding won’t be quite as creamy. I wouldn’t use milk less than 2%, for best results.
Cream – The addition of heavy whipping cream (35% b.f.) contributes both to the creamy flavour of the pudding and to the thickening process. I do recommend using the heavy cream. You may be able to use a lighter cream in a pinch, such as Half & Half 10% cream, but I haven’t tested it myself. I suspect it may result in a looser pudding to some extent.
Eggs – The eggs in this recipe play a critical part in thickening the custard, so should not be omitted.
White Granulated Sugar – The sugar is added simply for sweetness, so you can adjust the amount to your personal taste. I always suggest making the recipe as written first, then tweaking it after that to your taste.
While I haven’t tested it myself, I believe other/alternate sweeteners would work here, but I do suggest sticking with granulated sweeteners if possible (vs liquid), to avoid thinning the pudding too much.
Raisins – Adding raisins is totally optional. Add them if you love them or skip if you don’t.
How to make this creamy rice pudding recipe
This is a visual summary of the steps to make this rice pudding. Always refer to the Recipe Card below for complete instructions when making this recipe.
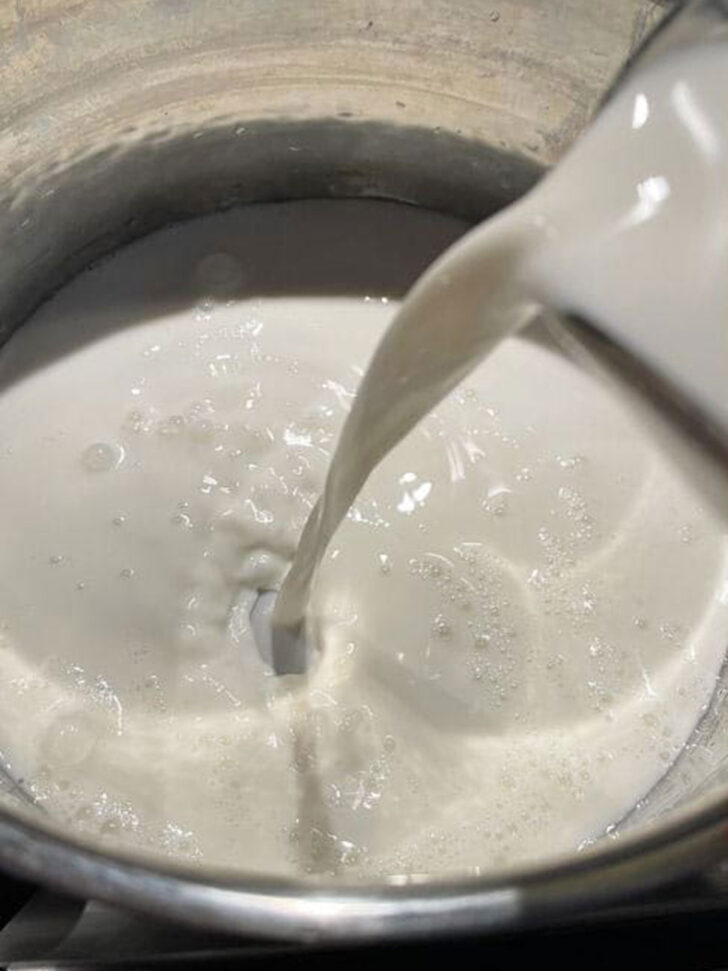
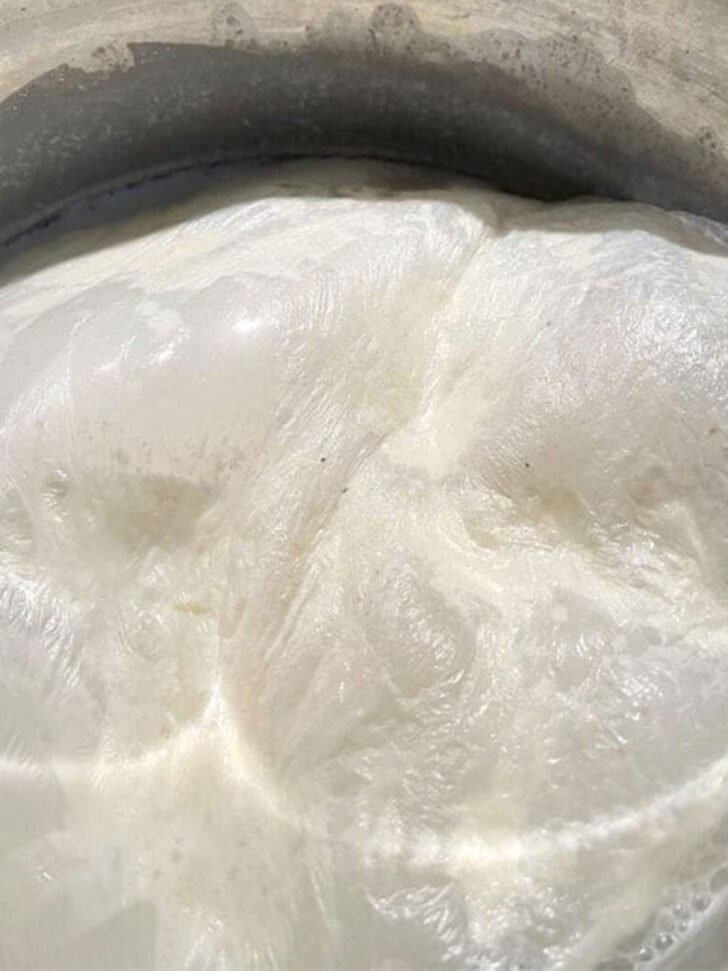
- To start the rice pudding, add the milk to a large pot and bring to a boil over medium heat. Watch it closely! When milk hits the boil it can boil up and over the edge of the pot, which is never a good thing.
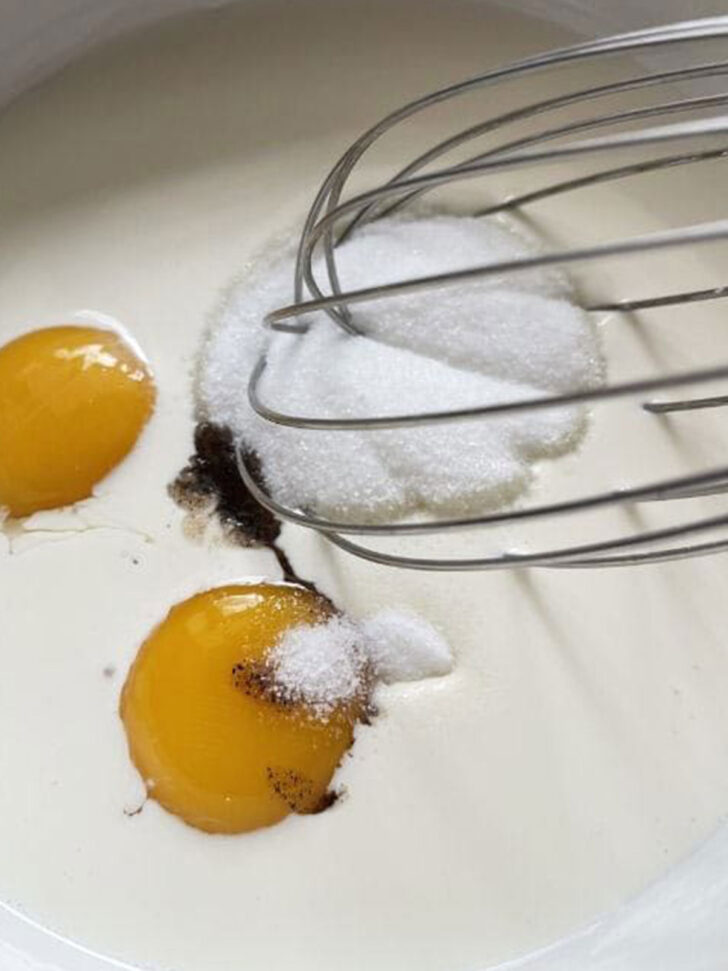
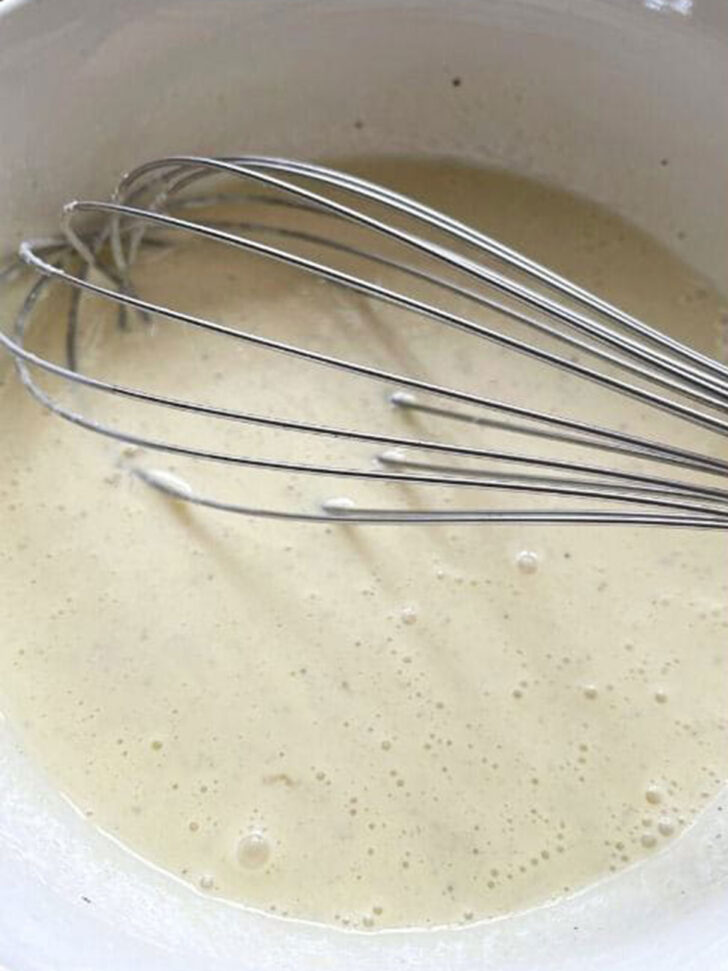
- While the milk is heating, whisk together the eggs, heavy cream, vanilla and sugar in a small bowl. This will give it a chance to come to room temperature while the rice cooks.
- Whisk the egg mixture until mice and smooth. Set aside for now.


- When the milk comes to a boil, stir in the rice, then reduce the temperature under the pot to about medium-low, or whatever setting on your stovetop will maintain a gentle simmer.
- Allow the rice and milk to simmer, stirring down the pudding every 10 minutes for the first 30 minutes of cooking.
- The milk will form a skin on top as it simmers. Just stir it back into the pudding.

- After 30 minutes of cooking, you’ll need to check and stir the pudding every 5 minutes.
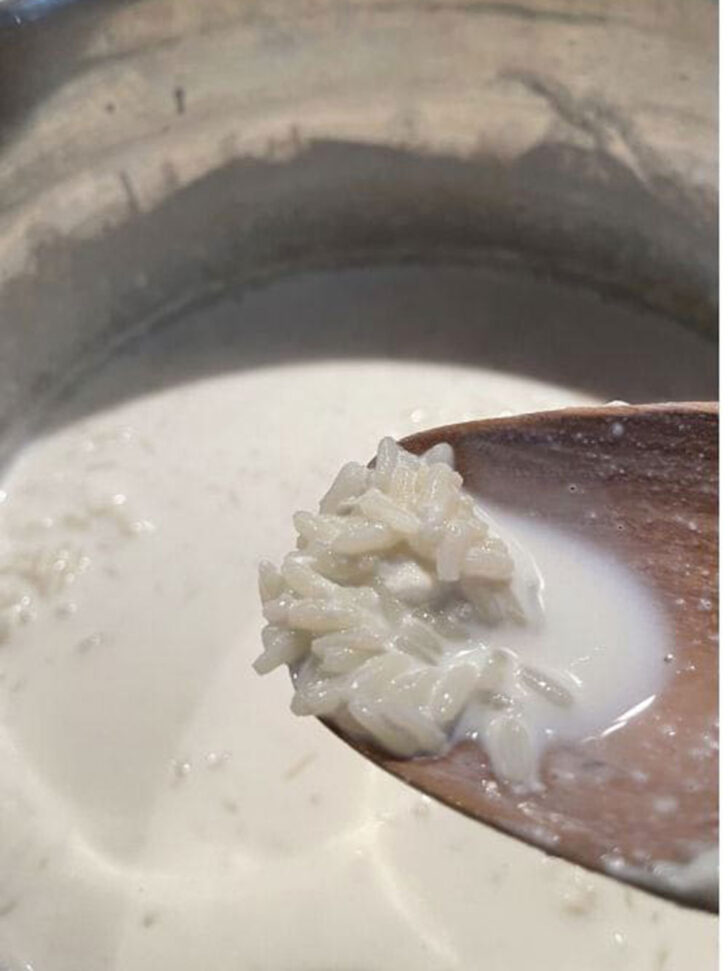
- Stir down the pudding and continue cooking until the rice is tender.
- Taste test the rice to see if it is tender. You don’t want any hard bite to it at all, so continue simmering until it is tender. If the liquid is greatly reduced and the rice isn’t yet tender, add a bit more hot milk to the pot, as needed, to avoid scorching the rice.


- Once the rice is tender, slide the pot off the heat (to avoid scorching the rice) and slowly add a couple ladles off the hot rice/milk mixture to the egg mixture. You need to do this very slowly, a drop at a time, so you slowly bring the egg mixture up to the temperature of the rice mixture. If you add too much hot liquid at once, the eggs will cook an become a bit like scrambled eggs, which is definitely not what we want. Once you’ve added two ladles of hot rice mixture to the egg mixture. Add the egg mixture into the pot with the rice.
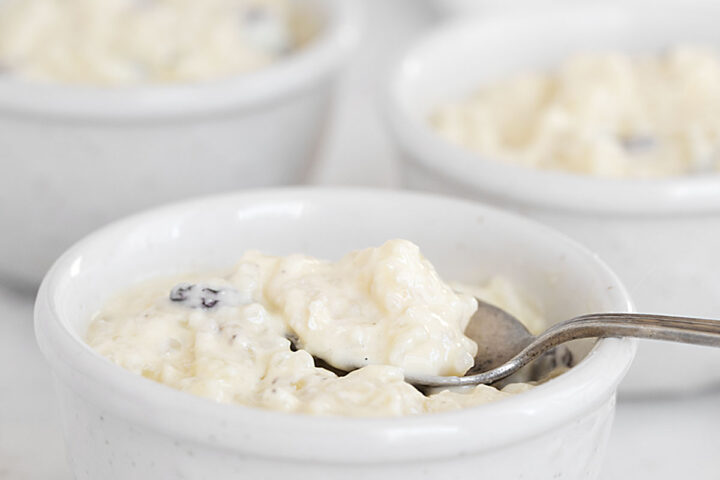
- Return the pudding to the heat over medium heat. Cook, stirring constantly, until the mixture just breaks a bubble on the surface, then remove the pudding to a bowl. Cover and refrigerate the rice pudding for at least 6 hours. The pudding will thicken further as it refrigerates.
Recipe Video
Recipe tips!
There are a few places where this recipe can go wrong, so I thought I’d point them out, since I’ve done all of them at one point or another :)
- Not watching the pot as your milk comes to a boil at the start of cooking, and having it boil up and all over your stove. Use a large pot and watch very closely as it nears the boil (starts steaming), to avoid that mess.
- Simmering the milk/rice mixture too vigorously and not stirring it down regularly. Either can result in rice scorching on the bottom of the pan or the mixture drying out before the rice has a chance to cook. Keep the mixture at a gentle, just-barely simmer and stir it down regularly. I like to set the timer on my stove in 10/5-minute increments, to remind me, so I can’t forget about it cooking on the stove.
- Adding too much hot liquid to your egg mixture too quickly. You need to bring the temperature of the egg mixture up very slowly (called “tempering”), so that the eggs don’t cook/curdle. Add a drop at a time (really!) at first and whisk continuously while adding. You can increase to a slow stream as you go along, but keep whisking and don’t rush it.
- Not cooking the pudding long enough after you add the egg mixture, resulting in a soupy finished pudding. It can be hard to tell the first time you make it, when your custard has cooked long enough. It helps to know what you’re aiming for. It won’t look like the finished pudding in the photos. It will get there once it’s refrigerated and set, but off the stove, it should look much more saucy. BUT, the sauce part should be creamy and noticeably thickened – not thin like milk. My method is when the pudding nears the boil (lots of steam rising from the mixture), I will stop stirring for a 10-15 seconds, to see if any bubbles rise in the middle. If not, I keep cooking, stirring for another minute or so, then I stop again, to see if any bubbles rise. Once I see a bubble rise, I keep cooking, stirring, for only about 30-60 seconds more, then remove and pour into serving bowl.
- Letting the liquid in the pot get too low. As rice absorbs liquid differently, you may find that the milk mostly disappears before your rice is cooked. If the mixture gets too dry, it may scorch on the bottom of the pan. Don’t hesitate to add more milk or water to the pot towards the end of cooking, to make sure the liquid is sufficient to suspend the rice off the bottom. For best results, add hot milk or hot water to prevent cooling down the mixture too much.
Troubleshooting
If your pudding doesn’t thicken properly, it wasn’t cooked quite long enough after adding the egg mixture. You want to cook it until a bubble breaks the surface of the pudding. You can rescue it by pouring it back into a saucepan, heating it, then stirring in a bit of cornstarch mixed with cold water, a bit at a time, until the pudding thickens as needed. Re-refrigerate.
If the pudding is too thick after refrigerating, loosen it by stirring in a splash of milk or cream.

Storing and freezing rice pudding
Rice pudding will keep nicely in the fridge for 3-4 days. If it becomes too thick, simply stir in a tablespoon or two of heavy cream to loosen.
Yes, you can. Rice pudding will keep well frozen for up to 3 months. Thaw in the refrigerator.
Want to save this recipe?
Enter your email and I’ll send it to your inbox. Plus, you’ll get great new recipes from me every week!
By submitting this form, you consent to receive emails from Seasons and Suppers.
You can unsubscribe at any time.
Get the Recipe: Extra Creamy Rice Pudding
Ingredients
- 4 cups (960 ml) whole milk, (3.5% b.f.), plus up to 1 cup more, as needed
- 1/2 cup (120 ml) uncooked long-grain white rice or Arborio rice, *or see Note 1 below for other rice options
- 2/3 cup (160 ml) heavy whipping cream, 35% b.f.
- 1/3 cup (65 g) white granulated sugar, *see Note 2 below
- 2 large egg yolks
- 1 1/2 teaspoons pure vanilla extract or vanilla bean paste
- 1/8 teaspoon salt
- 1/2 cup (120 ml) raisins, optional
Instructions
- Rinse a large pot with cold water. Don't dry it. Set the pot onto the stove-top over medium heat. Add the milk. Heat the milk to a boil over medium heat, stirring regularly. WATCH CLOSELY as it nears the boil! When milk hits the boil, it will boil up and possibly overflow. That's not a good thing.
- While the milk is heating, use a medium-sized bowl to whisk together the cream, sugar, yolks, vanilla and salt. Set aside on the counter, leaving the fork in the bowl. Set out a ladle to use, as well. I like to do this early so that the egg mixture comes to room temperature.
- Once the milk boils, stir in the rice and keep stirring until the mixture returns to the boil. Reduce heat to a shade higher than low, or whatever level on your stove allows the mixture to gently simmer (bubble breaking the surface but not too vigorously). Simmer for 30 minutes, stirring down the mixture every 10 minutes (Important that you stir it down regularly and ensure that there is no rice sticking to the bottom of the pan. You will notice that the mixture has probably formed a skin on top. Don't remove it. Just stir it back in.)
- Tip! Depending on the type of rice you used, your mixture may start to get thick at this point, with little milky liquid left. If so, you'll need to add more hot milk or water to the pot, adding just as much as needed to loosen the mixture up and ensure that the rice is suspended in liquid and not sitting on the bottom of the pan, where it might scorch.
- Once milk/rice has simmered for 30 minutes, continue simmering, but stir down the mixture every 5 minutes. With each stir, start testing the doneness of the rice by tasting a piece. You want the rice to be tender (so no hard center). Continue cooking, stirring down and adding additional milk, as needed until the rice is tender. Most rice is generally done at about 45-50 minutes of total simmering time. A lot will depend on how vigorously your mixture is boiling, so there is no hard and fast rule. Taste testing is the best indicator.
- Once the rice is cooked, slide the pot off the heat to avoid scorching the rice. Re-whisk your egg mixture with the fork. Using the ladle, spoon out a ladle-full of the hot rice/milk mixture, taking as much liquid as possible, but don't worry if you bring some of the rice with it. With the ladle in your left hand (assuming you're right-handed, if not, reverse) and using your right hand to start whisking the egg mixture with the fork, start adding the hot mixture to the eggs A DROP AT A TIME, at first, while continuously whisking with the fork. Increase to a slow stream, while whisking continuously, until the entire ladle-full has been added. Get another ladle-full of hot liquid and slowly add it to the egg mixture as well, whisking continuously. Keep adding hot liquid until you've got at least 1 1/2 cups- 1 3/4 cups of warmed liquid in your bowl. Once you have reached that point, pour the warmed egg mixture into your cooking pot.
- Tip! You never want to allow the mixture to vigorously boil after the egg mixture has been added, as you may end up with scrambled eggs.
- Return the pot to the heat, over medium-low heat. Cook, stirring almost continuously, just until a dime-sized bubble breaks the surface of the pudding. The pudding should be noticeably thickened and saucy, but still more saucy than a finished rice (the pudding will set more in the fridge as it cools). If the liquid seems almost like milk consistency (rather than heavy cream consistency), it's too thin. Cook just a wee bit longer.
- If using raisins, scatter them onto the bottom of a medium-large bowl. When the pudding is cooked, immediately pour the hot mixture over the raisins. Stir well to combine. Allow the pudding to stand on the counter for about 5 minutes to allow the steam to reduce, then cover the bowl with plastic wrap and place it in the refrigerator. Allow the pudding to cool and set in the refrigerator for at least 6 hours before serving. The pudding will set as it cools.
- To serve, simply stir and spoon into bowls. Serve with a sprinkling of cinnamon, if desired. If the pudding is or becomes too thick, simply add a tablespoon or so of heavy cream to the pudding and stir in.
- Store rice pudding in the refrigerator for up to 3 days. You can also freeze rice pudding for up to 3 months.
Notes
More pudding recipes to love!


Hi! I’m Jennifer, a home cook schooled by trial and error and almost 40 years of getting dinner on the table! I love to share my favourite recipes, both old and new, together with lots of tips and tricks to hopefully help make your home cooking enjoyable, stress free, rewarding and of course, delicious!
Oh my GOODNESS…….BEST rice pudding ever. Followed your recipe to the T. Thank you so much.
So glad to hear, Sandra! Thanks so much :)
Making this recipe again tonight, the first batch didn’t last very long! Even with just 1% milk it was amazing and this time I’m using half whole, half 1%milk (making a double batch and forgot to get enough!). Not sure I want to share any this time either! :P
I hear you! I have a hard time sharing this, too :) So glad you are enjoying it Sammi.
Excellent rice pudding. To kick it up a notch I added the zest of half a lemon. I also soak the raisins in rum and boiling water for 1/2 hour before adding.
Thanks Andy! Sounds delicious :)
Love the flavour. We like ours a little thicker so I added a table more rice and a table spoon of birds eye custard. Still wonderfully creamy and doesn’t change the taste.
Thanks so much, Theresa :) So glad you enjoyed it!
Is it really only 1/2 cup of rice for 4 cups of milk? It doesn’t seem as though it’s enough rice.
Cheers
It really is :) I know it seems like not nearly enough rice for that much milk, but I promise it is. It is just right. Enjoy!
My mother is Portuguese and makes the best rice pudding, but I have to say, this rivals hers. In fact, I find your recipe creamier! Thanks for the delicious recipe. It is fast becoming a family favourite.
So glad you are enjoying it, Martha! Thanks so much :)
Thanks – I just finished cooking it and it tastes wonderful !! It is cooling in the refrigerator. I followed everything exactly and I don’t need to change anything -in this recipe. Finally – I found a good rice pudding recipe . . .Thanks again.
Wonderful Recipe.
I have been looking for a true creamy rice pudding for years!
I did have to add more milk, as i believe i didn’t boil it in the beginning as you suggested.
After an over night in the fridge, its decadent!
I have to stop myself before eating it all before tonight’s dinner :)
Thank you.
So glad you enjoyed it! Thanks so much :)
Do you cook the rice uncovered or did you put a lid on it?? I am going to make this today and it looks so yummy.
Hi Martha, You’ll want to cook it uncovered the whole time. Enjoy :)
Thanks – I just finished cooking it and it tastes wonderful !! It is cooling in the refrigerator. Finally – I found a good rice pudding recipe . . .Thanks again.
So glad to hear, Martha! Thanks :)
I’ve been looking for a good Rice Pudding recipe for a while and found it…this is absolutely the best. I use half &half cream and when using Raisins cut the sugar by half. Arborio rice works so well for this recipe .Also I’ve made it using fresh ground Cardamon instead of Vanilla and that’s really fabulous too. Thanks you for this.
So glad you enjoyed it, Karen :) Thanks!
I have made this pudding twice. Followed the directions to a T. It is the most delicious rice pudding I have ever had. Better than ice cream! Only thing I changed, was I used Half ‘n Half instead of whole milk and short grain rice.
So glad you are enjoying it, Ruth! Thanks so much :)
Bomb.COM!! Damn this was delicious. Was disappointed to see that it didn’t make that much in the end. Lol will definitely double the recipe for next time. Thank you!!
So glad you enjoyed it, Kara! Thanks :)
Spectacular!!!!!!!!!! Would not change a thing!
So glad you enjoyed it, Pat! Thanks :)
Jennifer
I made this with Jasmin rice added 2 tbs.butter and it was fantastic.
Thank you for the tips for success.
KGL
So glad you enjoyed it, Ken! Thanks :)
Love, love love this creamy rice pudding it is a keeper!!!
So glad to hear, Yvette! Thanks :)
This is seriously the best, so creamy and so flavorful. I’ve made it in double batches and it’s a major hit! Thank you!
Thanks so much, Esther! So glad you enjoyed it :)
I made this rice pudding as part of a feel-good, comfort food meal I was making for a friend, post surgery. I followed the recipe to a T (but did add dried apricots w/the raisins). It came out sooo delicious! She thought it was a recipe from my grandmother ? I am lactose intolerant and wondered if this can be made with soy or almond milk? Thanks for a yummy dessert!
So glad to hear! As for the soy or almond milk, I have never tried it. My gut tells me that it should technically work, though I have no idea how satisfying the end result will be in terms of texture/creaminess etc. Worth a try though :)