Perfect picnic sandwiches, these Pressed Sandwiches are great for Summer eating, whether a BBQ or a picnic. Easy to make ahead and they travel well!
Why you’ll love these pressed sandwiches
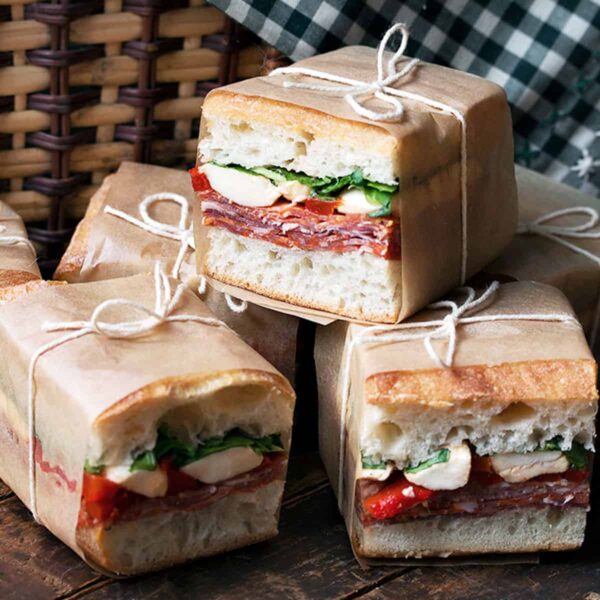
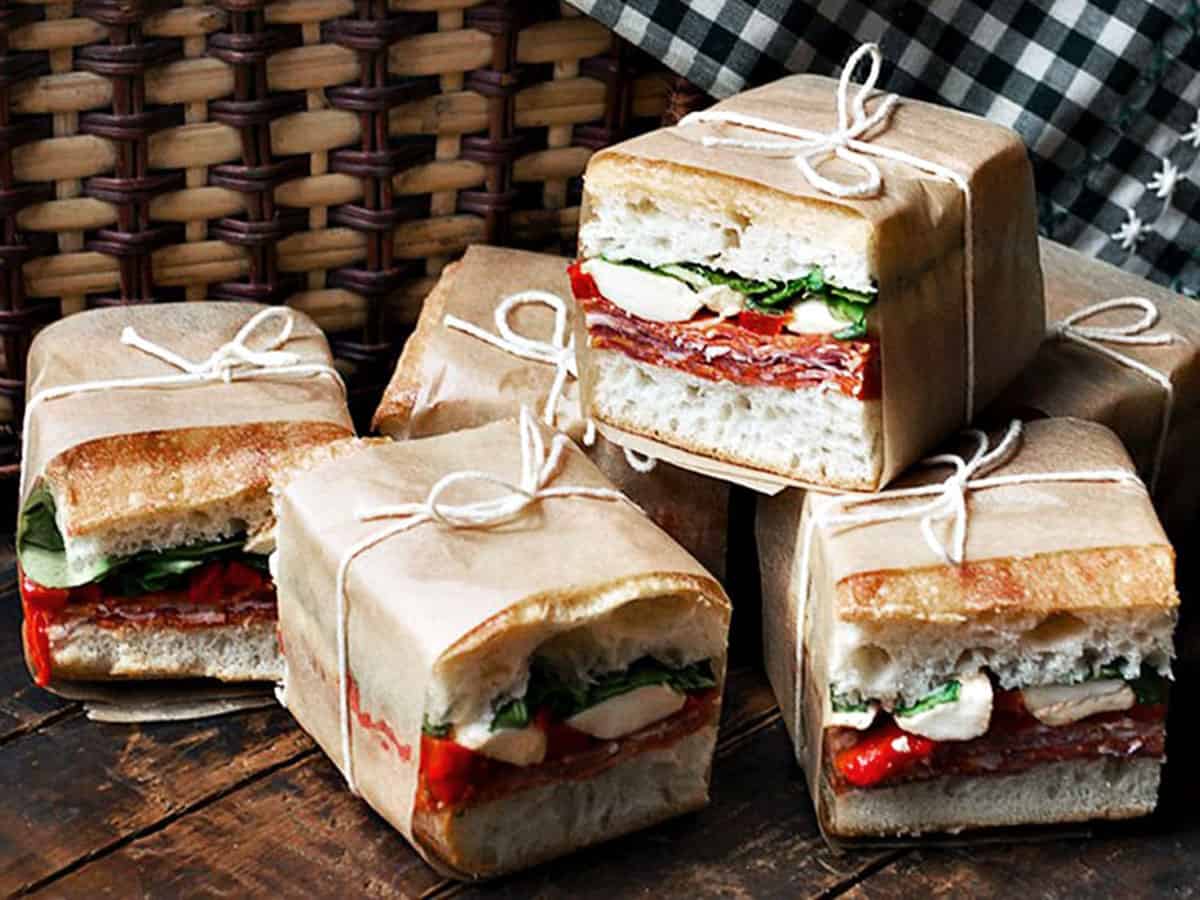
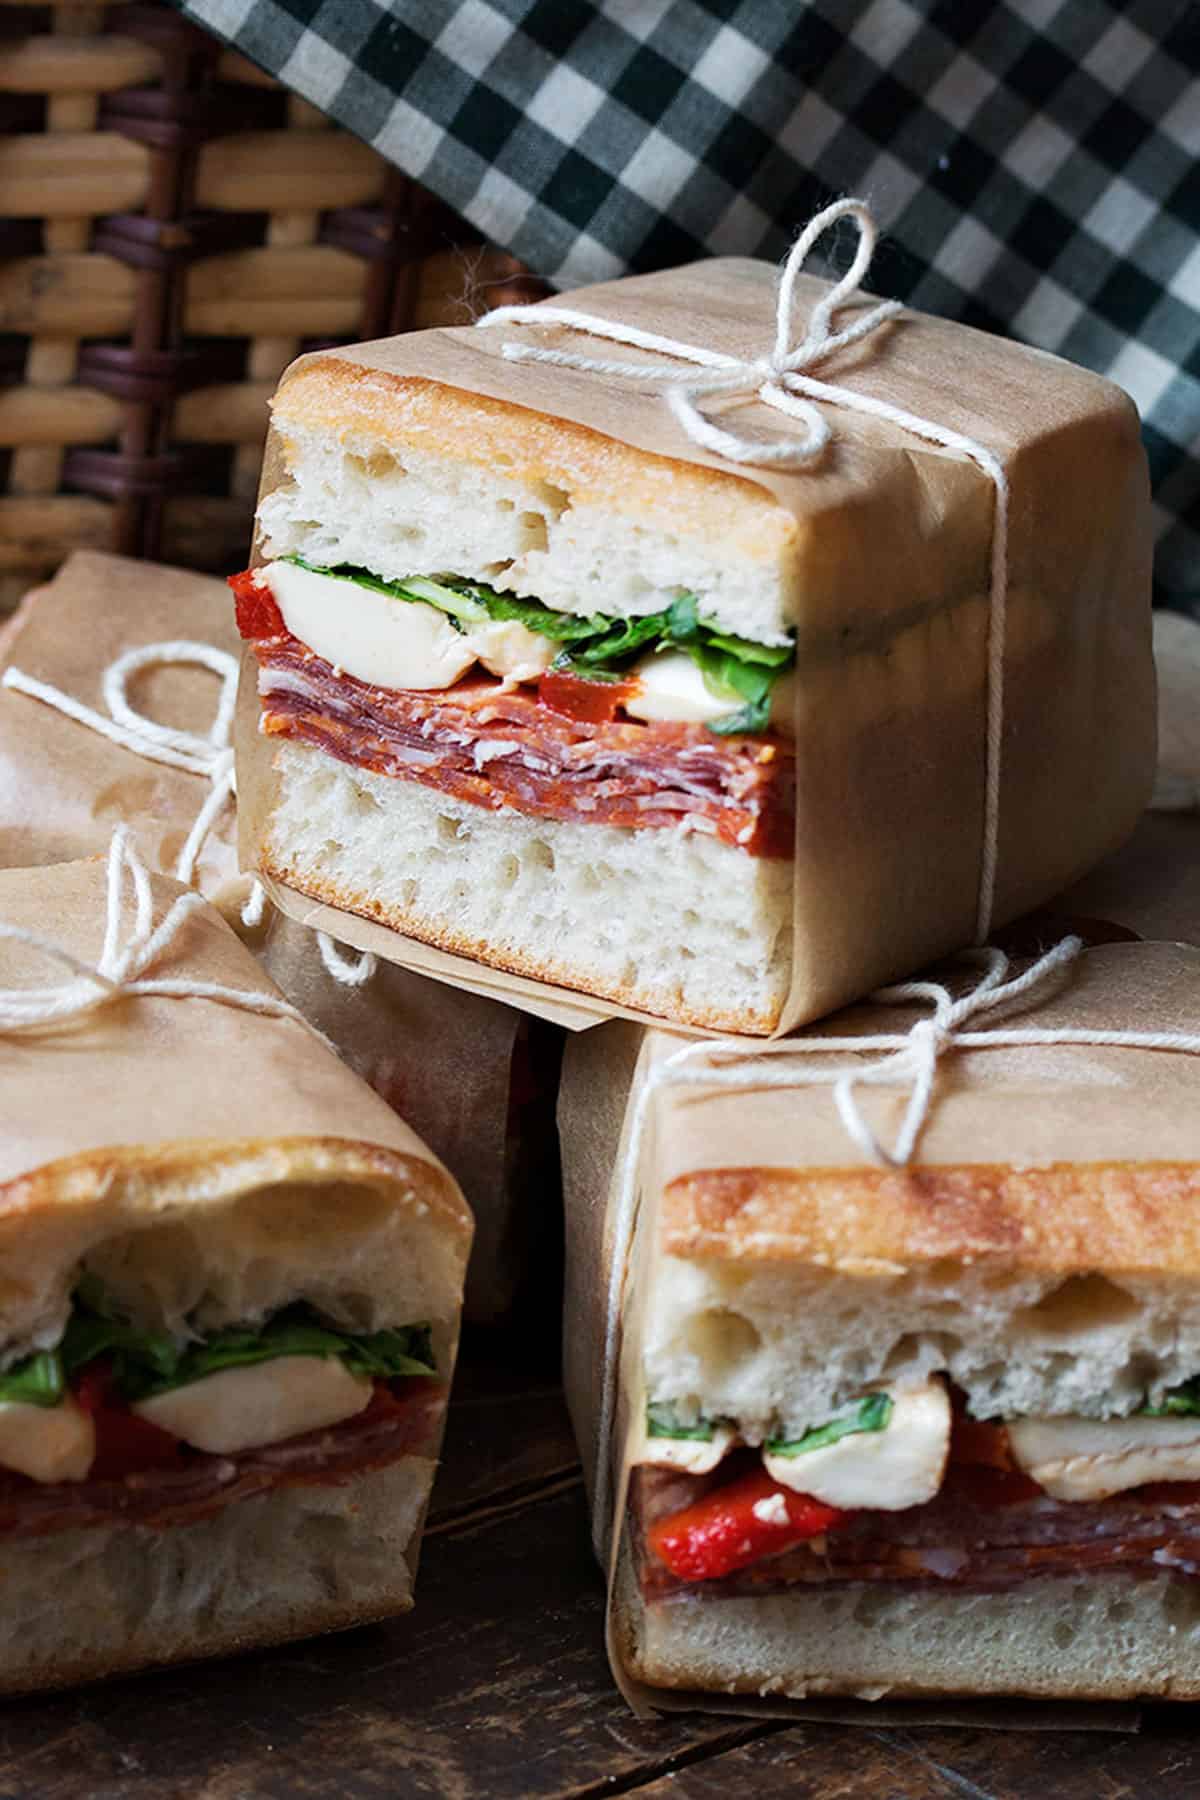
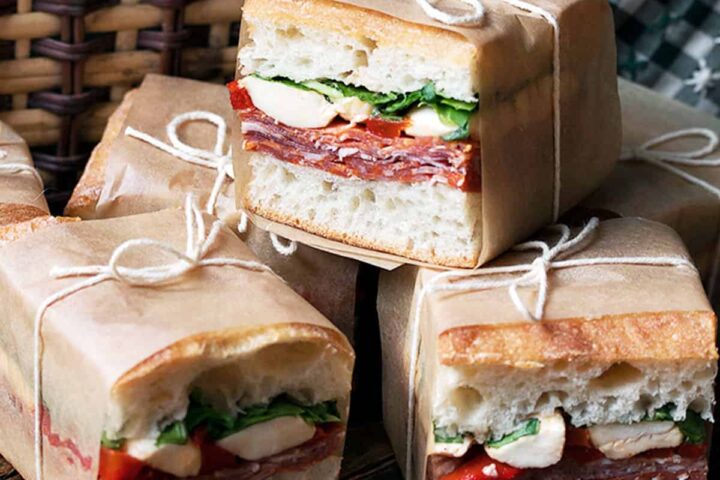
These lovely Pressed Italian Sandwiches are perfect for Summer picnics or packed lunches, as they are hearty and filling, can be made well ahead and travel well.
They are also great for Summer entertaining, as they are such pretty little packages that are easy to eat without plates. I love how all the flavours come together in this sandwich and notice how it’s red, white and green – just like the Italian flag!
Video: How to Make Pressed Italian Sandwiches
Key Ingredients
While there are endless possibilities of fillings for sandwiches, my Italian version features homemade roasted red peppers, a variety of Italian deli meats, bocconcini (with a little balsamic drizzle) and arugula, all on a lovely ciabatta bun.
How to store these Italian Sandwiches
These picnic sandwich will also keep really well in the fridge for several days, either before they are trimmed and cut or after. That makes them great for Summer snacking or when planning entertaining.
Cook’s Notes
- Pressed sandwiches are endlessly customizable. You can swap out spinach for the arugula, or sun-dried tomato for the roasted red pepper. And so on. The possibilities are endless.
- You can use any size ciabatta, from small buns to larger loaves. I like to start with a ciabatta baguette that I cut in half to make two 12-inch-ish loaves.
- I like to trim the edges off the sandwiches to make them neat squares and to enjoy seeing all the layers. But don’t throw away the trimmings! Chop them up and combine with some leafy greens and a drizzle of balsamic or Italian dressing for an absolutely fabulous salad.
- When it comes to adding a weight to press the sandwiches in the fridge, I use my cast-iron grill pan and the cast-iron press that came with it, topped with some cans to even out the weight. Refrigerate with the weight at least 6 hours or ideally, overnight.
- To keep the sandwich freshest, keep in the fridge, tightly wrapped in the plastic wrap and un-trimmed. When ready to serve or transport, simply trim the side and end crusts and if you like, wrap in a strip of parchment paper secured with some twine. You can then re-wrap in plastic wrap, if needed to keep them from drying out while they wait to be eaten.
- While it’s tempting to reach for a jar of roasted red peppers, I find that those packed in oil bring a little too much moisture to the pressed sandwich, making for the possibility of soggy bread. It only takes a few minutes to make your own, so I highly recommend that.
How to Serve
Once assembled, these are tightly wrapped and refrigerated with a weight on to to “press” them overnight. The next day, simply trim the sandwich loaf, cut in to small pieces and wrap with a little parchment and twine.
Want to save this recipe?
Enter your email and I'll send it to your inbox. Plus, you'll get great new recipes from me every week!
By submitting this form, you consent to receive emails from Seasons and Suppers.
You can unsubscribe at any time.
Get the Recipe: Pressed Italian Picnic Sandwiches
Ingredients
- 1 Ciabatta Baguette, cut in half to make approx. two 12-inch pieces
- 3 Tbsp butter
- 3 medium red peppers
- 3 cups arugula, rinsed and patted dry
- 2 cups bocconcini, sliced
- 10 oz Assorted Italian deli meats, (I used Soppressata Salami, Capocollo and Napoli Salami)
- Balsamic Vinegar
- Olive Oil
- Salt and Pepper, to taste
Instructions
- To roast the red peppers: Set your oven to the Broil setting. Slice the sides off the red peppers and place skin side up on a baking sheet (*I like to trim the ends so they lie as flat as possible, as they will brown better than pieces that are sloped). Place under the broiler until very well charred (blacon top, about 10 minutes (watch closely after 5 minutes. You'll want them to be mostly blackened on top.) Remove from the oven and immediately place the peppers in a plastic ziploc bag. Pop in the refrigerator for 30-40 minutes. Remove peppers from bag and peel off the blackened skin with a knife. Discard the skin and slice the peppers in to strips. Place in a bowl and drizzle with a bit of olive oil and sprinkle with salt and pepper. Set aside.
- To prepare the sandwiches: Cut your ciabatta in half and butter each piece (or you could brush with a bit of olive oil, if you prefer, but butter will help prevent moisture from getting into the bread. Place a generous layer of cold meats (4-5 over-lapping layers). Top with cooled roasted red pepper strips. Take your Bocconcini slices and place on a piece of paper towel. Top with another piece of paper towel and pat to dry a bit. Top the red peppers with a layer of the Bocconcini slices. Drizzle some balsamic vinegar over the Bocconcini slices and sprinkle with salt and pepper. Top with a generous layer of arugula. Top with top slice of ciabatta.
- Wrap each sandwich tightly with plastic wrap and place on a platter or baking sheet. When all the sandwiches are prepared, place the platter in the refrigerator. Place a heavy skillet on top of sandwiches to apply weight (if you don't have a heavy skillet, top with another baking sheet and place some large cans on top for the weight).
- Refrigerate at least 6 hours or ideally, overnight.
- When ready to serve, remove from plastic wrap. If desired, you can trim the sides and ends of the sandwiches to make neat sides and to enjoy the wonderful colours of these sandwiches.
Notes
Watch how to make it
Hi! I’m Jennifer, a home cook schooled by trial and error and almost 40 years of getting dinner on the table! I love to share my favourite recipes, both old and new, together with lots of tips and tricks to hopefully help make your home cooking enjoyable, stress free, rewarding and of course, delicious!
These are the cutest little sandwiches Jennifer! I know I’d love them. I love Italian anything and all those meats on ciabatta is making me hungry right now! Your job is done! And done well!
Thanks so much, Mary Ann!
I love those perfect squares and the video is great. I had lunch not long ago but I’d love one of these right now.They look like they’re loaded with wonderful flavor!
Thanks Chris and I’m always amazed at how well these keep in the fridge. You can enjoy these for days!
These looks amazing! Beautiful photos!
Thanks so much, Edyta :)
I’d love join in your picnic! This is a favorite sandwich of mine! Nice video, my friend!! Pinned!
Thanks so much, Annie :)
I’m ALWAYS up for a good sandwich and this one looks delish! Love the wrapping – too cute! Plus, those bocconcini? I could pop those like candy, lol!
Thanks so much, Dawn and I love those bocconcini, too!
I made it. Perfect. Thank you for recipe!!
So glad you enjoyed them, Iva :)
These sandwiches are delicious. And being able to make in advance is such a bonus. I used large ciabatta rolls from Panera Bread, and the mixed italian meats at Costco. I made two nights ahead, so was worried about putting down the roasted peppers as the first layer (I used jarred roasted peppers), so I layered meats on top and bottom. Olive oil is listed as ingredient, but only instructions were could use instead of butter. I omitted the balsamic, but drizzled with olive oil and also some pesto, then salt & pepper. Definitely load up with lots of arugula as it will smash down and not seem like a lot later. Two days later I cut them up into smaller sandwiches in the morning and wrapped the individual sandwiches with press & seal wrap. They traveled very well that way and made it easy for people to just grab one throughout the day. Will definitely be making these again. Thanks for sharing Jennifer!
So glad you enjoyed them! Thanks for letting me know :)
These look so delicious, Jennifer.
Perfect for my baby girls 1st birthday! We’re going picnic-style
Thank you
Sounds lovely, Katie. Enjoy!
Pingback: Pinspiration: Between Bread | Caravan of Style
Making these sandwiches for 300…any suggestions?? and where can I finf brown parchment paper…
Wow Carol. You are ambitious! I would go for the large ciabatta bun/loaf. My grocer sells ones that are about 8-inches by 10-inches or so. Each one can then be cut into 4 or 6 sandwiches (depending on finished size). It’s just easier to do one large loaf than 6 individual ones. The brown parchment is just unbleached. I get mine at my local health food store (or anywhere that sells “green” products like unbleached muffin liners etc.) Hope that helps and good luck!
Hi Jennifer, thank you for your reply, I am very appreciated it. I am sure your sandwich recipe will amaze my friends:). have a good weekend
Hi Jennifer. thank you for this wonderful sandwich. I am a fan of pesto, do you think I can add pesto into this sandwich? Will the bread become saggy if I add pesto? I am prepare a picnic in 2 days. 25 sandwiches….hope I can survive.
Hi Tammi, I think pesto would be great in this sandwich. I’d put it between the cheese and the arugula. That way the arugula will be a barrier between the pesto and the bread, so should be fine. Enjoy the sandwiches!
These look absolutely amazing. I love, love, love arugula and everything else you feature on this beautiful sandwich. Your newer salted chocolate brownie cookies are what brought me to your blog, and it is consistently beautiful recipes and pictures that will keep me coming back!
~Lori
Thanks so much, Lori. These were delicious sandwiches (and the cookies were pretty yummy, too). Thanks for visiting!
wow, these look yummy!
did you know these were featured in the national British newspaper the Guardian today? That’s what led me to your site!
Katie x
Hi Katie, Yes, I was thrilled and honoured to have my little sandwiches in the Guardian. (I did know ahead, as they emailed me to get permission to publish it.) Thanks though and for thanks for popping over here.
(Link to the Guardian article, for anyone interested in checking out the other goodies in the article)
Hi Jennifer,
I feel like a late bloomer but I have never heard of a pressed sandwich and I am wondering what is accomplished by pressing it. Does the texture change or flavors? I read all the comments and noone seems to question this so maybe its just me? Regardless of the reason…I love Italian sandwiches and plan on trying these. Thanks.
Hi Carm, Before I made them, I wondered the same thing. Pressing makes these sandwiches shorter of course (so easier to eat), but most importantly I think, the fillings seem to meld together, so when you eat them you don’t get any of that filling shifting that often happens with layered sandwiches. Means you get all the flavours from top to bottom with every bite.