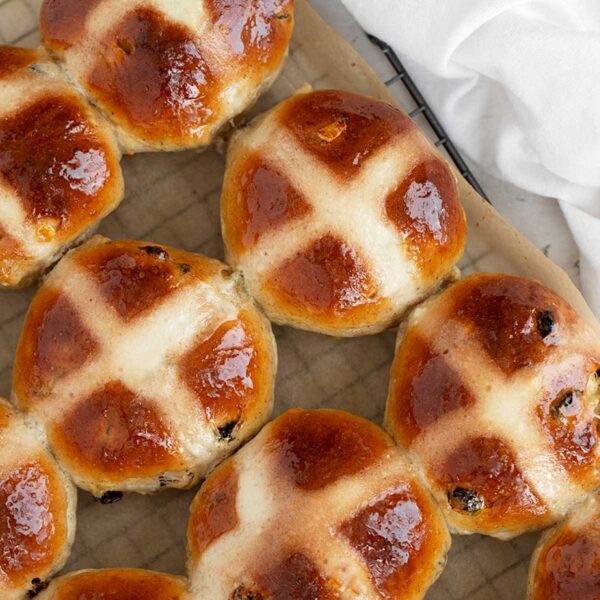
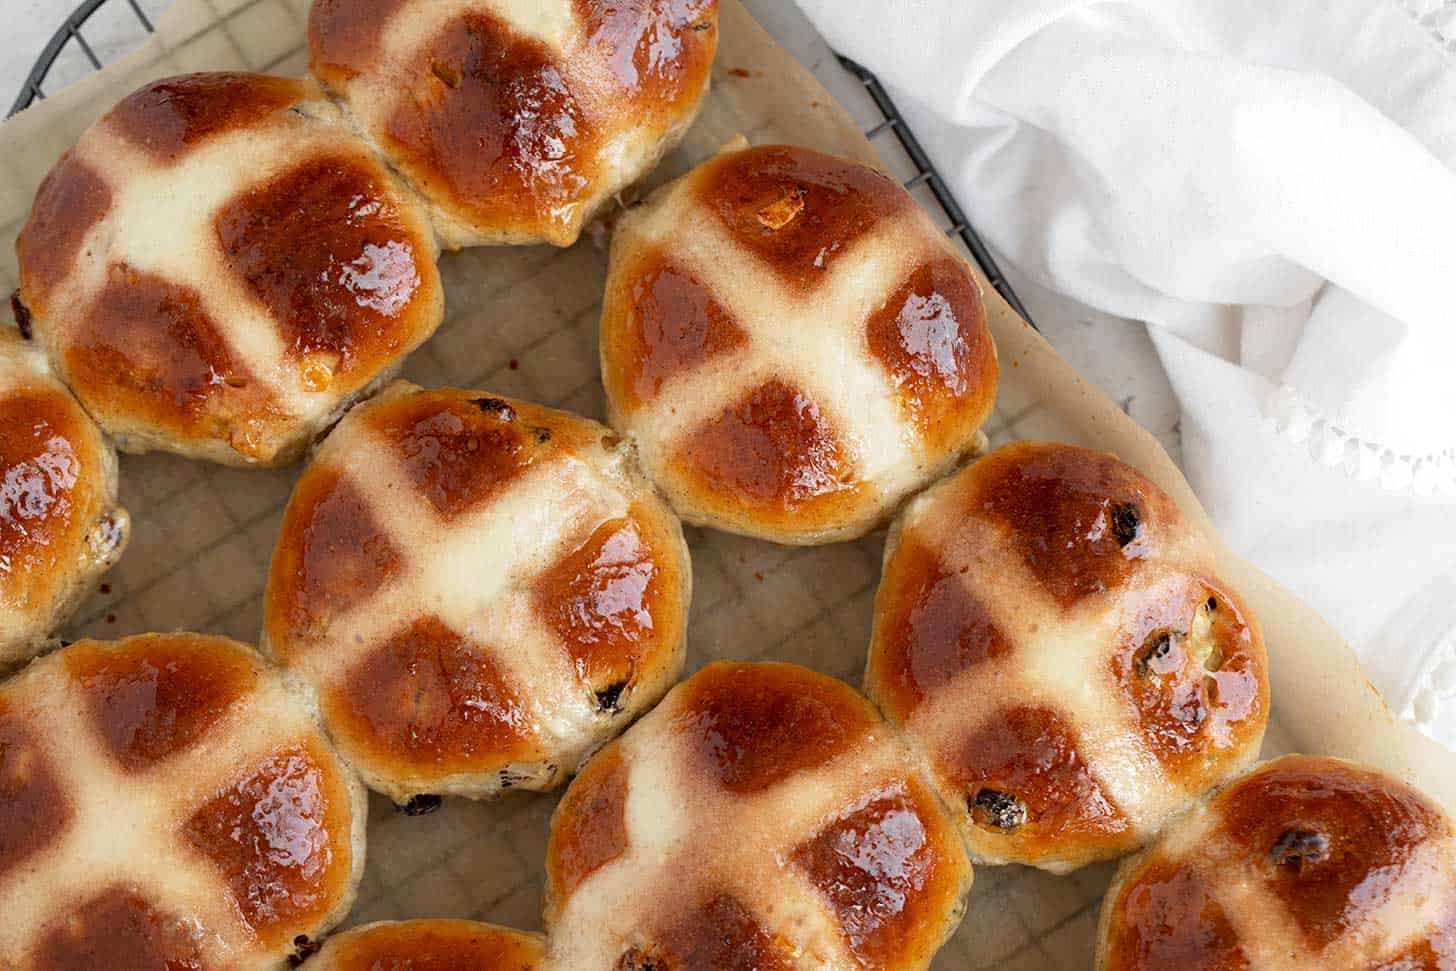
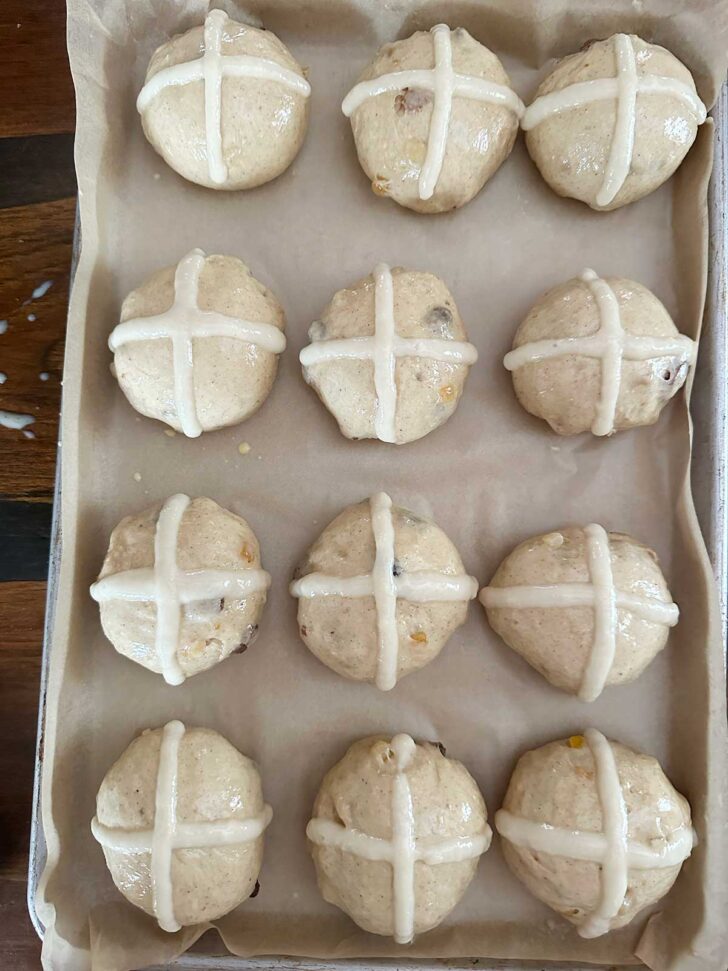
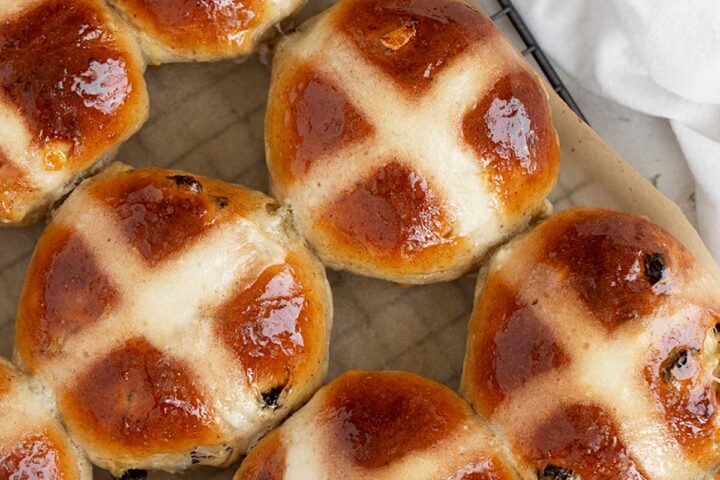
Traditional hot cross buns with raisins, currants and mixed peel. Topped with a flour and water cross pattern before baking.
If you’re looking for a traditional hot cross bun recipe, this is it! These hot cross buns are British-style hot cross buns, where they have been traditional Easter buns for centuries.
These hot crossed buns are filled with raisins, currants and mixed fruit peel, then topped with flour paste crosses before baking. They’re perfect for eating out of hand and fabulous toasted. They also freeze beautifully!
What you’ll need
Yeast – I prefer to start with Instant yeast (I love SAF Brand Red), which I add directly to the bowl with the flour. If starting with Active Dry yeast, you’ll need to proof the yeast in the milk first, then add it to the bowl.
Bread Flour – Bread flour makes for a wonderful texture in the finished buns, so I highly recommend it if possible. In a pinch, all-purpose flour will work, though you may need to add a bit more flour to the bowl.
Raisins – I use a mixture of raisins in my hot cross buns, including Thompson raisins, golden raisins and sultanas. I always plump the raisins first by soaking them in hot water. I’ve found skipping this step causes the raisin to rob the buns of moisture, resulting in drier buns.
Currants – Currants are a lovely addition if you have them and enjoy them. Simply replace some of the raisins with currants.
Mixed Fruit Peel – Also known as candied peel, mixed fruit peel is made from the peel of lemons and lemons. The peels are boiled in sugar syrup then dried and chopped. The peel brings a lovely hint of citrus flavour to the buns, but you can omit it and replace it with more raisins.
Spices – These buns use cinnamon, nutmeg, allspice and mace. Mace is not a common spice, so if you don’t have it, omit and add a bit more of the other 3 to replace it.
Milk – I suggest using 2% or 3% milk for best results.
You will also need – salt, white sugar and eggs (2).
How to make traditional hot cross buns
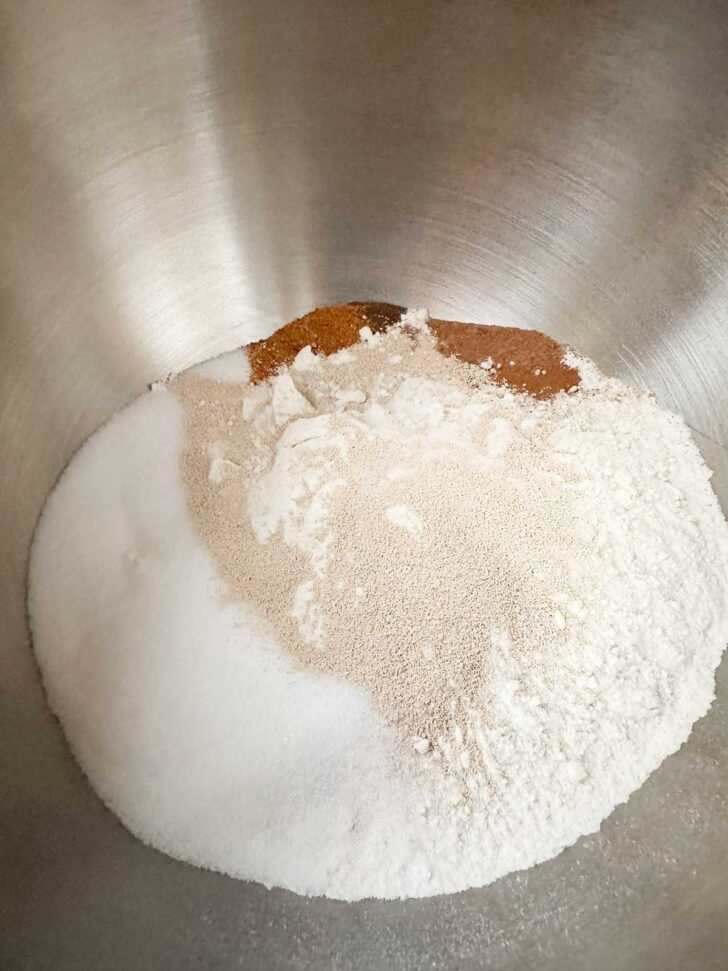


- Start by combining the flour, sugar, salt and spices in the bowl of a stand mixer. Add the lukewarm milk, room temperature butter cubes and lightly beat egg. Mix together until the flour is mixed in, then knead with the dough hook at Speed 2 for 7 minutes.
- The dough after kneading for 7 minutes will wrap the dough hook, but will still be sticky.
- Add the raisins and mixed peel to the bowl, together with a Tablespoon of flour.
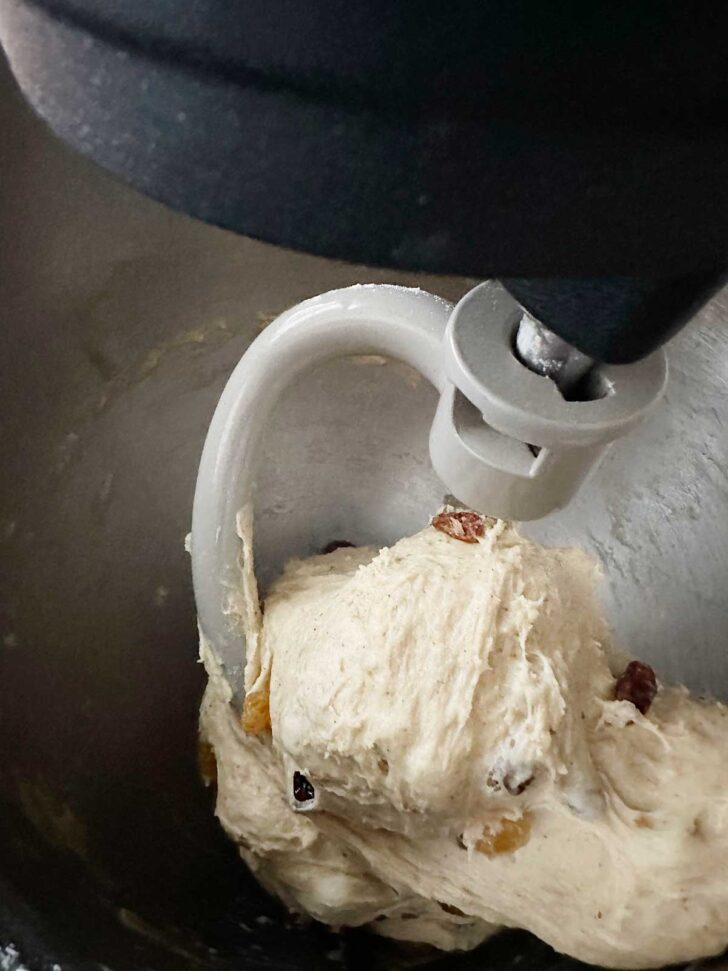
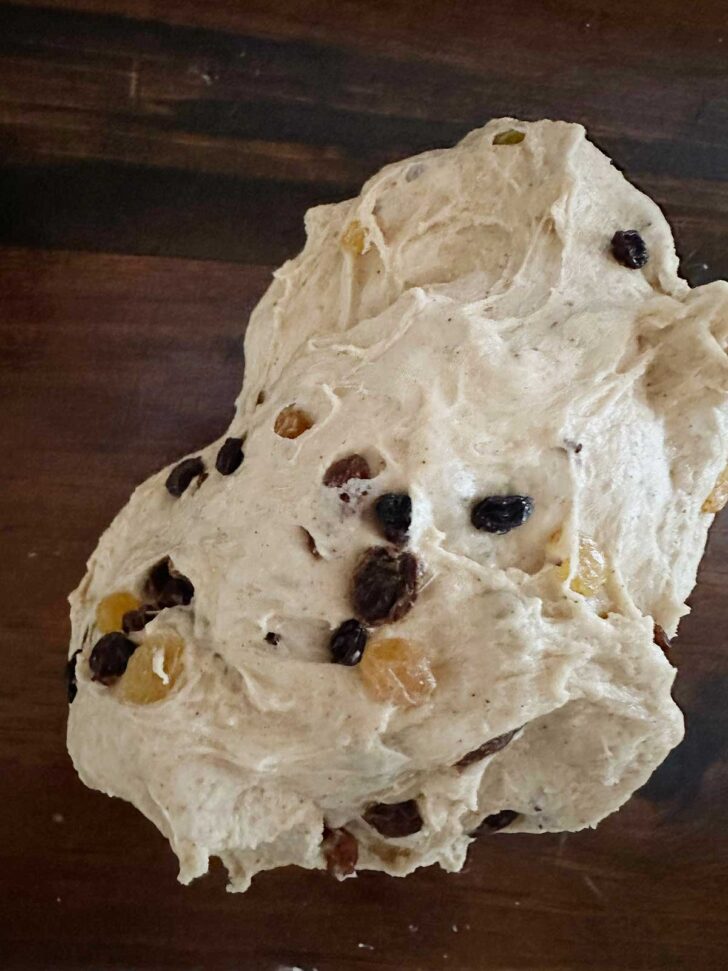

- Knead the raisins and fruit into the dough for 3 minutes at Speed 2. The finished dough will clean the bowl, and wrap the dough hook, but will have a sticky bit of dough at the bottom of the bowl a couple of inches in diameter. If your dough is sticker than that, add a bit more flour to the bowl a bit at a time until it reaches that point.
- Remove the dough to a work surface and gather into a ball.
- Place the dough into a greased bowl or large measuring cup, cover with plastic wrap and allow to rise until doubled in size, about 60-75 minutes.
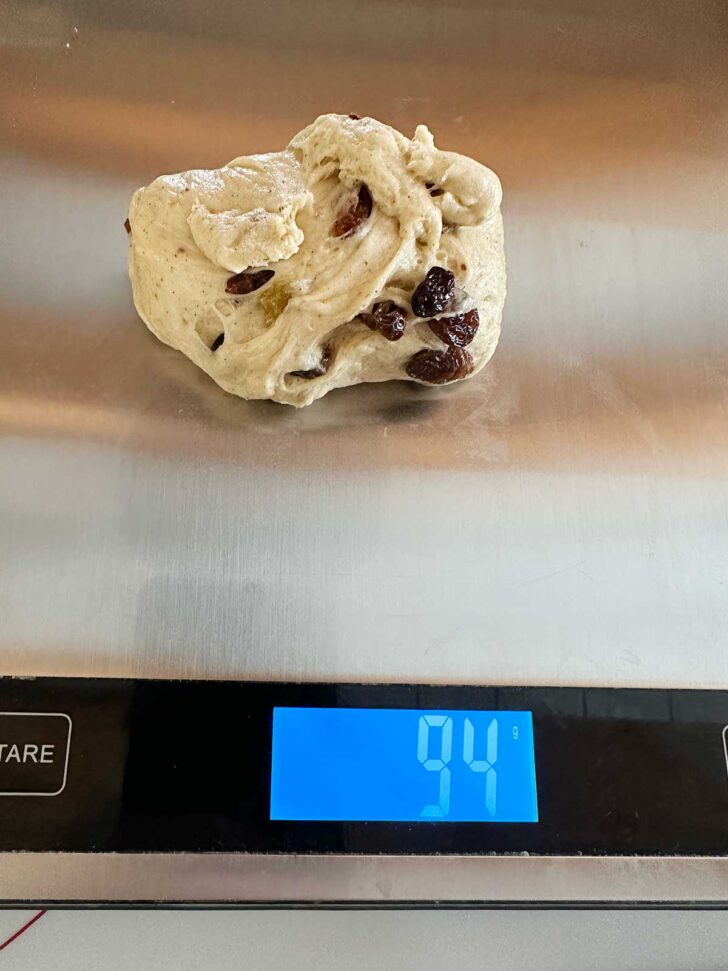
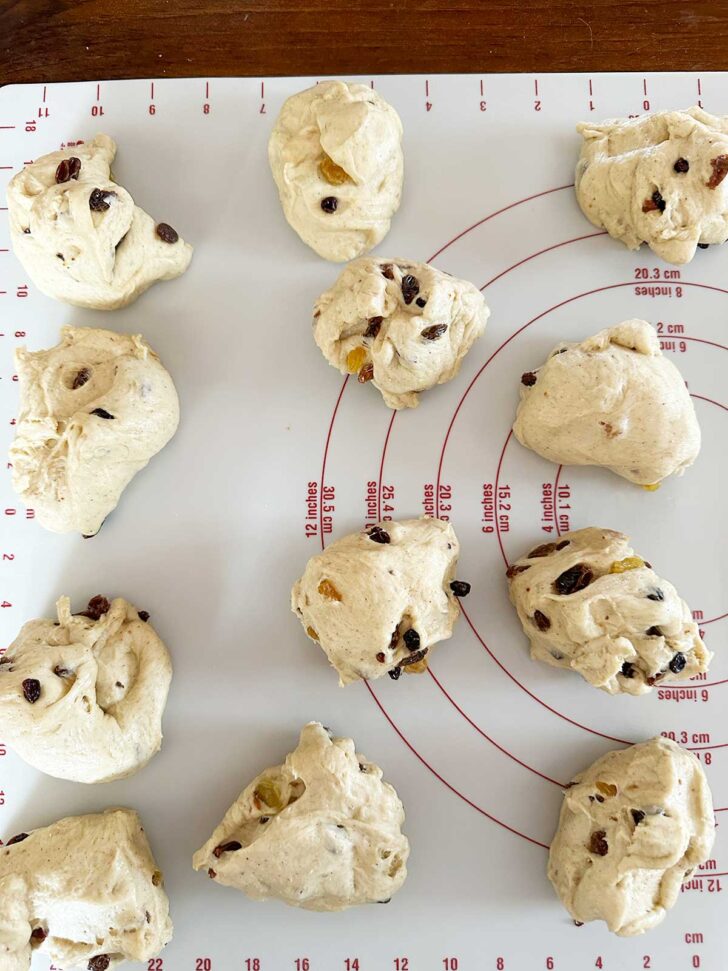
- When the dough has doubled, remove it to a work surface and gently deflate. Divide the dough into 12 even-sized pieces. I like to weigh out the whole dough piece and divide by 12 to get a goal weight for each piece, then I weigh out each piece.
- Repeat with the remaining pieces for a total of 12 pieces of dough.
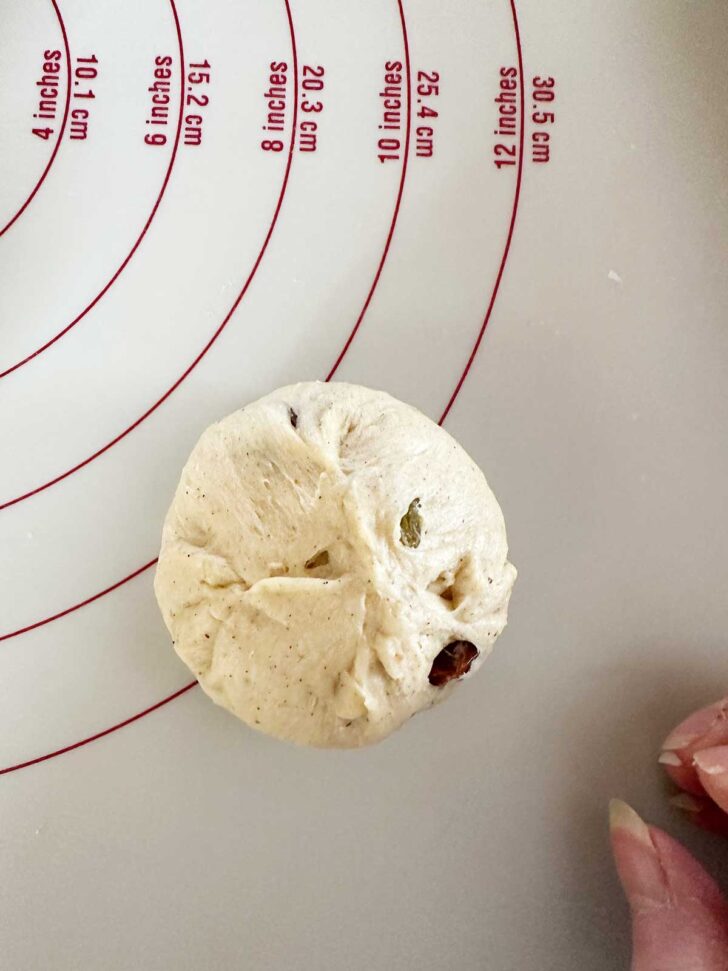
- Form the dough pieces into balls by pinching the sides into the centre, then flip it over and cup your hand over the ball and gently rotate to seal.
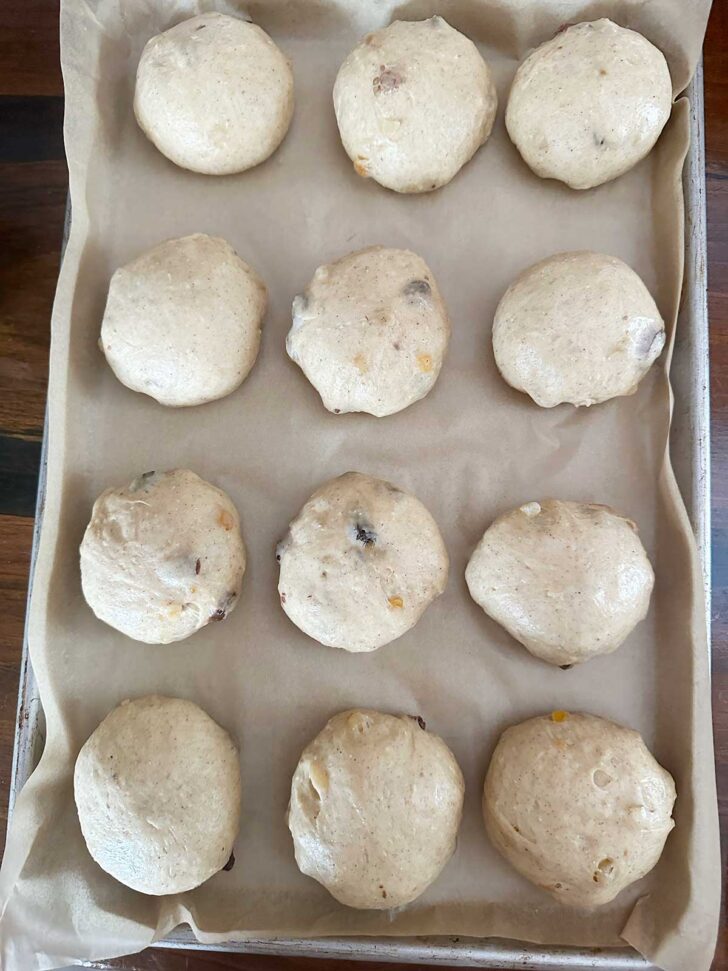
- Place the dough balls onto a parchment-lined baking sheet as far apart as possible (Shown is a 10×15-inch baking sheet. If using a 9×13-inch baking sheet, they will be closer together.) Cover with greased plastic wrap and allow to rise until doubled in size, about 45 minutes.
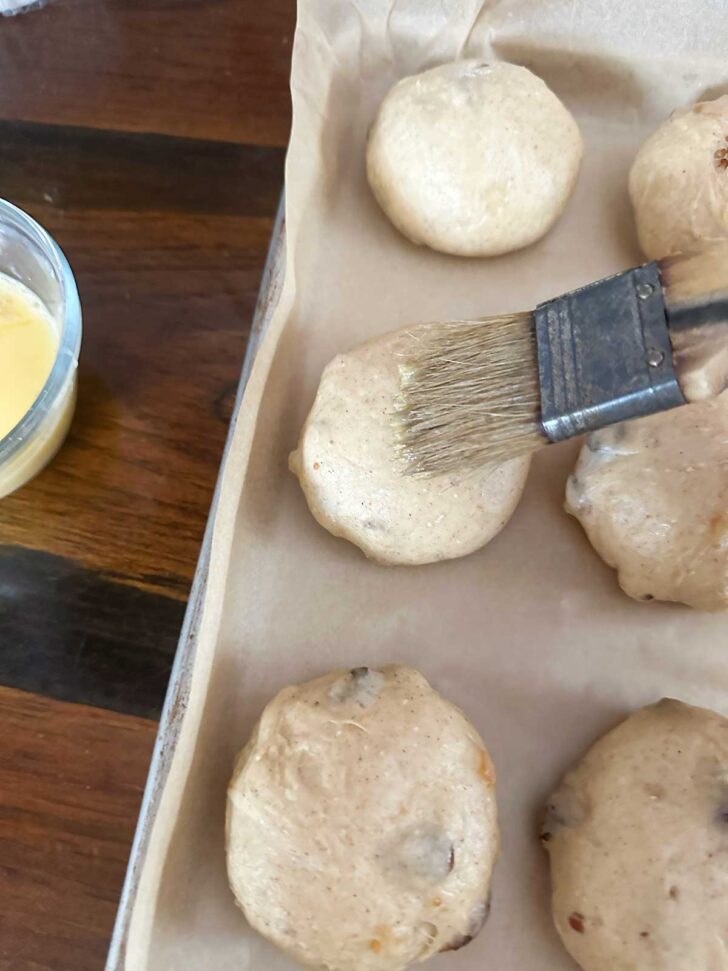
- Brush the buns with the egg wash.
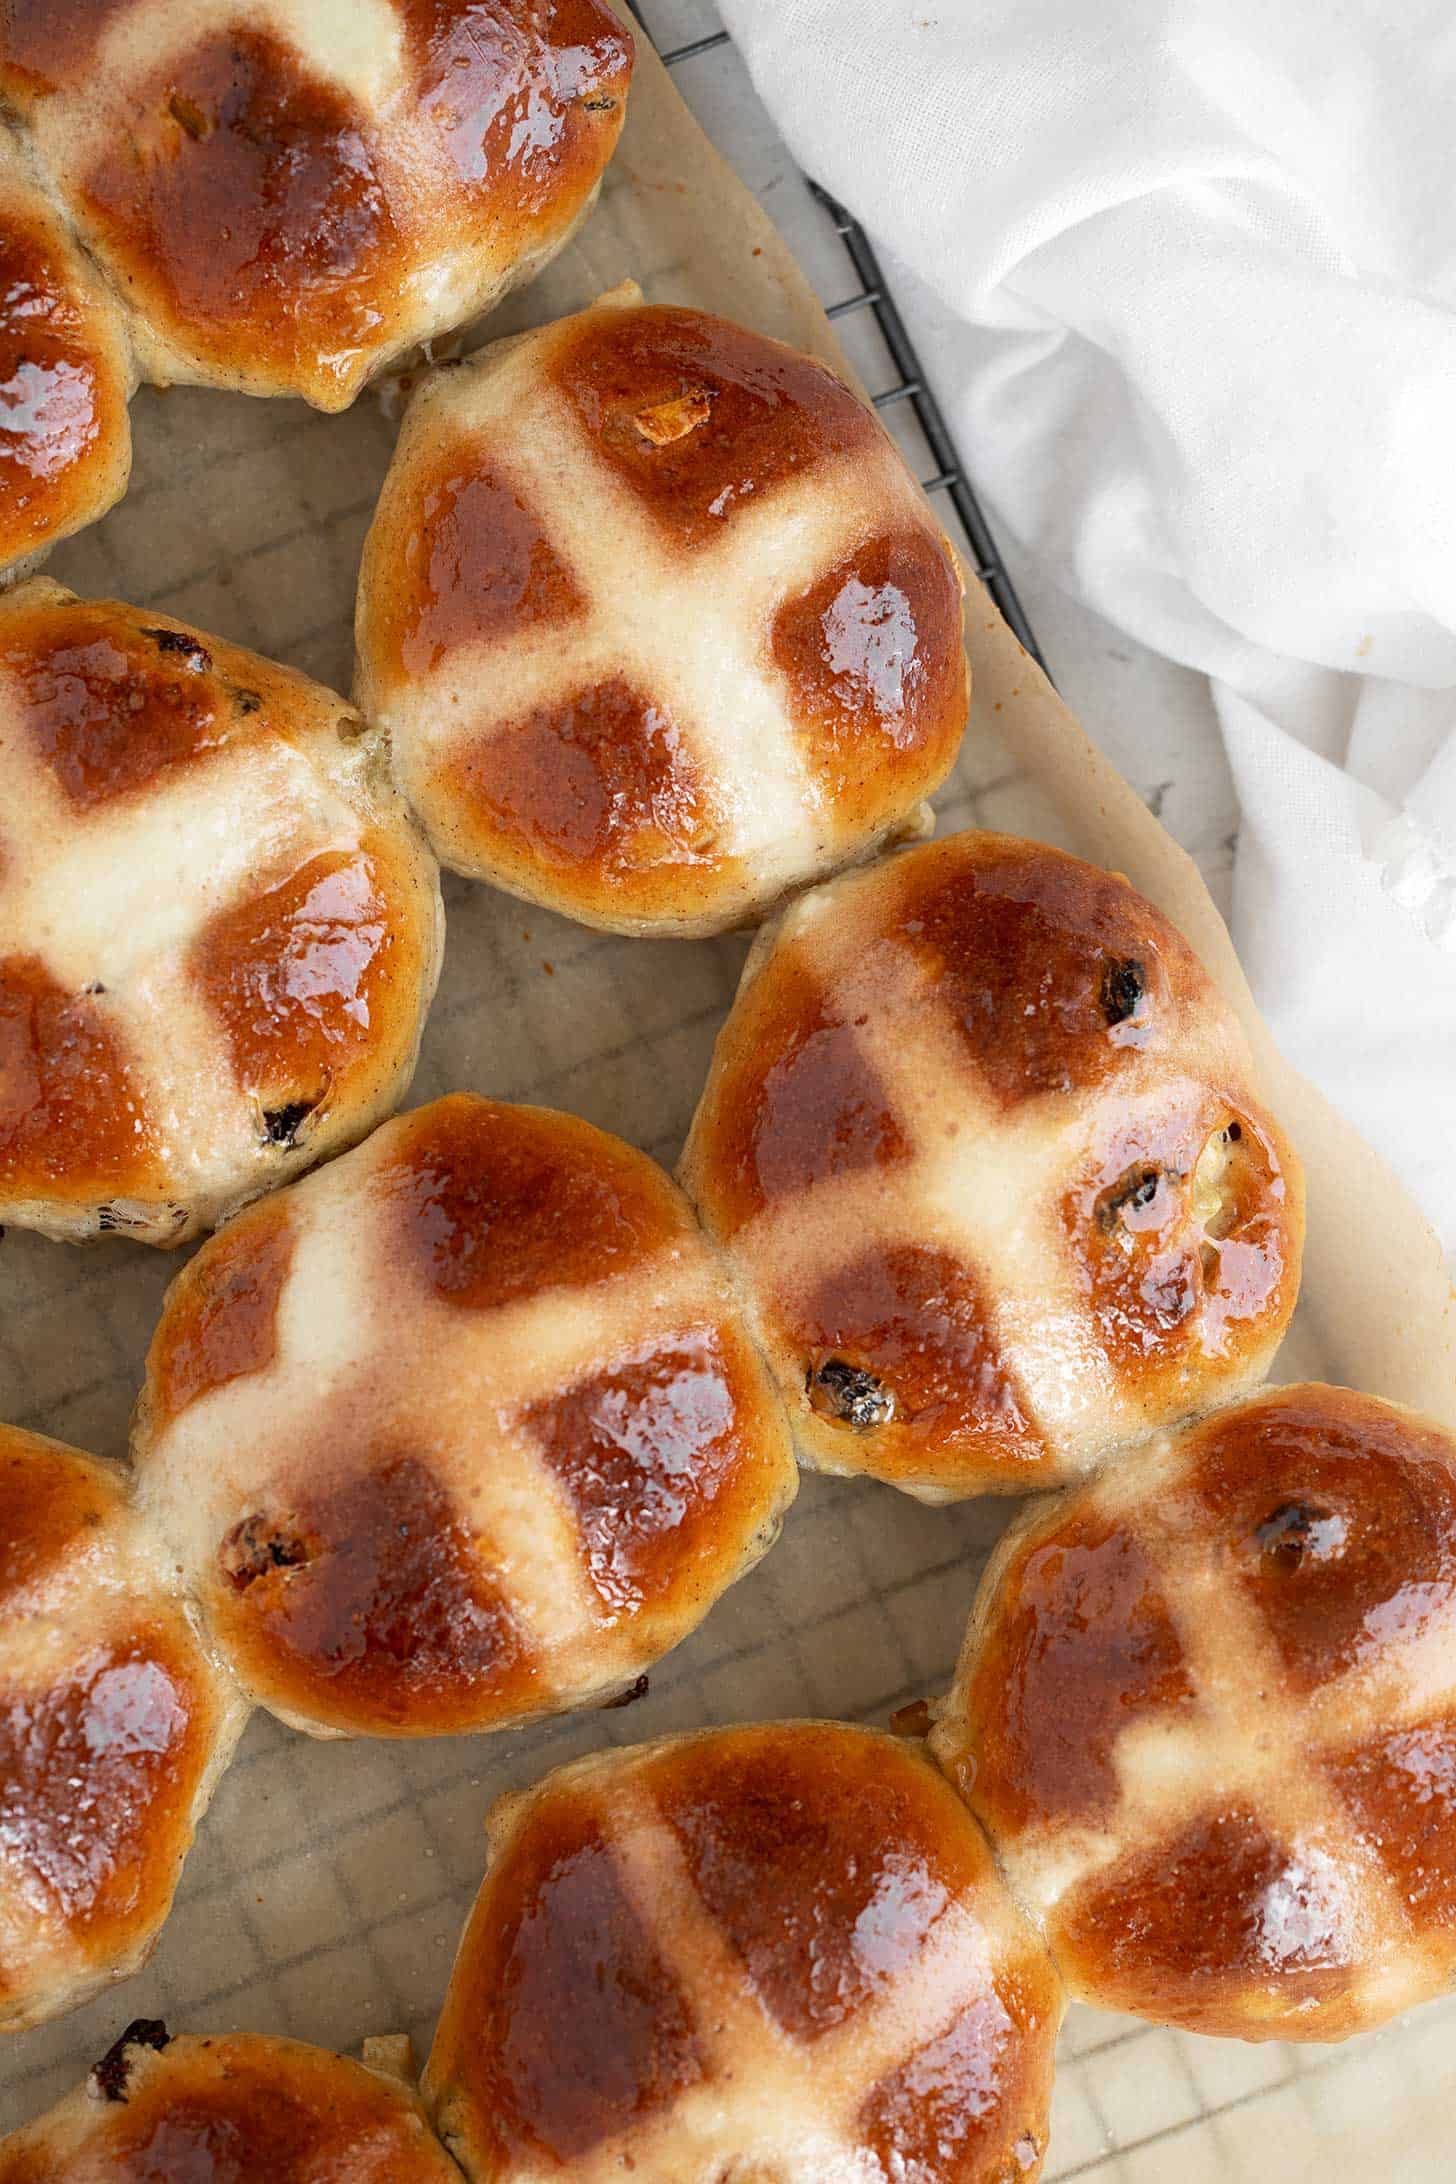
- Pipe the flour crosses onto the buns, then bake. Immediately after baking, brush the buns with sugar syrup.
These buns can be made without a stand mixer. Simply mix together in a bowl, stirring together to start, then remove to a work surface and knead for 10-12 minutes. The dough will be a bit sticky. Try to avoid adding additional flour as much as possible.
Pan size options
You can make these hot cross buns in a 9×13-inch quarter sheet pan or a 10×15-inch jelly roll baking pan rimmed baking sheet. A 9×13-inch cake pan would also work. I recommend metal baking pans for even baking.
The buns will be taller than shown here if using a 9×13-inch pan. They will also need a few extra minutes in the oven to cook through. Using a 10×15-inch baking sheet will create flatter buns that are better suited for toasting.
Recipe tips!
- If you have a kitchen scale (which I highly recommend!) use the weight measurements for the flour and take the guesswork out of measuring flour!
- These buns are pleasantly but not heavily spiced. If you prefer a more heavily spiced bun, you can increase the amount of spices, but keep in mind that more spices will probably slow down the rise, so expect that the rising times will be longer than specified.
- The dough will be on the stickier side after mixing. I don’t do any kneading after removing from the mixer so I don’t have to add any additional flour. By the time it has finished the first proof, it will be less sticky and is easy to form into buns.
- You don’t need a piping bag for the flour paste crosses. Simply use a plastic sandwich bag and snip off the corner.
- If the buns rise into each other during the second proof, don’t separate them or it may affect the rise. Likewise, don’t separate them while they cool after baking either, as it causes the steam to escape and can make for gummy buns. Only break them apart once completely cooled.
- Always remember that rising times will vary from kitchen to kitchen. It may be faster or slower, but it’s important to trust what you see in the bowl. Allow it to rise until it has doubled (and no longer), however long that takes.
Top Tip
I’ve found hot cross buns much nicer (more moist) if they are only baked until they reach 190F internal temperature. Obviously, you would need an instant-read thermometer to monitor the internal temperature. If you don’t have a thermometer, use time and colour to guide you. The buns will be starting to be a deeper golden colour. Time-wise, a 10×15-inch pan might reach that temperature in 16-18 minutes. For a 9×13-inch pan, it might be around 23-25 minutes.
Making ahead, storing and freezing
Hot cross buns are best enjoyed within 24 hours of baking. If you can’t eat them all up right away, freezing is the best option to preserve the freshness.
If you’d like to make the hot cross buns ahead, simply allow them to cool, then wrap them well and freeze them until needed.
Be sure to thaw the buns at room temperature in the original wrapping.
Want to save this recipe?
Enter your email and I’ll send it to your inbox. Plus, you’ll get great new recipes from me every week!
By submitting this form, you consent to receive emails from Seasons and Suppers.
You can unsubscribe at any time.
Get the Recipe: Traditional Hot Cross Buns
Ingredients
For the buns:
- 4 cups (500 g) bread flour, spooned and levelled *See Note 1 below
- 3 teaspoons instant yeast, *See Note 2 below for Active Dry yeast
- 1 teaspoon fine table salt
- 1/4 cup (55 g) white granulated sugar
- 1 teaspoon cinnamon
- 1 teaspoon nutmeg
- 1 teaspoon allspice
- 1 teaspoon mace, *See Note 3 below
- 1/4 cup (55 g) butter, at room temperature, cubed
- 1 large egg, lightly beaten
- 1 1/4 cups (285 ml) milk, lukewarm (about 105F)
- 1/4 cup (55 g) mixed peel, *See Note 4 below
- 1/3 cup (55 g) raisins
- 1/3 cup (30 g) sultanas
- 2 Tablespoons currants, optional
For the flour crosses:
- 8 Tablespoons all-purpose flour
- 4 Tablespoons white granulated sugar
- 4 Tablespoons water, room temperature
For the egg wash:
- 1 large egg
- 2 Tablespoons (30 ml) milk
For the sugar glaze:
- 4 Tablespoons white granulated sugar
- 4 Tablespoons water
Equipment
- 9×13 or 10×15-inch rimmed baking sheet (or 9×13-inch baking pan)
Instructions
- Tip! For the best and most accurate results, use the weight measurement and a kitchen scale. If you don't have a scale, be sure that you are measuring your flour with the spoon and level method, to avoid adding too much flour.
- In a large bowl or the bowl of a stand mixer, add the flour, instant yeast, salt, sugar and spices.
- With a stand mixer fitted with the kneading hook, stir together the dry ingredients briefly. Add the lukewarm milk, room-temperature cubed butter and the egg. Using Speed 2 on the mixer, mix together until the flour is mixed in, then continue to knead on Speed 2 for 7 minutes.
- Meanwhile, measure out the raisins and sultanas and place them into a small bowl. Cover with hot water and let stand while the dough kneads.
- When the dough has kneaded for 7 minutes, drain the raisins and sultanas and pat dry with a paper towel. Add them to the bowl with the dough. Add the mixed peel to the bowl as well. Add 1 Tablespoon of flour to the bowl.
- With the mixer on Speed 2, knead in the raisins and peel for 3 minutes.
- The finished dough should be very moist and a bit sticky. It should clean the bowl and wrap the dough hook but will have a sticky bit of dough on the bottom of the bowl a couple of inches in diameter. If your dough is stickier than that, add a tiny bit more flour to the bowl and knead in until it reaches that point.
- Remove the dough to a greased bowl. Cover with plastic wrap and allow to rise until doubled in bulk, about 60-75 minutes.
- Prepare a 10×15-inch rimmed baking sheet or a 9×13-inch rimmed baking sheet or baking pan (preferably metal) and line with parchment paper. Set aside.
- When the dough has doubled, remove it to a work surface and gently deflate. Divide the dough into 12 equal-sized pieces. Tip! I like to weigh the total dough ball, and then divide by 12 to get a weight for each bun. Typically, this is in the 90-95g range for me.
- Form each piece of dough into a ball, by pinching in the sides of the dough to form a tight ball. Flip it over with the pinched side down, cup your hand over the ball and roll on the work surface to seal. Place onto the prepared baking sheet. Repeat with the remaining balls of dough, placing them onto the baking sheet as far apart as possible.
- Spray a large piece of plastic wrap and place it over the buns, sprayed side down. Allow the buns to rise until doubled, about 45 minutes.
- Meanwhile, prepare the egg wash by whisking the egg and milk together with a fork. Set aside.
- In a small bowl, stir together the flour and sugar for the flour crosses. Add the water and stir together until you have a smooth paste. Transfer the paste to a disposable piping bag or a plastic sandwich-type storage bag. Set aside, ensuring that the paste is well-covered to prevent drying out.
- Preheat the oven to 390F (non-convection). If your oven doesn't allow for that level of specificity, set it to 400F and reduce the baking time slightly.
- When the buns have doubled in size, use a pastry brush to brush the buns with the egg wash. Tip! If the buns have joined together as they rose, don't try to separate them or you may deflate them. Leave them connected. Be sure to brush the buns completely or they may look patchy when baked.
- To pipe the crosses onto the buns, snip the tip of the piping bag or the corner of the sandwich bag so the hole is about 1/4-inch in diameter (5-6ml). Pipe the crosses onto each bun, starting the cross about half an inch from the bottom of the buns.
- Place the buns into the oven and bake, rotating the baking pan front to back halfway through baking. For buns on a 10×15-inch pan, bake until deep golden and the buns reach an internal temperature of 190F when tested with an instant-read thermometer, about 16-20 minutes. For buns baked on a 9×13-inch pan, baking time will be a bit longer as the buns will be taller, about 20-25 minutes.
- While the buns are baking, make the sugar syrup by combining the sugar and water in a 1-cup measuring cup and microwaving for 45-60 seconds. You can also bring to a boil in a small saucepan. Set aside.
- Remove the buns from the oven and immediately brush the top of the buns with the sugar syrup. Transfer the buns on the parchment paper to a cooling rack to cool completely. Tip! If the buns are connected, avoid separating them until they are completely cooled, as separating and releasing the steam in the buns may make the buns gummy inside.
- Allow the buns to cool completely then transfer to an air-tight container. Hot cross buns are best enjoyed within 24 hours of baking. If you can't eat them all up or if you are making them ahead, wrap them well and freeze them for up to 3 months.
- Enjoy the hot cross buns, split with butter or split and toasted with butter.
Notes
More hot cross bun recipes to love!
Hi! I’m Jennifer, a home cook schooled by trial and error and almost 40 years of getting dinner on the table! I love to share my favourite recipes, both old and new, together with lots of tips and tricks to hopefully help make your home cooking enjoyable, stress-free, rewarding and of course, delicious!
Jennifer,
You have a Hot Cross Bun with icing recipe on your site also. Are there differences besides the cross technique. I am wondering if you prefer one over the other. I have made others of your yeast recipes with great results but these buns will be a first time and with company coming it would be great to know if you would point me to one over the other. Thank you for any input you can offer.
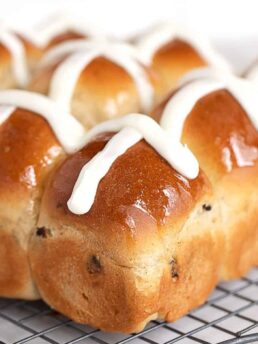
Hi Den, the two recipes are quite similar in taste, so the differences come down to flour cross vs icing and pull-apart style vs stand-alone buns. (The traditional recipe also makes a few more buns than the iced one.)
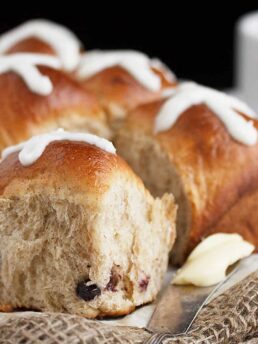
The iced hot cross buns are the ones I grew up with, so they are nostalgic for me. While delicious, the downside of the iced buns is that they don’t have as long a shelf life due to their pull-apart style and soft sides, which causes them to lose moisture more quickly. That’s not an issue if you’ll be eating them all up right away, of course (which we always did back then). Also, because of the icing and the shape, the iced ones can’t be toasted. My Mom would always bake these ahead and freeze the block of buns right away. She would thaw overnight, still wrapped and ice them on Easter morning for Easter breakfast/brunch. They freeze well, so they were just like freshly baked and are delicious when enjoyed plain with butter (like a dinner roll).
The traditional buns tend to stay fresher longer as they hold the moisture better. The flatter shape and flour crosses also make them perfect for toasting. I make these when I want to have buns around for a few days to toast for breakfast or with tea.
So it really comes down to how and when you want to enjoy them. If you’d like to have buns around over the weekend to enjoy, I’d go with the traditional ones. If planning to serve just with Easter breakfast or brunch, the iced ones would be a nice addition to the table.
Jennifer, what a fantastic response, thank you so much. You covered everything I was wondering and now, depending on my situation Easter season I am ready for anything. I’m very appreciative but also certain that your detailed response has helped all your followers make the best choice for them. Happy Easter…!
These were delicious! Everyone who tried them loved them. I rested the formed buns in the refrigerator for a few hours during a busy day before continuing with the recipe, and they worked out just fine. I replaced 1/4 tsp of cinnamon with 1/4 tsp of ground cloves, used KAF fruitcake blend dried fruit, would do both again. I used a 9×13 cake pan, 390 degrees, 20 minutes. I noticed that my baked buns were not as brown as in the photo, although my instant-read thermometer read over 190 degrees in the center. Absolutely scrumptious; will certainly make them again next year.
So glad you enjoyed them, Beth :) Thanks so much!
Perfect, these taste like the hot crossed buns I remember from years ago and just can’t find anymore. So much better than store bought.
Thanks so much, Robyn :) So glad you enjoyed them!
I’ve tried countless recipes for hot cross buns over the years and thought that these were some of the best. They’re soft, moist, and nicely spiced. I used rounded measures of the spices and added vanilla and orange zest. The dough was a bit sticky but handled easily without additional flour. I’m always looking for ways to use up sourdough discard so subbed 226 grams discard for 113 grams each of flour and milk. Thank you for putting so much detail and effort into your recipes.
Thanks so much, Sadie. So glad you enjoyed them!
Going to make these for Easter Sunday. Can I prepare the dough the day before and refrigerate and then let it proof the next morning?
Hi Mon, I haven’t tested it, but you should be able to form the rolls, place on the baking sheet, wrap really well and refrigerate overnight. In the morning, allow to rise as needed, then pipe on the cross and bake. Enjoy!
Delicious Jen! I like making hot cross buns but your easy, clear and concise directions make them a breeze to put together.
Thanks so much, Barb. So glad you enjoyed them!