A classic, traditional Yorkshire Pudding recipe, with lots of tips and troubleshooting information along with this tried and true recipe that cooks have relied on for decades.

Classic, traditional Yorkshire Pudding is, of course, the perfect side for roast beef and gravy, but I say why wait until roast beef is on the menu? I think they’re pretty much the perfect side for any dish that has gravy.
The ingredients and process for making Yorkshire Pudding are deceptively simple. I say deceptively, because there are a lot of ways Yorkshire Pudding can go wrong. Yorkshire #fail is a real thing, so you can and should expect a bit of a learning curve if you haven’t made them before.
As for the recipe itself, I use a slightly tweaked version of the iconic Joy of Cooking Yorkshire Pudding recipe. It works and it’s delicious.
So if you are an experienced Yorkshire Pudding maker and haven’t tried this particular version, you might want to give it a try. If you are beginner Yorkshire Pudding maker, this is a great starting point and I hope I can help you navigate the various Yorkshire landmines, so you have fewer fails along the way than I did :)
Ingredients and Substitutions
All Purpose Flour – regular all purpose flour is what you need here. Self-raising flour won’t work in this recipe. You can use either bleached or unbleached all purpose flour.
Eggs – You’ll need 3 large eggs to make the recipe as written, though the recipe will work fine with just 2 eggs, if you prefer. I add an extra egg here, as I like an egg-y Yorkshire myself. Experiment and use whichever you prefer.
Milk – Full-fat, whole milk (3.5% b.f.) is the best option, if you have it. Otherwise, 2% works as well. I haven’t tested lower fat or non-dairy milks in this recipe.
Fat for the pan – You will need a bit of fat for the pan. Beef drippings would be the first choice, if you have them. Alternately, lard, shortening or a cooking oil with a high smoke point, such as vegetable or canola, would be a good option. Olive oil and butter aren’t the best choice, as they aren’t suited for high heat.
You will also need – water and salt.
What pan can you use for Yorkshire Pudding?
Next, let’s pick a pan for our Yorkshire Pudding! If you’re just starting out, pick a pan and stick with it a bit, until you figure out the perfect formula for that pan in your oven. Once you gain some confidence, you can experiment with other pan shapes and sizes.
Muffin tin – I have used a muffin tin here, as it the pan most people have in their kitchen. It’s a great starting point for making individual Yorkshire Pudding. Use your dodgiest pan, as Yorkshire Pudding making can be a little hard on muffin tins.
Popover Pan – Really just the muffin tin in a different shape. This will produce nice, tall Yorkshire puddings, though you will need to experiment with batter depth to get best results.
Traditional 4-cup Yorkshire Pudding Pan – Yes, there is a dedicated Yorkshire Pudding pan (affiliate link). It’s not so widely known in North America, but it is available to buy on Amazon, if you want to seek on out.
One large baking pan – Yorkshire Pudding is also made in one large pan, where it cut into squares and served. Something in the 7×11-inch-ish range is generally used, or whatever size allows for a batter depth of about 1/4-inch-ish. A large cast-iron skillet also works great for a single large pudding.
Again, it is important to understand that each pan will behave differently, so what works with a muffin pan, may need to be tweaked with a different pan. That said, if you read on so you understand the process, you should be able to make the adjustments needed.
Step-by-Step Photos
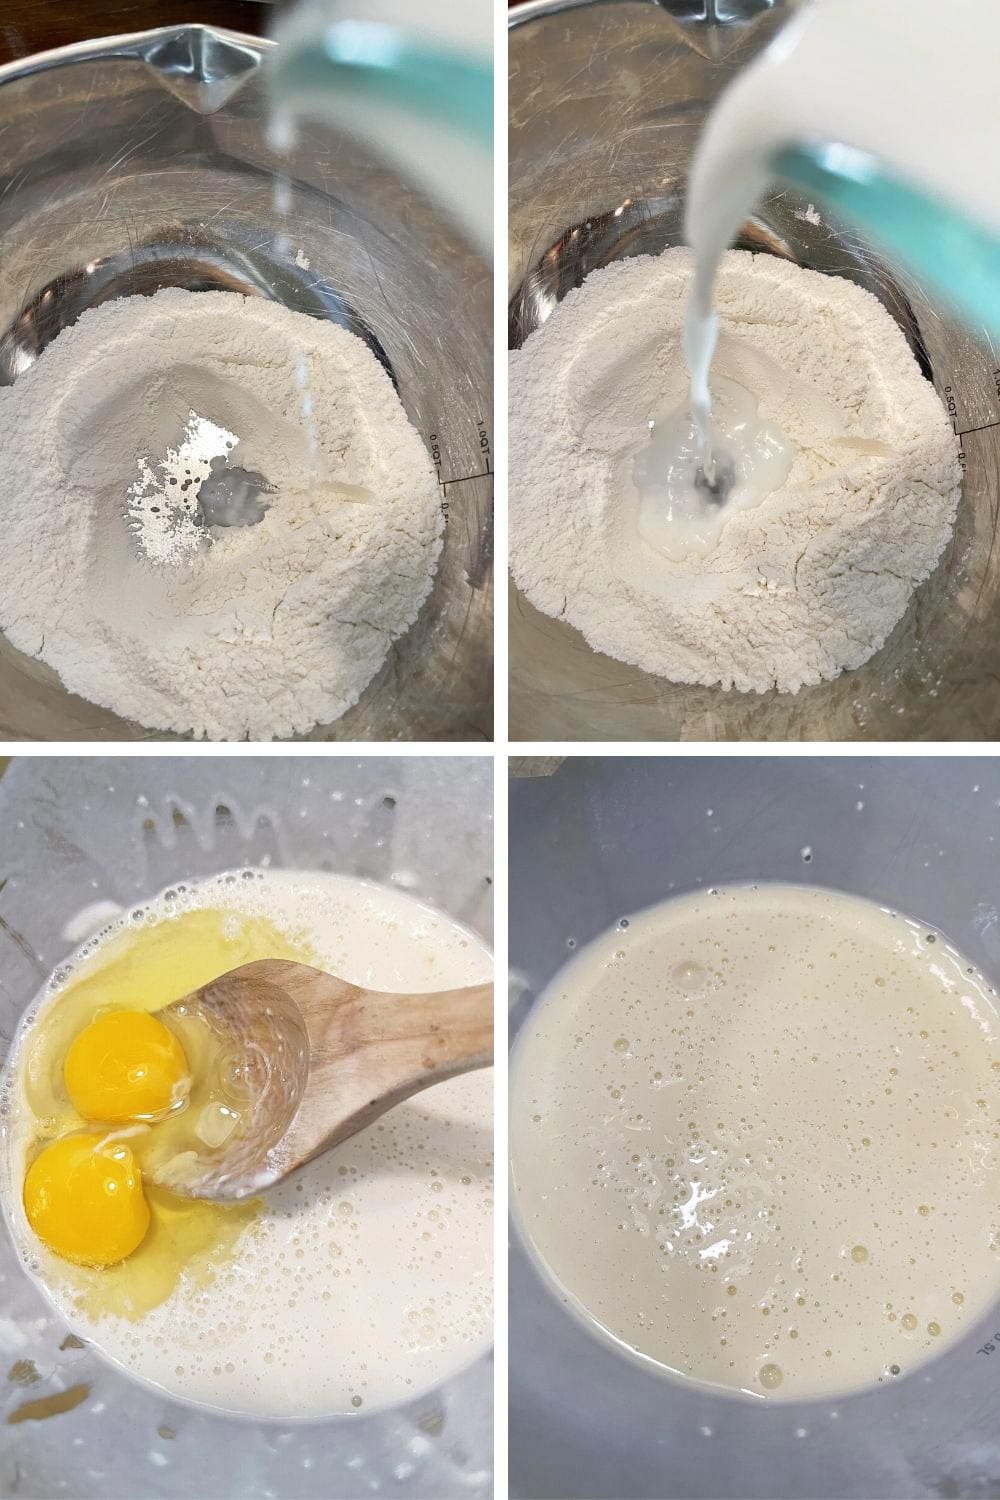
1. Mix the Batter – I’ve tried mixing Yorkshire batter a number of different ways and it seems to be the area that is most forgiving. So you can hand beat or whisk, or use a paddle or whisk on your stand mixer, as you like. Just make sure that you end up with a totally smooth batter, that has developed a bit of thickness (think in terms of the difference between milk and light cream thickness) to it and that has some larger bubbles around the outside edge of the bowl. That generally involves mixing it well or a minute or two.
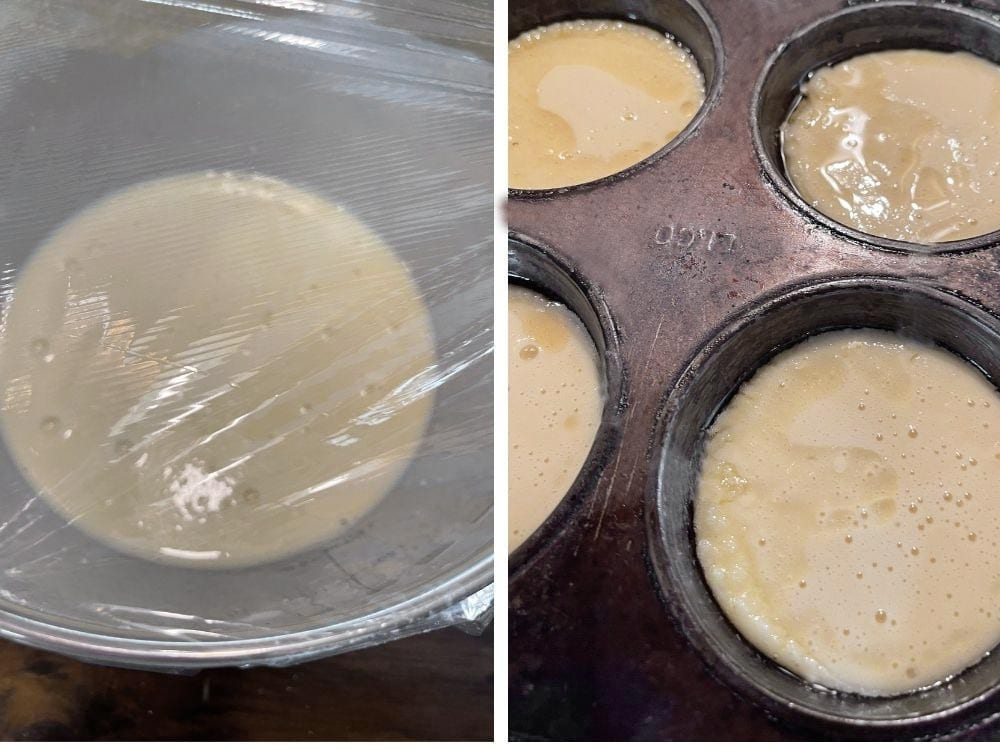
2. Rest the Batter – Cover the bowl and rest the batter at least 30 minutes.
3. Oil the pan and heat it up on the oven – This is the most important part of the Yorkshire Pudding process. For beginners, I suggest brushing the muffin cups with oil, as it is easier to control the amount of oil. Place the pan into the preheated oven and leave it there until it is smoking hot. The time needed will depend somewhat on the pan, but minimum is 10 minutes, with minimal oil in the pan, up to 15 minutes or so, with more oil. Turn your kitchen fan on or whatever else you need to do to avoid a possible smoke detector issue here.
4. Re-mix the batter, add it to the hot pan and bake – Just before taking the hot, empty pan out of the oven, re-mix the resting batter and pour it into a 2-cup measuring cup, to make it easy to pour. Have it ready to go right beside the oven. Remove the hot pan from the oven and quickly pour the batter into the muffin cups, filling it 1/2-2/3 full. It should sizzle, if you pan is hot enough. Immediately place back into the oven and bake. You’ll need to reduce the oven temperature after 15 minutes. Do not open the oven door at any point except to take them out of the oven. Once out of the oven, remove from the pan. Most will lift right out, but if not, just run a knife around the outside to remove. Place onto a cooling rack and enjoy warm.
Troubleshooting Yorkshire Pudding
Here are my best tips for helping you crack the code of Yorkshire Pudding …
The #1 way that Yorkshire Pudding can go wrong is that the oil in the empty heated pan is not hot enough. The magic of Yorkshire Pudding happens when the batter hits the hot pan and oil. If the oil isn’t hot enough, what happens is that the batter will just absorb the oil and the puddings will cook up soggy, oily and dense. When the oil is hot enough, the batter will immediately cook and seal on the outside, allowing them to set and rise properly.
The #2 way that Yorkshire Pudding fails, is adding too much oil to the pan. The issue isn’t really too much oil, per se, as I”m sure you’ve all seen Yorkshire cooked in quite a lot of oil. The issue really is that more oil needs more time in the pre-heat in the oven to be heated to the needed temperature and often that isn’t properly accounted for. Heating the oil can also be affected by the heat-retention of the pan you are using. Some are better than others at heating up and thus, heating the oil efficiently. If you have a problem with soggy Yorkshire, try reducing the oil and see if that improves the situation.
So that said, if you are a beginner at baking Yorkshire, the easiest route is to use less oil to start and move up from there. You are far less likely to underheat the oil if there is less of it. As you gain confidence, add a bit more oil and a bit more time in the oven pre-heating, until you find the sweet spot. Yorkshire does love a little oil or drippings to cook in, so work your way to that point. Generally, use about 1/2 tsp in a muffin cup or 1-2 tsp in popover or Yorkshire Pudding pans. A larger pan may need a bit more.
Finally, experiment with how much you fill your pan with batter until you find what works best with your particular pan. I have found 1/2-2/3 full in a muffin pan works fine, but depending on the shape and size of yours, you may find it better to add a bit less. You can easily test by filling a cup or two with a little more or less batter and judging the finished results.
FAQ
What is the difference between Yorkshire Pudding and Popovers? While some maintain they are essentially the same thing, I disagree. I make a lot of popovers and they are different, even though the batters are very similar. Yorkshire is lighter in texture, hollow-er and eggier tasting, with a unique texture from the steaming action that happens inside them as they cook.
Can I use a glass or silicone pan for Yorkshire Pudding? Neither is recommended, for both their heat retention capabilities and the high heat involved. A metal pan of some sort is recommended.
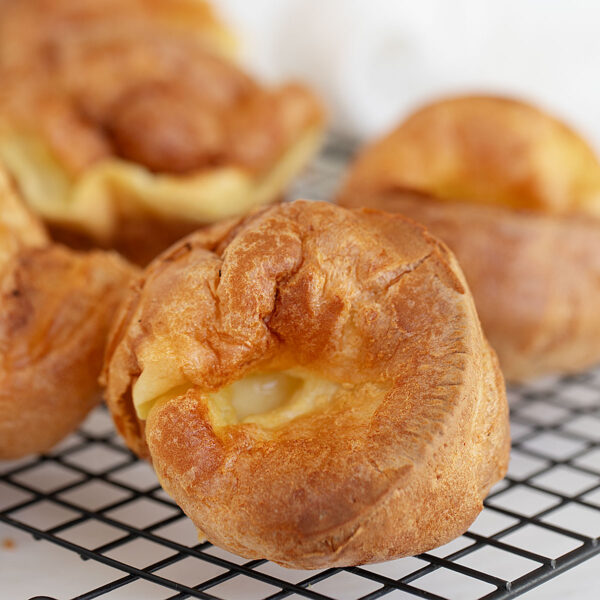
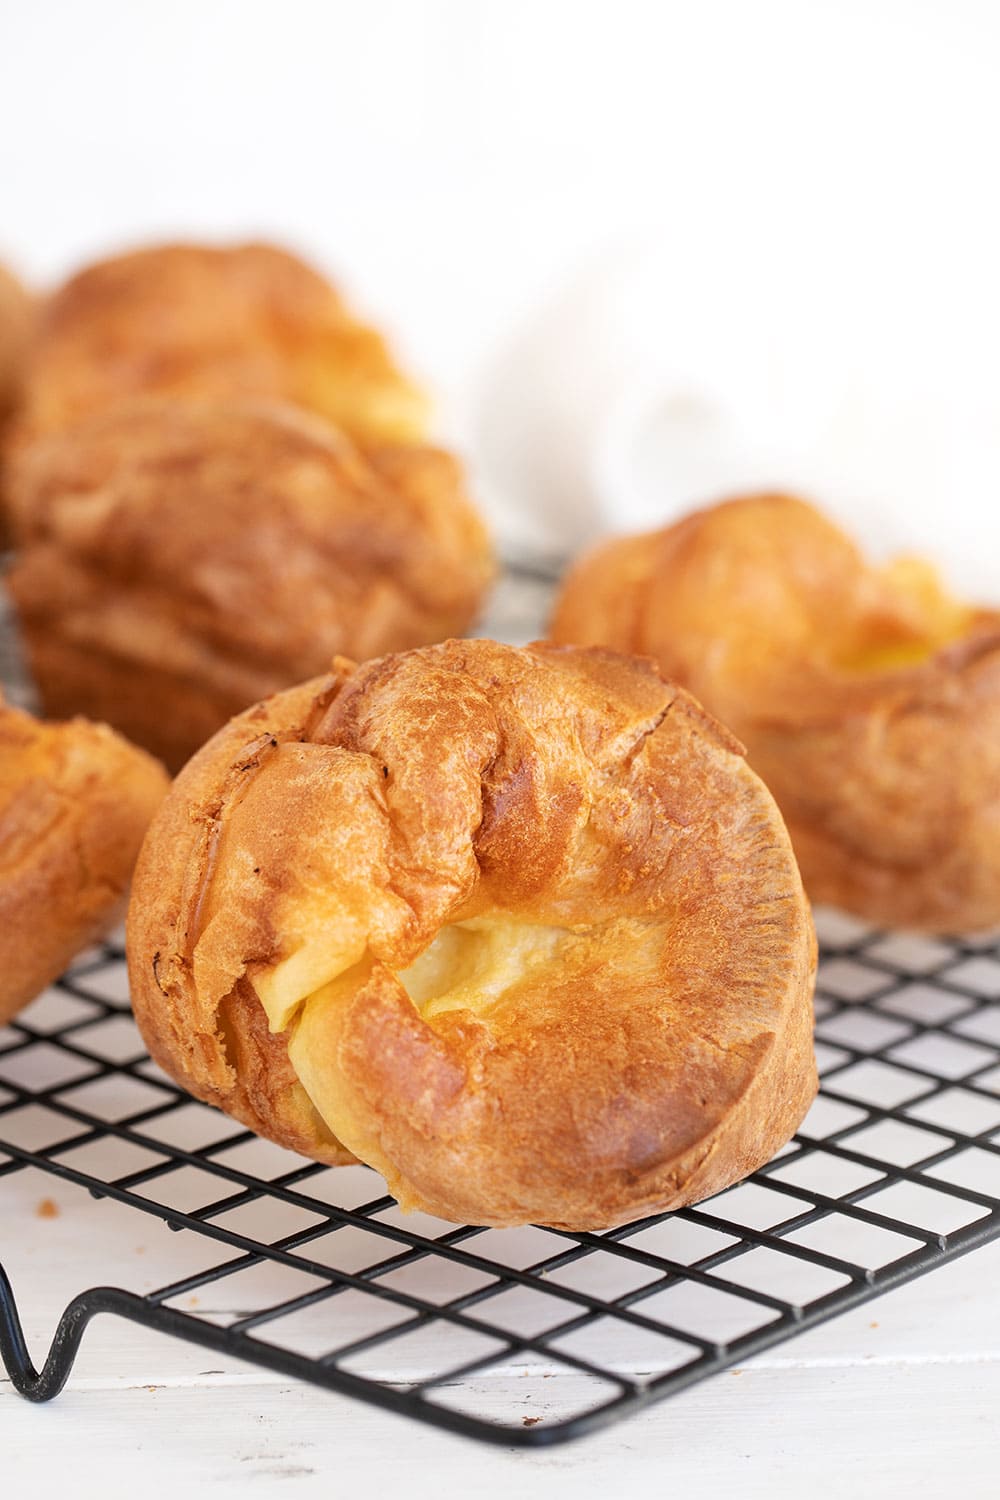
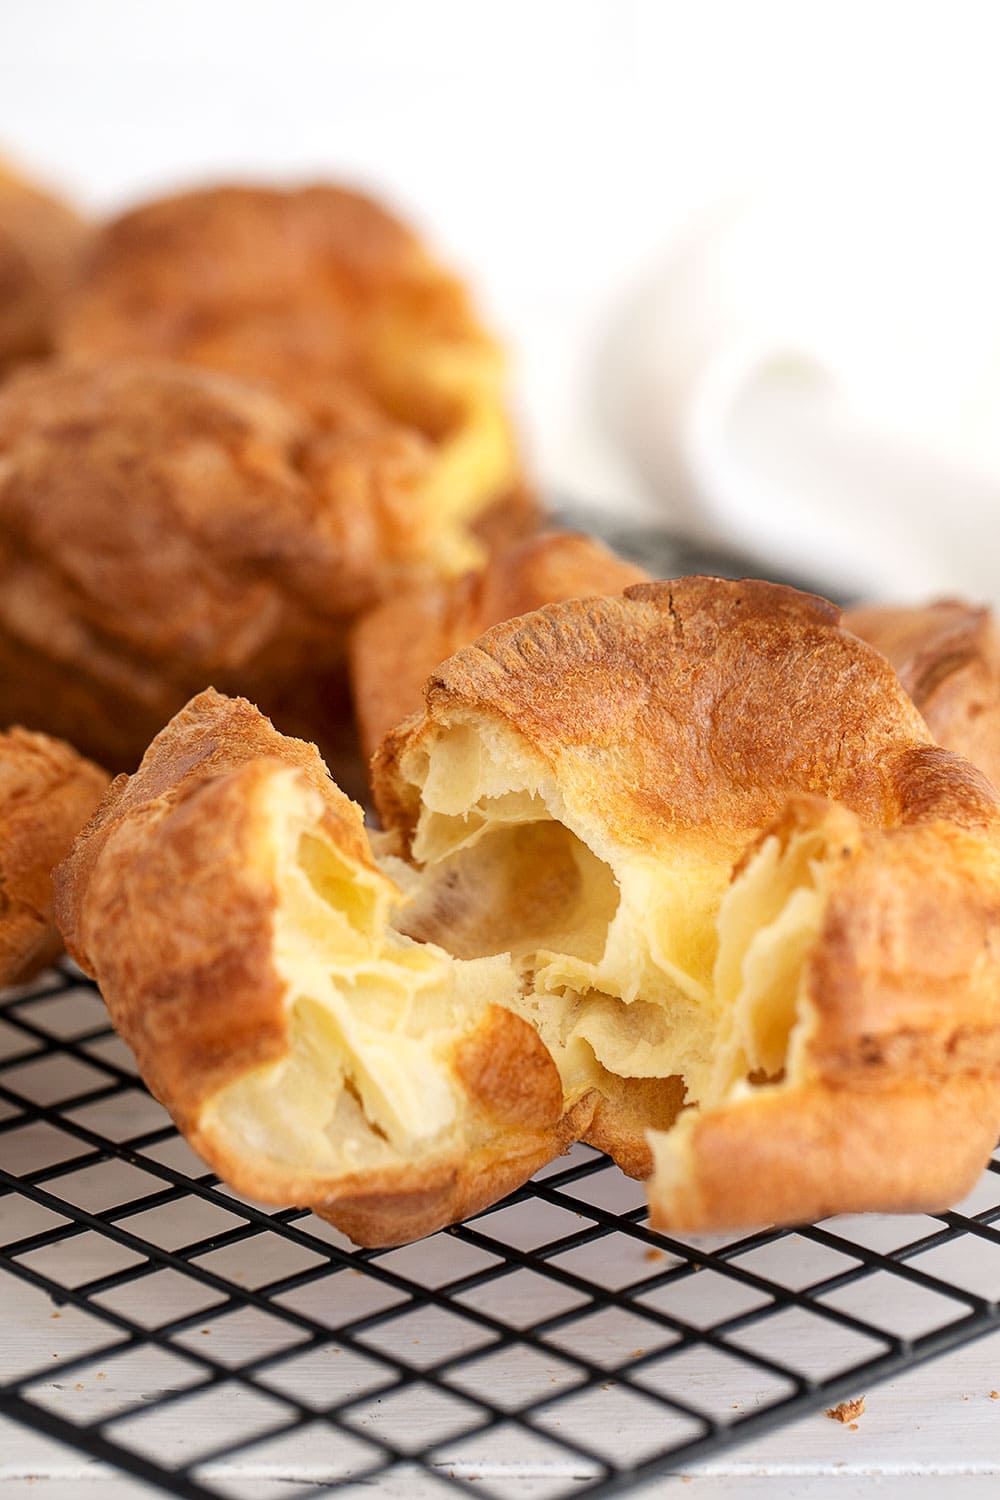
What should my Yorkshire Pudding look like when cooked? Should it be hollow? Yes, it should be hollow. That’s a feature, not a fail. That’s where the gravy goes :) The inside of the Yorkshire should be moist, but set. The moisture inside will make it feel cool-ish to the touch. It reminds me of choux pastry in that respect. The outside will be golden and lightly crispy, but not super crisp. They will often form a hole in the top centre, though not always. Yorkshire have their own mind, so expect a bunch of different shapes and sizes, even among puddings cooked next to each other.
Can you make Yorkshire Pudding ahead? Yes, make earlier in the day and just let them rest on a cooling rack until dinner. To re-warm, toss on a baking sheet and place into a 375F oven until warmed through (3-5 minutes).
Can you freeze Yorkshire Pudding? Yes, simply pop into a freezer bag or container and freeze up to 2 months. To re-warm, place frozen Yorkshire on a baking sheet and place into a 400F until warmed through, about 6-8 minutes.
How do I make cupped-shape Yorkshire Pudding? Using a room temperature Yorkshire Pudding batter will produce a tall and crowned Yorkshire Pudding. If you prefer a cupped-shape Yorkshire Pudding (so you can pour gravy into the top cavity), refrigerate the batter for 1 hour after mixing and then add the cold batter to the hot pan.
Want to save this recipe?
Enter your email and I'll send it to your inbox. Plus, you'll get great new recipes from me every week!
By submitting this form, you consent to receive emails from Seasons and Suppers.
You can unsubscribe at any time.

Get the Recipe: Yorkshire Pudding
Ingredients
- 3/4 cup + 2 Tablespoon all purpose flour
- 1/2 teaspoon fine salt
- 1/2 cup whole milk, full-fat 3.5% or 2% recommended
- 1/2 cup water
- 3 large eggs, can use 2 eggs as well, see Note 1
- Meat Drippings, cooking oil or shortening, for the pan
Instructions
- Stir together the flour and salt in a medium bowl. Make a well in the centre and pour in the milk and water. Beat until fluffy, the add the eggs and continue to beat until large bubbles rise to the surface. Cover the bowl and let rest at room temperature for 30 minutes.
- Preheat oven to 425F (not fan assisted), with the rack in the centre of the oven.
- Brush muffin cups generously with beef drippings, lard, shortening or high smoke-point cooking oil such as vegetable or canola oil or for baking with a bit more oil, measure in about 1/2 tsp for each regular muffin cup or 1 tsp for a larger muffin tin , Yorkshire Pudding pan or popover pan.
- Place empty pan into pre-heated oven and heat until very hot, about 12-15 minutes. Before removing the pan from the oven, re-whisk the batter and pour it into a 2-cup measuring cup so it is easy to pour. Place next to the oven to have it ready.
- Remove the hot pan from the oven and quickly pour the batter into the muffin cups, filling about 1/2-2/3 full. The batter should sizzle as it hits the pan.
- Place into oven and bake for 15 minutes at 425F, then reduce the oven temperature to 350F for an additional 10-15 minutes. *Use the shorter amount for smaller puddings or longer for larger puddings, depending on the pan size you are using.
Notes
More British Favourite Recipes to Love!

Hi! I’m Jennifer, a home cook schooled by trial and error and almost 40 years of getting dinner on the table! I love to share my favourite recipes, both old and new, together with lots of tips and tricks to hopefully help make your home cooking enjoyable, stress-free, rewarding and of course, delicious!
The absolute best / fail-proof Yorkshire pudding recipe. My ultimate go-to! 🖤
Glad to hear, Julie :) Thanks so much!
I made these last night, and they turned out amazing! The best I’ve ever made. I think the extra egg made them a lot more fluffier. Family loved them! Will definitely make again.
Thank you!
So glad to hear, Darlene :) Thanks so much!
Making these – or rather this – tonite. I’ve been making for years quite successfully but tonite I’m only feeding me and hubs so rather than using my Yorkshire tins which I then have to clean, I am using my medium size cast iron thus baking it as one pan. Actually is the way my Great Grandmother used to make in England and still made when here. 😀 We’ll see if I can duplicate her! Thanks for the info. Will let you know how that works.
Enjoy your recipes very much. Best for 2022!
Thanks so much Holly and enjoy! (I love a big pan Yorkshire :)
These look scrumptious, Jennifer! I know that usually are typically served with a roast, but I could happily make a meal out of just these!
Me, too Dawn :) They are actually a really nice little snack, as I know, since I’ve been eating these off the counter this past weekend. Thanks!
One of my favorites growing up Jennifer! Mom often made it and we loved hers. Can’t wait to give your recipe a try!
Well nothing is as good as Moms made, but this is a pretty good Yorkshire Pudding, too :) Thanks!