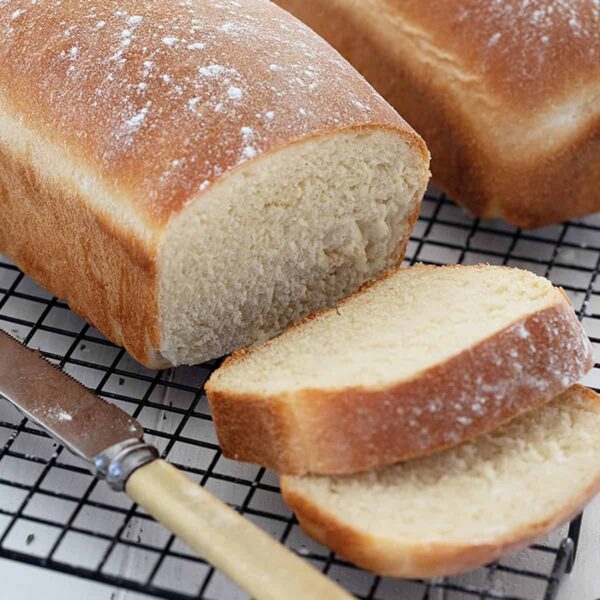
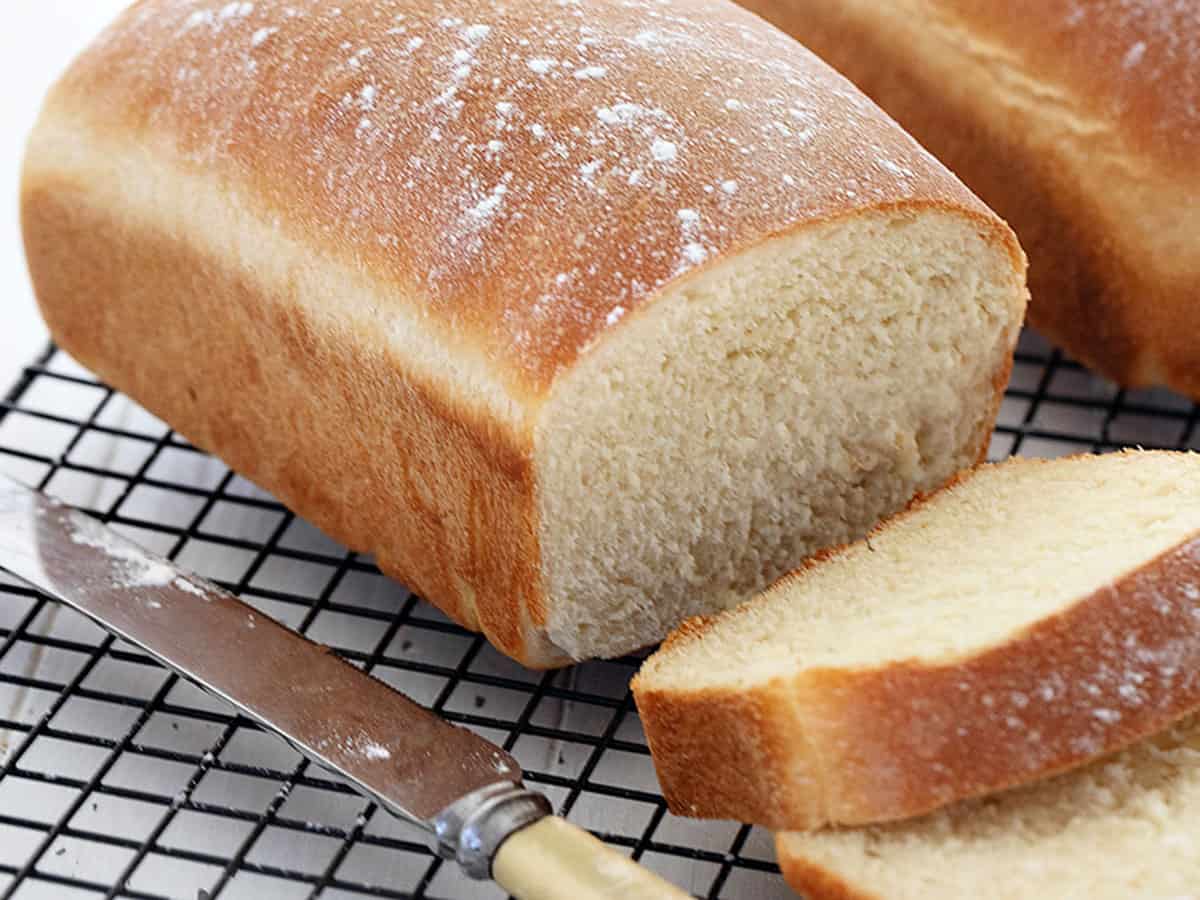
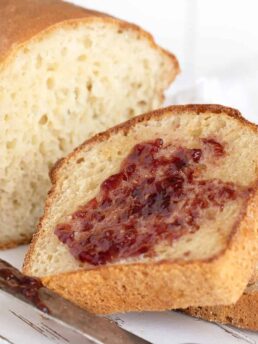
Walking you through making a basic white yeast bread at home, with tips and step-by-step photos. This easy homemade white bread is made with milk, for a lovely soft crumb. It makes two loaves (or halve the recipe to just make one loaf) and freezes beautifully!
Since homemade bread making is something I do a lot, I figured it might be helpful to anyone wanting to learn how to make bread at home, to share a basic homemade white bread recipe and to walk you through the process of making it.
New to bread making? Check out my Get Started with Yeast Bread Baking resource page.
This simple 6-ingredient bread recipe will make two 1 lb. loaves of bread. The recipe has lots of flexibility in terms of ingredient options and doesn’t use a ton of flour to make two loaves. I love this loaf as it’s a nice sturdy loaf, that slices well and easily to any size slice.
This bread freezes beautifully, so you can enjoy one right away and freeze the other for later. It also features an easy, no-rolling-needed shaping method, that’s great for beginners.
Ingredients and substitutions
A few notes about the key ingredients …
Flour: The first choice for flour would be unbleached, all purpose flour. Regular all purpose flour will work fine here as well. Bread flour will also work, though the amount needed for this recipe will be slightly different. You will need about 5-6 cups of flour for the 2 loaves. If you have less, you can halve the recipe and make just one loaf.You can replace 1 to 1 1/2 cups of the white flour with whole wheat flour, if you like. The whole wheat flour will probably absorb more liquid, so you may end up needing less total flour overall. Using whole wheat flour will result in a more dense textured bread.
Yeast: Regular Active Dry Yeast or Regular Instant Yeast is recommended here. My yeast of choice for many years has been SAF Brand Instant Yeast, in the red package. It is only available in larger 1 lb. packages, but I store it in a jar in the freezer and it lasts for years! I use it straight from the freezer. There are a lot of advantages of using Instant yeast. Learn more at my resource article Types of Yeast and Which One to Use When.
Vegetable Oil or Butter: Pick whichever you prefer. Vegetable oil has less flavour, but produces a more tender crumb and a bread that tends to stay fresh longer. Butter provides more flavour, but doesn’t stay fresh quite as long. If using butter, use it melted and cooled.
Milk or Water: Milk is a great choice for this bread if you have plenty on hand, for best flavour and texture. Any fat level of milk is fine or even re-constituted powdered milk is fine. Use what you have. You can substitute an equal amount of water, if milk is unavailable or in short supply. Obviously, the flavour of the loaf will be affected somewhat, though the texture will be fine.Another option is to use part milk, part water. It’s really quite flexible in that respect. Simply keep to the amount of liquid specified, whether milk, water or a mixture of both.
Salt and Sugar: Both of these provide flavour and in the case of the sugar, a little food for the yeast to do its work. You can substitute honey or maple syrup for the white sugar, if you prefer.
How to make homemade white bread
I have use a stand mixer fitted with a kneading hook, but if you don’t have a mixer, simply get yourself a big bowl and a wooden spoon and do your kneading on the counter instead.
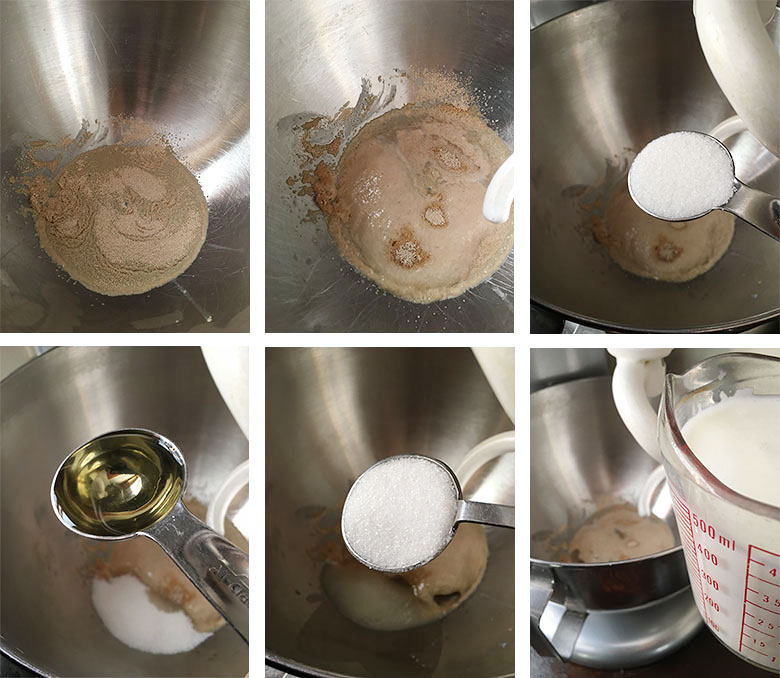
- Step 1: Add the 1/4 cup of lukewarm water (105-110F, if you have a thermometer) to your mixer (or bowl). Sprinkle the yeast over-top, give it a quick stir and let stand for 5 minutes.
- Step 2: While your yeast is sitting, go ahead and warm your milk or water to lukewarm (105-110F) on the stove-top in a saucepan or in the microwave. If you don’t have a thermometer just test it like you would a baby bottle. It shouldn’t feel hot. Just comfortably warm.
- Step 3: Your yeast should look foamy at this point. Go ahead and add the salt, sugar, oil (or butter) and lukewarm milk (or water). Mix to combine.
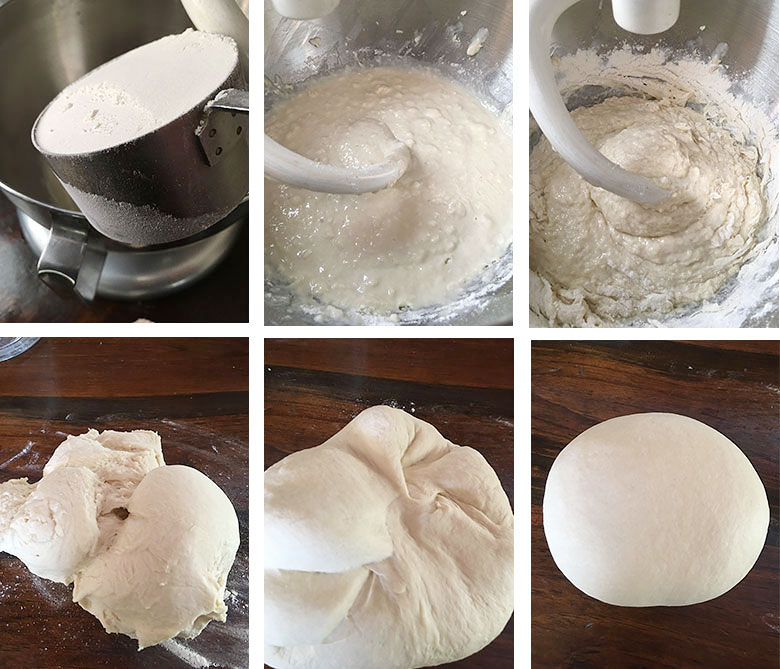
- Step 4: With your mixer running on low (or in your bowl with a wooden spoon), add just 2 cups of the flour, one cup at a time, mixing in as you go.
- Step 5: Add the 3rd and 4th cup of flour and mix in. Your mixture will start to move from batter-like to dough-like, but will still be quite moist and loose.
- Step 6: Begin adding your 5th cup of flour is smaller increments, mixing as you add. If mixing by hand, when the mixture becomes difficult to stir, remove the dough to a well-floured work surface and continue adding flour and kneading it in.
- Step 7: As the dough comes together and starts to gather around the kneading hook and starts to clean the bowl, add flour in very small amounts, just as needed, until you have a moist, but not sticky, smooth dough.I made a short video of the last part of mixing/adding flour. If you are new to bread making and you think it would be helpful to see the end part of mixing the dough, pop on over to my Youtube page to give it a watch. Note that I’ve sped up the video so it looks quicker than it will actually be. You want to use Speed 2 only on your mixer when mixing the dough. My bread took slightly over 5 cups of flour, though your mileage may vary. Just use as much as needed.
Notice how the flour is added in small increments towards the end. I’m especially looking for stickiness at the bottom of the bowl, the smoothness of the dough and how clean the bowl is (sticky dough/sticky bowl). You are always better to err on the side of just slightly sticky dough than risking adding too much flour and ending up with a stiff dough. You can always knead in a bit more flour when you move the dough to the countertop, but it’s impossible to take flour out.
- Step 8: Remove the dough to a floured work surface and knead by hand for about a minute, then form your dough into a ball. If you can’t knead it because it’s sticky, add more flour in small bits, as needed, until it is no longer sticky. If you can’t knead it because it’s too stiff, you have added too much flour. It’s tough to remedy that at this point, as adding water will just make it slimy. You can try spraying it with a bit of water to see if that might loosen it up a bit.
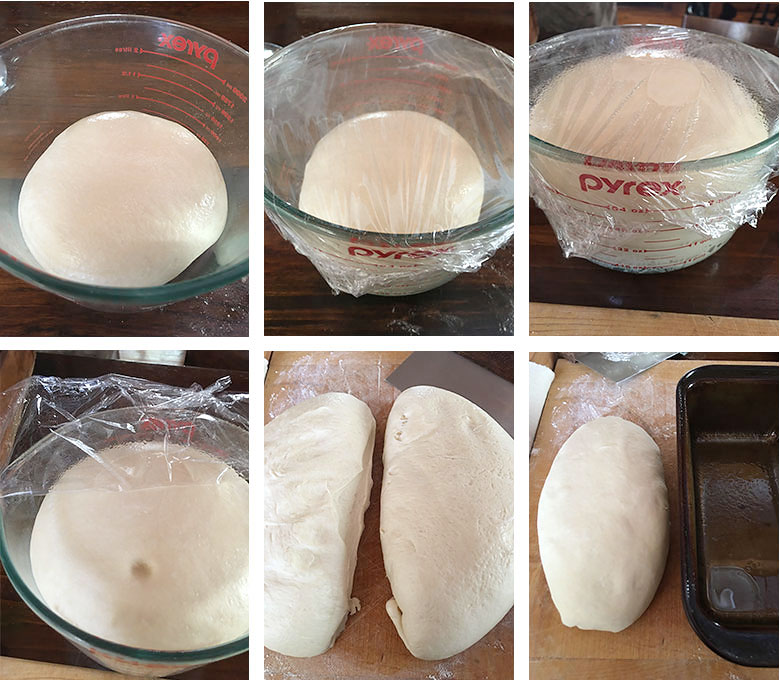
- Step 9: Spray a bowl or large measuring cup with cooking spray. Drop your dough ball into the bowl, top down (so it comes into contact with the cooking spray, then flip it over so the top of the ball (now oil-coated) is up. Cover the bowl tightly with plastic wrap and let stand at room temperature until doubled, about 60-90 minutes. I use my 8-cup measuring cup, so I can easily see when it’s doubled. To test if the dough is ready, poke your baby finger into it. If the indentation remains (doesn’t fill back in), it’s good to go.
- Step 10: Remove the dough to a floured work surface and press down on it to deflate it. Divide the dough into 2 equal pieces.
- Step 11: Grease two 8×4-inch loaf pans and have ready.
- Step 12: Working with one piece of the dough, form it into a rough oval, about the length of your baking pan. I like to set the pan beside me as I do this so I can see the length needed. Flip your oval of dough over and pinch together the sides in the centre, bringing in the ends when pinching as well. You should have a pinched seam down the centre of the dough. Flip the dough back over again and it should look tighter with a more defined shape. *Don’t stress this part. Your dough will still rise if it isn’t perfect. It will just rise better if you can do that bit of pinching. Just remember the goal is to make the dough on top of the loaf taut, by pinching it underneath.
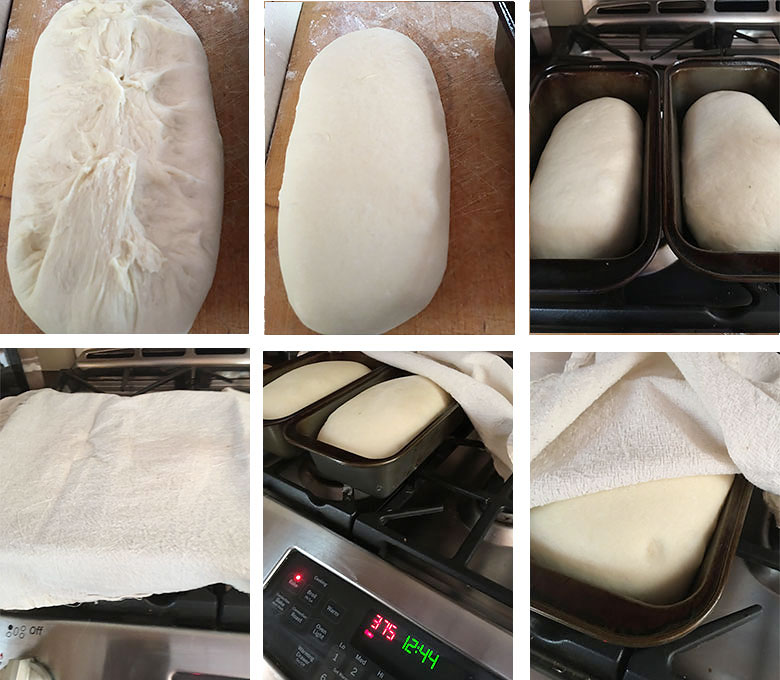
- Step 13: Place the dough into your prepared loaf pan, seam side down. Repeat with the other piece of dough.Cover the pans with a clean tea towel (or plastic wrap) to rise until doubled. This should take anywhere from 30-60 minutes. Keep an eye on it. Again, you can test if it’s ready by poking it with your finger. If the indentation remains and just slightly and slowly fills back in a bit, it’s ready to bake. (If the indentation fills back in immediately, it is not ready to bake). Start your oven preheating to 375F. *Note: I started my dough at 10:50 am and it was 12:44 when it was ready for the oven, so about 2 hours from start to baking time, or about 2 hours, 30 minutes start to finish. Your rising time may be different, depending on the temperature of your kitchen. Trust what you see, not the clock.
- Step 14: When the dough is ready to bake, place in preheated 375F oven, with the rack in the centre of the oven. Bake for 25-30 minutes or until the loaf tests at least 190F when tested with a thermometer or when it is dark golden and has pulled away from the sides of the pan. Mine took 28 minutes to reach 190F internal temperature. If you don’t have a thermometer, you can use a skewer to test. Just poke it in from the side close to the edge of the pan, into the centre of the loaf. It should come out clean and dry.
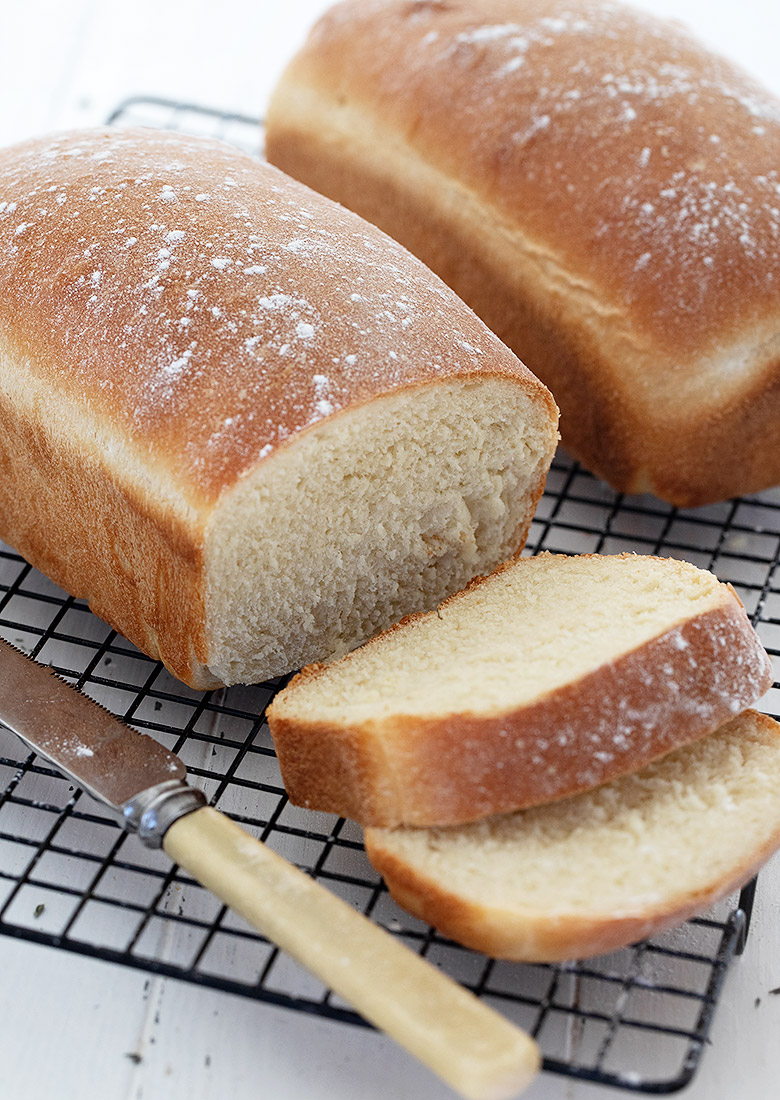
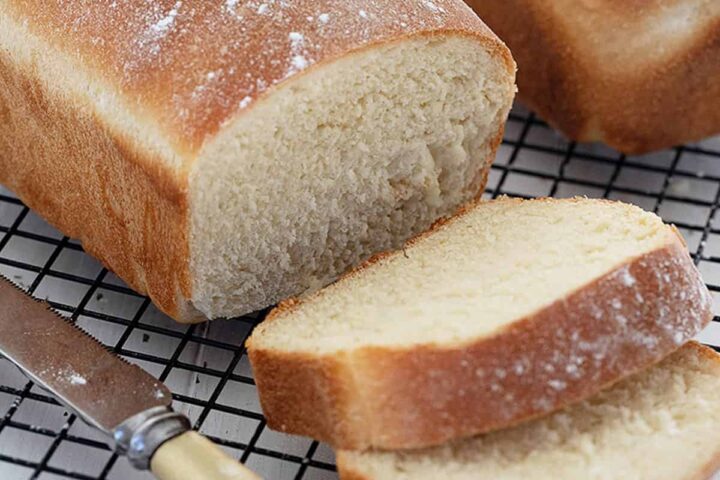
- Step 15: Remove the loaves from the oven and immediately remove from the pans to a cooling rack to cool. Allow to cool almost completely before slicing, as slicing a hot loaf can make the loaf turn gummy.
Storage and freezing
Store your baked bread at room temperature, wrapping the cut end with plastic wrap. I like to store it on a cutting board, wrapping just the cut end, but placing the cut side down, to keep the plastic secure against the cut end, to keep the moisture in the bread.
Baked and cooled bread can be tightly wrapped and frozen for up to 3 months, though it will be best if used within the first month after freezing.
Want to save this recipe?
Enter your email and I’ll send it to your inbox. Plus, you’ll get great new recipes from me every week!
By submitting this form, you consent to receive emails from Seasons and Suppers.
You can unsubscribe at any time.
Get the Recipe: Easy Homemade White Bread
Ingredients
- 2 1/4 teaspoons active dry yeast or regular Instant yeast, (one small package)
- 1/4 cup water, lukewarm (105-110F)
- 2 cups milk or water, lukewarm (105-110F)
- 3 Tablespoons vegetable oil , or melted butter, slightly cooled
- 1 Tablespoon fine sea salt, a bit less for regular fine table salt
- 2 Tablespoons white sugar, or 2 Tbsp honey or maple syrup
- 5-6 cups all purpose flour, approximately
Instructions
- Add the 1/4 cup lukewarm water to the bowl of a stand mixer, fitted with a kneading hook or a large bowl. Sprinkle yeast over-top. Give it a quick stir, then let stand 5 minutes. After 5 minutes, the yeast should look foamy.
- Add the lukewarm milk (or water), the vegetable oil (or melted butter), salt and sugar. Mix to combine. Add 2 cups of the flour and mix to combine. You dough mixture will be batter-like at this point. Add the 3rd and 4th cups of flour, one cup at a time, mixing in between adding. At this point, begin adding additional flour in small increments, adding and kneading, adding only as much flour as needed to create a moist, smooth but not sticky dough.
- Remove dough to a floured work surface. Knead by hand for about 1 minute, then form the dough into a ball. Grease a bowl or large measuring cup. Drop the dough ball into the greased bowl, top side down, then flip it back over so the now oiled top is facing up again (this will help keep the dough moist). Cover the bowl tightly with plastic wrap and let stand at room temperature until it has doubled in size, about 60-90 minutes. Test that the dough has risen enough by poking it with your baby finger. If the indentation remains (doesn’t fill back in), it’s ready.
- Grease two 8×4-inch loaf pans and set aside.
- Remove the dough to a floured work surface and press down on it with the palms of your hands to deflate it. Divide the dough into 2 equal sized pieces. Take one piece of dough and shape it into a rough oval, about as long as your loaf pan. Flip the oval over the use your thumb and middle finger to pinch from the outside edges in towards the centre all the way down the dough. As you near the short ends, work them into the pinching as well (see Step by Step photos above the recipe card to see how this looks if it isn’t clear). Flip the dough back over and then place into prepared loaf pan. Repeat with the other piece of dough.
- Cover the loaf pans with a clean tea towel and let rise at room temperature until doubled again, about 30-45 minutes. Again, check the dough by poking it. If the indentation remains, it’s ready to bake.
- Preheat oven to 375F (350F for glass pans). Not convection/fan-assisted.
- Bake loaves on the centre rack of the preheated 375F oven for about 25-30 minutes, or until the loaf tests at least 190F when tested with a thermometer. If you don’t have a thermometer, the loaf should be golden, will have pulled away from the sides of the pan and if you stick a skewer in the side and into the centre, it should come out clean and dry.
- Remove loaves from the oven and immediately remove from the pans and onto a cooling rack to cool to at least just warm. Avoid cutting into a hot loaf, as it can cause the loaf to get gummy inside. I sometimes like to dust the top of the baked loaves lightly with flour, for a rustic loaf. You can also rub with butter, for a nice soft crust.
Notes
More bread recipes to love!
Hi! I’m Jennifer, a home cook schooled by trial and error and almost 40 years of getting dinner on the table! I love to share my favourite recipes, both old and new, together with lots of tips and tricks to hopefully help make your home cooking enjoyable, stress-free, rewarding and of course, delicious!
If your only making 1 loaf do you keep the same amount of yeast? First timer here so looking forward to trying this one :)
Hi Martin, yes, I would keep the yeast at 2 – 2 1/4 tsps for one loaf.
I forgot to rate this Amazing bread recipe last time. I made buns (12) with one half, and cinnamon rolls (12) with the other half. I Used the Milk and Butter option. Both rose beautifully. The dough was perfect, and the end result was nice soft buns with a wonderful texture and taste. I will use this recipe again, and again! Thank you Jennifer :)
I’m so glad to hear, Melissa :) Thanks so much!
Best bread recipe ever! I used milk instead of water and it came out beautifully :)
So glad you enjoyed it, Isabelle! Thanks so much :)
Great video and tutorial!
Do you prefer to use milk or water? And have you ever used half of each?
Thanks Janie :) I have made bread all kinds of ways, but when it comes to sandwich bread, I tend to prefer bread that has some milk in it. Using half milk and half water is a great way to get some of the benefits of both.
This is the second time I’ve made this recipe and it’s great! Super easy. Fun for the kids to knead. I used water instead of milks, butter instead of oil, and honey instead of sugar. It came out large and fluffy. I was nervous about the 1 TBS of salt, but it didn’t taste salty at all. Worked well with organic flour. I’m in MO so I did the 1.5 hour proof and 45 minute second proof since we have cold winter months. I baked it for 20 minutes and it was plenty done for us as we like a soft crust. Thanks for sharing!
So glad you are enjoying it :) Thanks so much!
How would you version this to a 1.5 lb in a bread machine?
Hi Gina, if you use the “1/2” button on the recipe card, that will halve the recipe. That should be pretty close to size for a 1.5lb machine I believe.
Only bread recipe I use friends who have received a loaf absolutely rave about the bread it’s super simple to make
So pleased to hear, Katie :) Thanks so much!
I like to make yeast breads by hand and find kneading dough by hand to be therapeutic. Would six minutes be a sufficient amount of time for kneading the dough by hand, or would you suggest 8 minutes instead?
Hi Deb, I think 8-10 minutes if kneading by hand, unless you’re really efficient (which you might be if you regularly knead by hand :)
Jennifer,
I ended up starting the bread recipe before seeing your answer. To be on the safe side, I kneaded the dough for 7 minutes and that did work. From now on I will plan to knead it for 7 to 8 minutes 😊
The bread is delicious and is now my go to recipe!
So glad you enjoyed it, Deb :) As you make more and more bread I think you’ll know when you have kneaded enough just by the feel of the bread, too.
This was a lovely bread to bake. Beautiful rise and wonderful flavor. I appreciate the versatility of being able to alter the sweetener used in this bread to match what I have on hand.
So glad to hear, Susan. Thanks so much!
5+++++++
I am new to making bread but I have made this recipe twice a week for three weeks and it is absolutely glorious. We are an active family on the go so sandwich’s are staple, this bread is perfect. Would using whole wheat flour be the same measurements?
I’m so glad you are enjoying it, Veronica! And no, whole wheat flour is a whole different situation. Generally speaking, you can replace about 1/4 of the all purpose flour with whole wheat flour without too much issue. That said, the resulting bread will be heavier and probably a little slower to rise. If you want to make a 100% whole wheat bread, you would be best seeking out a recipe specifically for that, rather than trying to adapt, as it can be tricky. Whole wheat flour absorbs liquid differently and it can sometimes be challenging to get a good rise with 100% whole wheat, so there are often additives, such as Gluten Flour to aid it along.