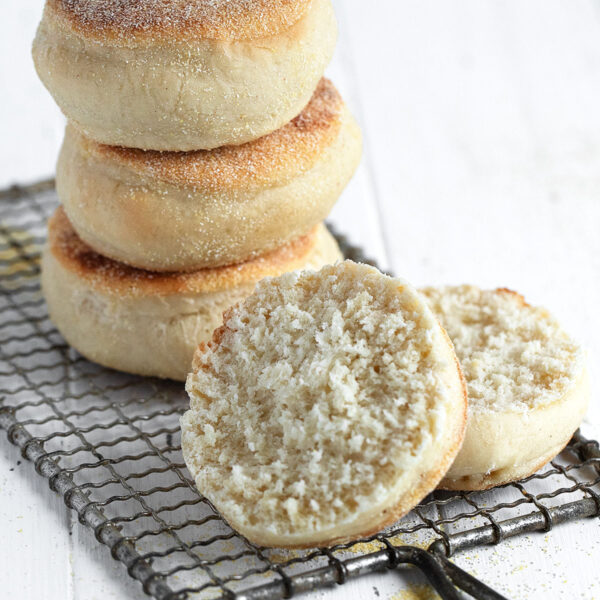
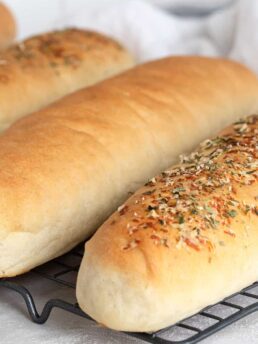
Making English muffins at home is easier than you think! These homemade English Muffins are ready in less than 2 hours or there is an over-night rise option, as well.
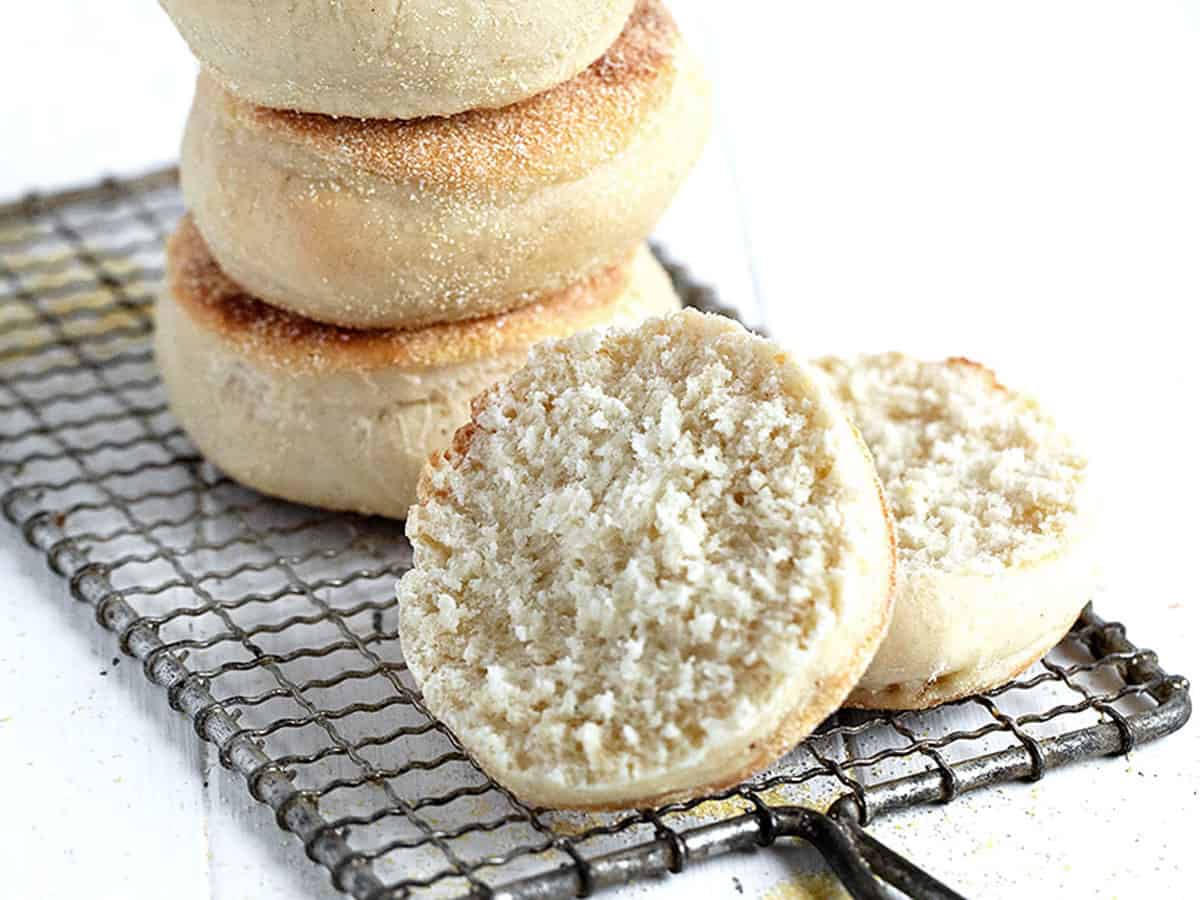
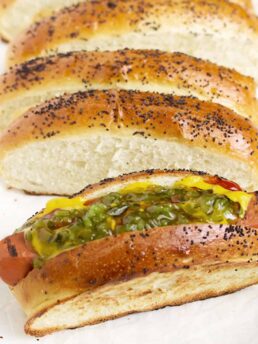
I love a great English muffin breakfast sandwich (for breakfast, lunch or dinner :), so I love to bake up some homemade English muffins every once in a while, to make sure I’m always prepared. This is my favourite recipe. They have great flavour, especially when made with buttermilk, which gives them a sourdough-like tang. They also have great nooks and crannies to hold the butter!
Step by Step Photos
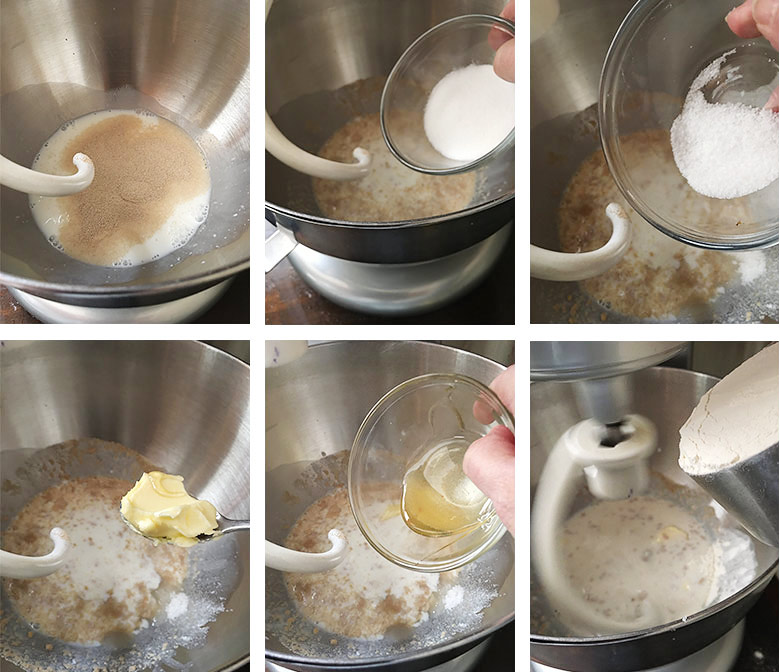
Step 1: Prepare your dough by mixing together all the ingredients. You should end with what looks like a very moist, almost sticky dough. Don’t add any more flour in the bowl. Remove to a floured work surface and knead a few times, adding a bit more flour there, if needed, just until the dough is kneadable and no longer sticky. Place the dough in a greased bowl, cover and refrigerate for 1 hour.
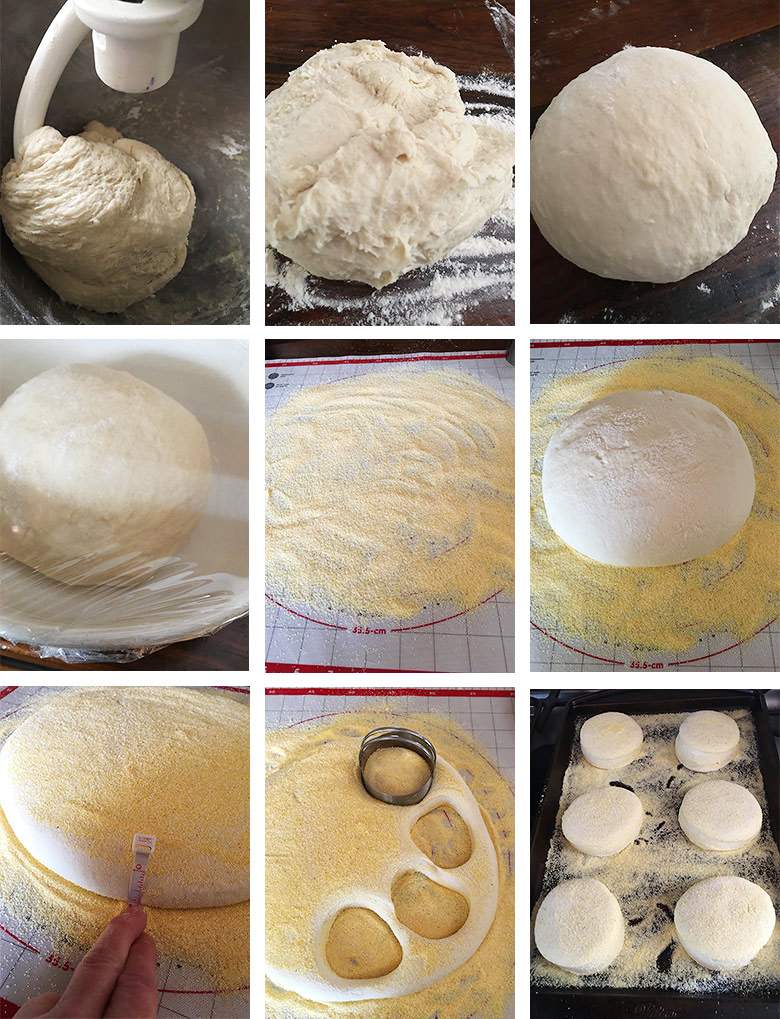
Step 2: After refrigerating, remove the dough to a floured work surface and form into a ball. Sprinkle the rolling surface with some cornmeal, place dough ball on top, then sprinkle the top of the dough with more cornmeal. Roll the dough ball into a circle about 3/4 – 1-inch thick, then cut your rounds out with a 3-inch cutter, trying to cut them as close together as possible, to avoid waste, as you can’t re-roll the left-over dough. Avoid placing your cutter over the outside edge completely. Move it in a 1/4-inch or so, so that you get a clean cut edge. Place your cut rounds onto a cornmeal-sprinkled baking sheet, cover with plastic wrap and let rise 30-40 minutes.
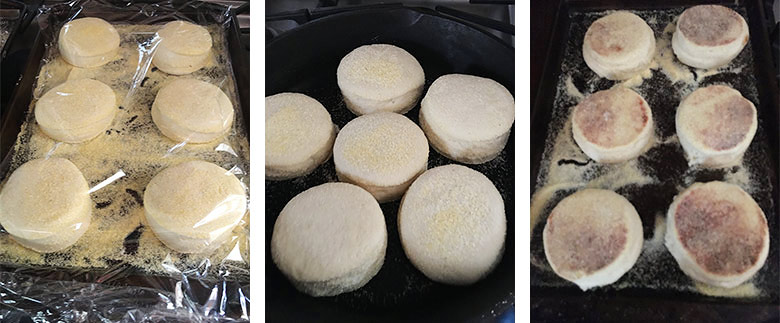
Step 3: Preheat oven to 350F. Fry muffin dough in an un-greased skillet just until they start to colour, then flip and fry the other side. I like to press down lightly with a spatula after they are flipped, to ensure a nice, flat shape. Remove from the skillet to your original baking sheet and pop into the preheated oven to bake for 15 minutes, or until they test at least 195F internal temperature. Remove to a cooling rack to cool completely.
FAQ
- Can I add some whole wheat flour? Sure. The finished muffins with whole wheat flour will be slightly more heavy and dense in texture. I would suggest replacing about 1 cup of the all purpose flour with whole wheat. As whole wheat flour absorbs more liquid, you may not need to add as much total flour to produce the moist finished dough, so hold back that last cup of flour and add in small increments, just adding as much as needed.
- What can I substitute for the honey? You can use any other syrup you might have around – maple syrup, light corn syrup, agave, brown rice syrup, barley malt syrup. If you don’t have any of those, simply add an equal measure of brown sugar.
- Can I make them “cinnamon raisin”? Sure! Simply add 1 – 1 1/2 Tbsp of cinnamon to the dough (add with the flour) and mix in about 1 cup of raisins at the end of mixing the dough. I would soak and dry the raisins before adding to “plump” them, but also so they don’t absorb moisture from the dough as it rises. Simply soak in warm water for 10-15 minutes, then drain and dry well before adding to the dough. Do note that the addition of cinnamon to the dough will slow the yeast activity/rising somewhat, so you may need to extend the rising time slightly.
- How do I store the baked English muffins? After cooling completely, I store my baked muffins in a plastic storage bag and store in the fridge, for maximum shelf life. English muffins also freeze beautifully. Simply store in a freezer bag or container for up to 3 months.
- How do I know when they are baked through? An instant read thermometer is the perfect tool! Insert through the side and just into the centre of the muffin. It should reach 195F at least or between 195-200F internal temperature. If you don’t have a thermometer, use a skewer inserted in the same way. It should come out clean and dry.
- Can I double the recipe to make more? You can. Simply double the recipe ingredients and you’re good to go. I have found the smaller batch easier to work with myself, so I just make what I need, as I need them. That way I’m not having to fry or bake in batches etc.
- Can I keep in the fridge over-night and bake in the morning? Yes you can. Make the muffins through the rolling/cutting, place on the cornmeal-dusted baking sheet, cover tightly with plastic wrap, then pop in the fridge overnight. In the morning, remove from the fridge and let rise at room temperature about 45-50 minutes (with the plastic wrap still on), then fry and bake as per the recipe.
How to enjoy homemade English muffins
- Toasted with butter – or butter and jam/peanut butter etc.
- Classic Breakfast Sandwich – egg, cheese, bacon or sausage or just an egg and cheese on a toasted and buttered muffin, of course
- Open-faced Sandwich – split your muffin, toast and top with a fried egg, ham, asparagus, wilted spinach, eggs benny etc and knife and fork it.
- Sandwich of any sort – just use the split muffin in place of bread slices for any sort of sandwich. One of my favourites is peameal bacon, cranberry sauce and Brie cheese and a warm, toasted and buttered muffin.
- English Muffin pizzas – these were a staple for me growing up! Split your English muffins, spread on some pizza sauce (or even tomato paste or sauce works), top with cheese and bake in a 425F oven for 8-10 minutes, or until crisp and melty.
- Grilled Cheese – English muffins actually make great grilled cheese sandwiches. Simply split, fill with cheese, then butter to outside and grill.
- Hamburger bun – not conventional, but a nice substitute for a burger bun.
- English Muffin Bread Pudding – ideal for when your English muffins are starting to dry out a bit. Simply cube, toss in some ham, cheese (maybe some asparagus or broccoli) and pour an egg/milk custard overtop and bake.
How to Split an English Muffin
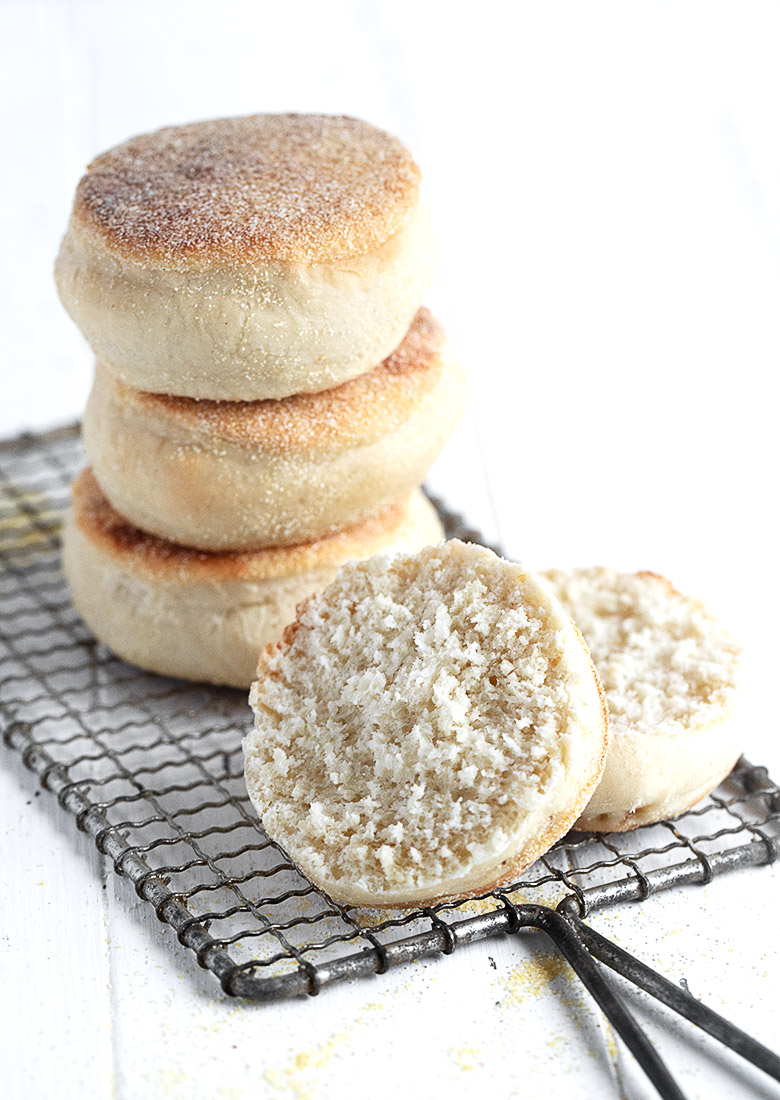
To make sure you get maximum nooks and crannies, use a fork to score around the sides, then gently pull your muffin apart to split it.
Want to save this recipe?
Enter your email and I'll send it to your inbox. Plus, you'll get great new recipes from me every week!
By submitting this form, you consent to receive emails from Seasons and Suppers.
You can unsubscribe at any time.
Get the Recipe: Homemade English Muffins
Ingredients
- 1 1/4 cup buttermilk, or soured milk, at room temperature *See Note 1.
- 1 Tablespoon Instant yeast, *see Note 2 below if using Active dry yeast
- 2 1/4 teaspoons Kosher salt, or about 1 3/4 tsp fine salt
- 2 Tablespoons white sugar
- 1 1/2 Tablespoons honey
- 1 1/2 Tablespoons butter, at room temperature
- 3 cups all purpose flour
- 1/2 cup cornmeal, *See Note 3 below
Equipment
- 3-inch biscuit cutter (or similar sized glass)
Instructions
- Remove your buttermilk or milk from the fridge for at least 30 minutes before starting, so it comes to room temperature. If you are making soured milk (see Note 1 below), do that and then let stand at room temperature.
- Add the room temperature buttermilk or milk to a large bowl or the bowl of a stand mixer, fitted with a kneading hook. Add the yeast and stir to combine. Let stand 5 minutes. Add the sugar, salt, honey and butter and mix to combine. Add the flour, one cup at a time, mixing as you go. When you have added all the flour, you should have a somewhat sticky looking dough, but it should be wrapping itself around the kneading hook. Don't add anymore flour to the bowl, but rather remove to a lightly floured surface and knead a few times with a bit of flour, if it's too sticky to knead. You'll probably find you don't need to add a lot of flour. Keep the dough moist. Only add as much flour as needed to remove any bit of stickiness. Form the dough into a ball and place into a greased bowl, cover with plastic wrap and refrigerate for 1 hour.
- After the 1 hour, remove the dough to a lightly floured surface. Knead the dough just a bit, adding a bit more flour, as needed, if the dough is too sticky to knead. Add just as much flour as you need and be careful of not adding too much. Form the dough into a ball.
- Scatter 2-3 Tbsp of the cornmeal on a work surface, in a roughly 10-inch circle. Place the dough ball on top of the cornmeal, then scatter another 2-3 Tbsp of cornmeal on top of the dough ball. Scatter the remaining cornmeal onto a baking sheet and set aside.
- Using a rolling pin, roll the dough ball into a roughly 3/4 - 1-inch thick circle. Using a 3-inch biscuit cutter, cut rounds out of the dough, trying to keep them as close as possible as you can't re-roll/re-use the scrap dough. Don't cut right to the outside edge. Move your cutter in about 1/4-inch before cutting. You should get six to eight 3-inch rounds from the single (not doubled) recipe. Place the cut rounds onto the cornmeal dusted baking sheet. Cover the baking sheet with plastic wrap. Let rise at room temperature 30-40 minutes or place in the fridge overnight if you like, and let rise about 45-50 minutes in the morning, then fry and bake as detailed below.
- Preheat the oven to 350F.
- When that time is about up, heat an un-greased skillet on the stove-top over medium-high heat. When ready, add the muffins to the skillet, leaving some room between so you can get a spatula in there to flip them. Reduce the heat slightly to about medium heat and allow the muffins to cook until the underside starts to colour a bit, then flip them and repeat on the other side. After I flip the muffins, I like to gently press down on the top of them with a spatula to flatten them slightly. Not too much. Just enough to remove any large air pockets that might have formed from the heat of the cooking.
- Remove the browned muffins to the same baking sheet and place into the preheated 350F oven. Bake for about 15 minutes, or until they register between 195-200F when tested with an instant read thermometer. If you don't have a thermometer, you can test by inserting a skewer in the side of the muffin and into the centre. It should come out clean and dry.
- Remove muffins from oven, then immediately transfer to a cooling rack to cool completely. Once cooled, store in an airtight container. I like to store mine in the refrigerator if they aren't going to be used up right away. These will also freeze well up to 3 months.
Notes
More Homemade Baking Recipes to Love!
Hi! I’m Jennifer, a home cook schooled by trial and error and almost 40 years of getting dinner on the table! I love to share my favourite recipes, both old and new, together with lots of tips and tricks to hopefully help make your home cooking enjoyable, stress free, rewarding and of course, delicious!
Hi Jennifer,
Can i use plain yogurt as a substitute for buttermilk? If so, would you know what ratio i would use?
Thanks a lot!
Hi Menchi and I’m sorry, but I have no idea whether it would work or not, so I don’t know how much you would need. Sorry, I haven’t tried this myself.
Great recipe and they smell and taste just like Thomas. Was unable to find in the store during the “new normal”. I will no longer buying these are easy and wonderful. Made them in a cast iron skillet and no sticking issue. Stay safe and be well.
Glad to hear! Thanks so much :)
Do you have to worry about them sticking in the frying pan? I know you like using your cast iron pans, and so do I, but would a non-stick be better for these?
Hi and no, I have absolutely no issues with sticking. At all. They have a nice coating of cornmeal on them, which helps a lot. Even right after placing them in the pan, you can shake the pan and they’ll move. I also think the cast iron works best for heat retention/regulation. The thinner non-stick pans can get too hot sometimes :)
Can’t wait to try, one question, is it possible to brown them after they’ve cooked?
Hi Karen, I haven’t tried it, but I can tell you what I think would happen if you did that. I think if you bake them first, they will rise too much (end up too thick) and they will turn a little round/bun-ish in shape, rather than flat. The browning process seals the outside and sets their shape. The baking after just finishes cooking the insides of the muffin. Can I ask why you want to do it the other way around?
Hi Jennifer
I can’t seem to get any your save to pinterest links to work when I click on them to save the recipe to my pinterest page.. Instead of a photo of the English muffins appearing, the only thing that appears when I click on your save to pinterest link is a black star with a red line through it which pinterest won’t accept. Didn’t have a problem saving a recipe from another blogger just a short while ago, it just seems to be here the link is not working for some reason. A bit puzzling too as I’ve not had a problem saving your recipes except for today.
Anyway, just thought I’d let you know in case I’m not the only one.
All the best stay well
Hi Joycelyn and thanks for letting me know. I have to insert an image to be pinned on the back end and I had forgotten to do that with this post. It’s fixed now, so you shouldn’t have any issues going forward :) Thanks and you stay well, too!
I can’t be trusted with English muffins in the pantry – I don’t know what I’d do with homemade! Wowza! It’ll be tough to share!!
Lol! I hear that :) I freeze them, so they’re not quite as handy.
I have no yeast and there is none to be found. How can i substitute that?
Hi Claudia, the only substitute for commercial yeast would be a sourdough starter.
Thank you. Would baking powder work? If so, what would be the quantity to use for this recipe?
I suppose in a pinch you could give it a try. There is no guarantee they will turn out as you might like though, so if flour is in short supply for you as well, consider whether you want to use it up to try. That said, google advises you can try 1 tsp of baking powder for every cup of flour (so 3 tsp, for this recipe), instead of yeast. If you try it, let me know how it works out :)
I will try it and let you know. :)
Thanks and P.S. I would dial back the added salt just a bit if using baking powder.
I love English muffins, especially with nooks and crannies to soak up the butter and jam!
Thanks Matt :) Me, too!
That seems like alot of sugar. And honey too? Are these meant to be a sweet English muffin?
Hi Steph, I appreciate it seems like a lot of added sugar, but I can assure you they don’t come out as “sweet” English muffins. Just a normal English muffin, which I guess are actually a bit sweet, we just never really noticed it :)
I love English muffins for breakfast, lunch and dinner, just like you. Smothered with butter. The porous texture is the answer:) Looking forward to baking a batch!
Thanks Milena and yes, they need to soak up the butter :)
English muffin egg sammies are the BEST!! Especially if it’s on a homemade English muffin!! These muffins look delicious – those perfect nooks and crannies have me drooling! This is the perfect thing to make right now!
Thanks Cheyanne :)
I LOVE your recipe and adore English muffins. We could have such fun baking together. All your photos are very helpful. Outstanding :)
Thanks Tricia!
Now homemade english muffins are something I definitely have to give a try! Perfect for this upcoming weekend for a breakfast sandwich!
Thanks Dawn and yes, must keep the breakfast sandwiches coming ;)
English muffins are a favorite of mine any time of day, just like you. Looking forward to baking my own!
Would I be able to make these English muffins with gluten free flour? We are gluten free and dairy free at our house, and I am always looking for recipes that I can convert and make at home.
Currently, I am using the Bob’s Red Mill gluten free 1 to 1 baking flour.
Hi Kailie, I’m afraid I can’t say, as I’ve never tried to make these either gluten or dairy free. The only way to know is to give it a try :) Do let me know how it worked out!
English muffins are on my baking bucket list Jennifer. Yours look perfect. You’re inspiring me to give them a go!
Thanks Mary Ann and they are much easier to make than you probably thought :)