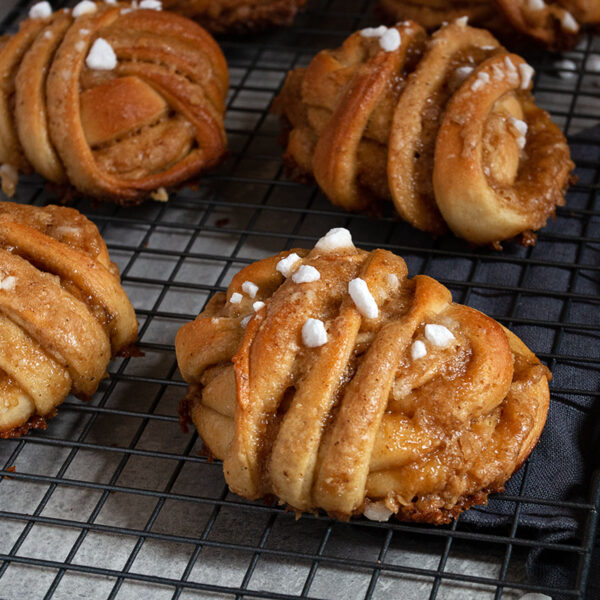
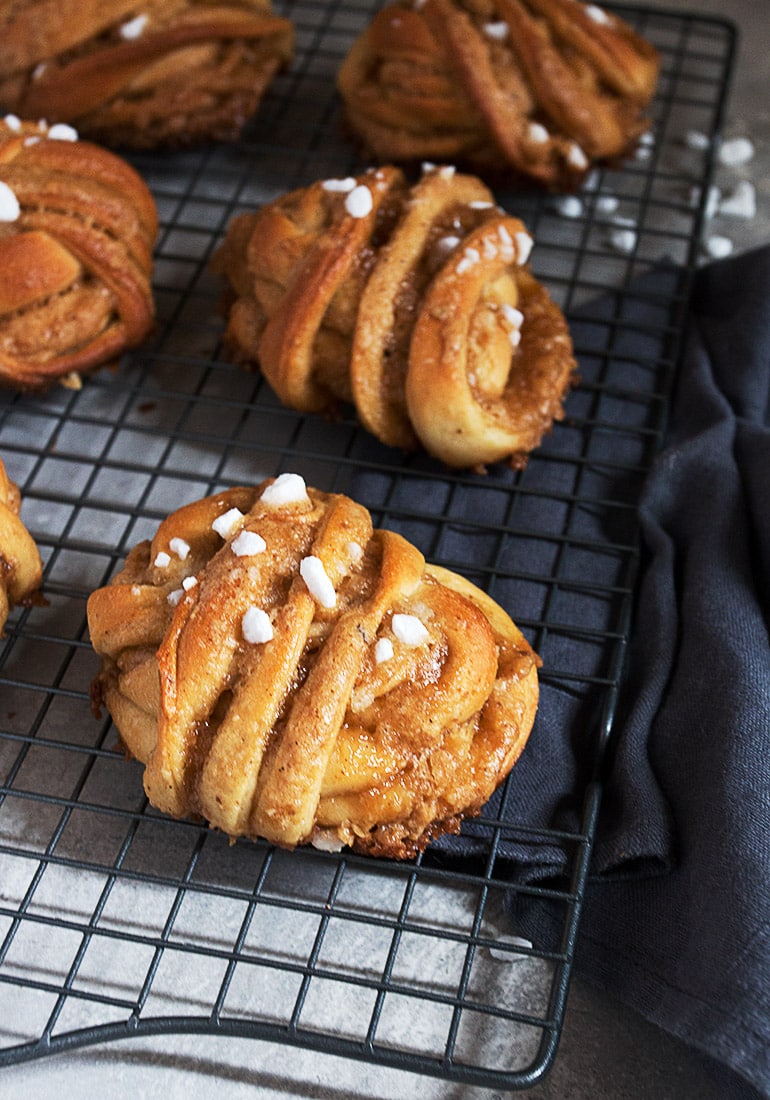
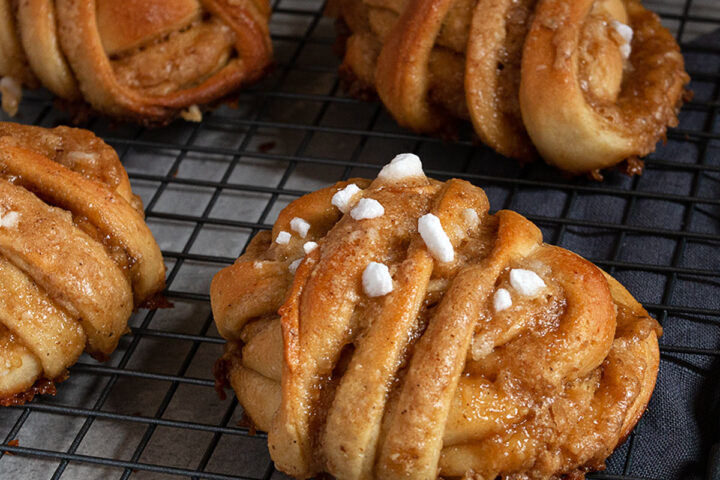
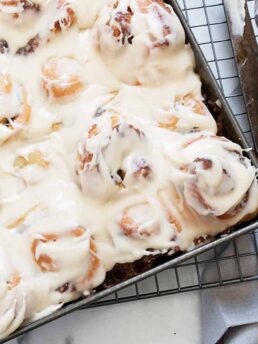
Pretty maple twist rolls, filled with a maple syrup and walnut filling and twisted into a fun and pretty shape!
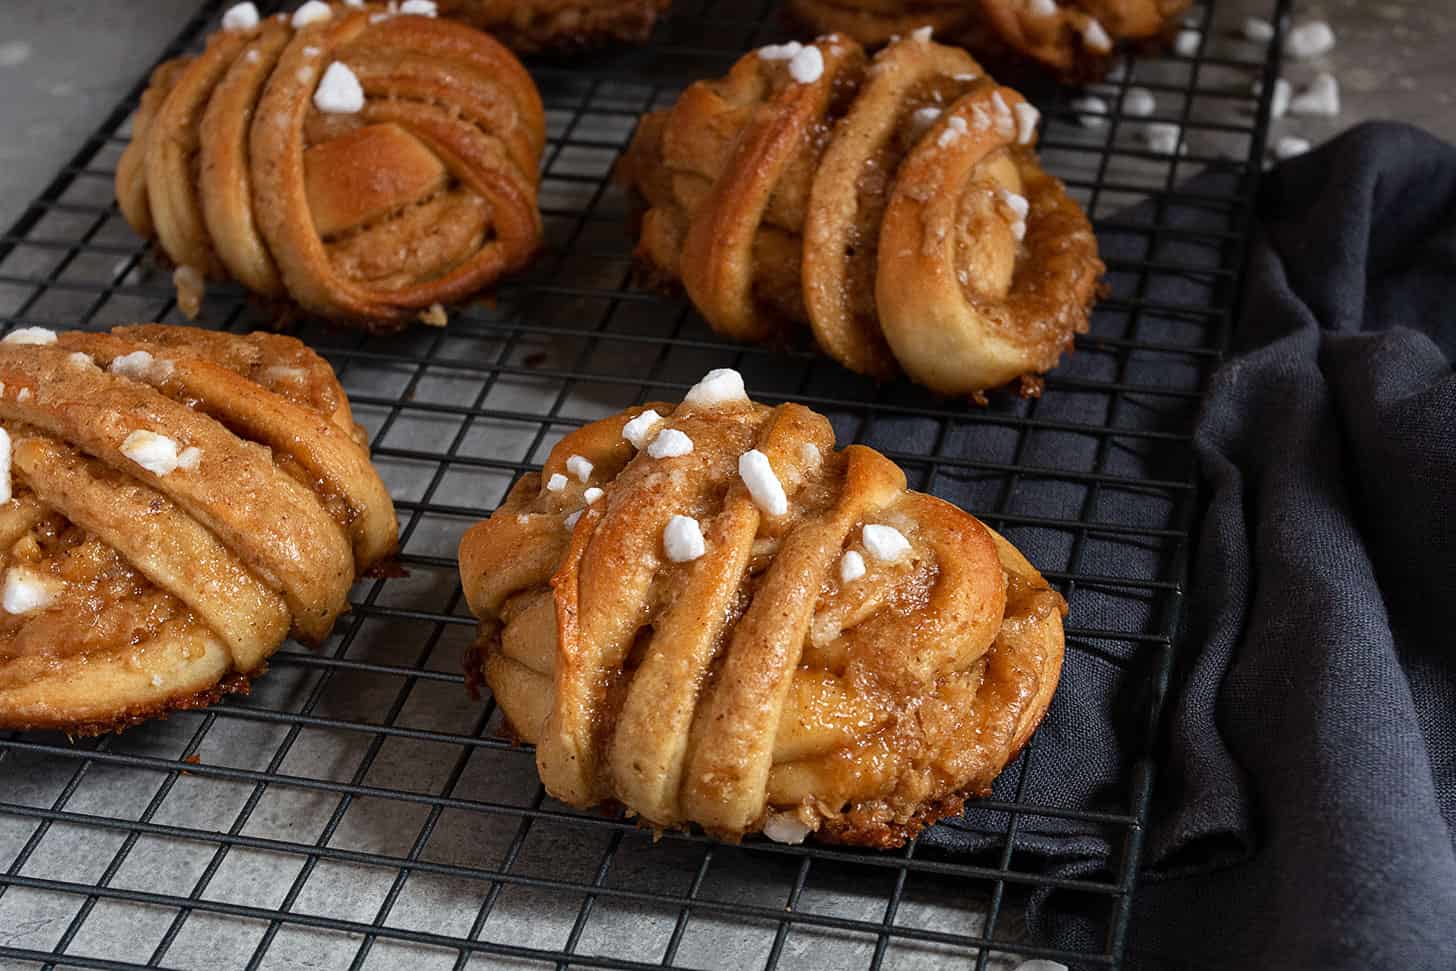
These maple twist rolls start with a sweet yeast dough, they they are filled with a maple syrup and walnut paste, cut into strips, twisted and contorted into pretty buns. Before baking they are brushed with more maple syrup, for a slightly sticky outside.
These rolls may look complicated, but they are really easy to make they make a great, sweet maple treat to enjoy any time of day!
Ingredients and substitutions
A few notes about the key ingredients …
Maple Syrup – Real Maple Syrup is obviously best, if you have some. If not, you could use best quality maple pancake syrup here.
Walnuts – Since the Walnuts are going to go through the food processor, starting with walnut pieces is the most economical. If you only have walnut halves, that’s ok, too.
Pearl Sugar – If you don’t have pearl sugar, sprinkle any sugar you have on top. Great choices would be a coarse, sanding sugar or demerara. Maple sugar would be perfect, if you happen to have some. If none of those are on hand, sprinkle with a bit of white granulated sugar.
Recipe tips!
- Always remember that flour amounts listed in yeasted dough are always approximate. Start by adding 2 of the 3 cups, then work up from there, adding only as much as is needed to make a soft, smooth and moist (but not sticky) dough.
- After you’ve folded your filling spreaded dough into thirds, you only need to roll it slightly in one direction, to make it wider. It should already be 14-inch long. So just roll until it’s 8 inches wide.
- Don’t sweat the twisting. They don’t have to be perfect and they don’t all have to be the same. Their uniqueness is part of their charm.
How to shape these maple twist rolls
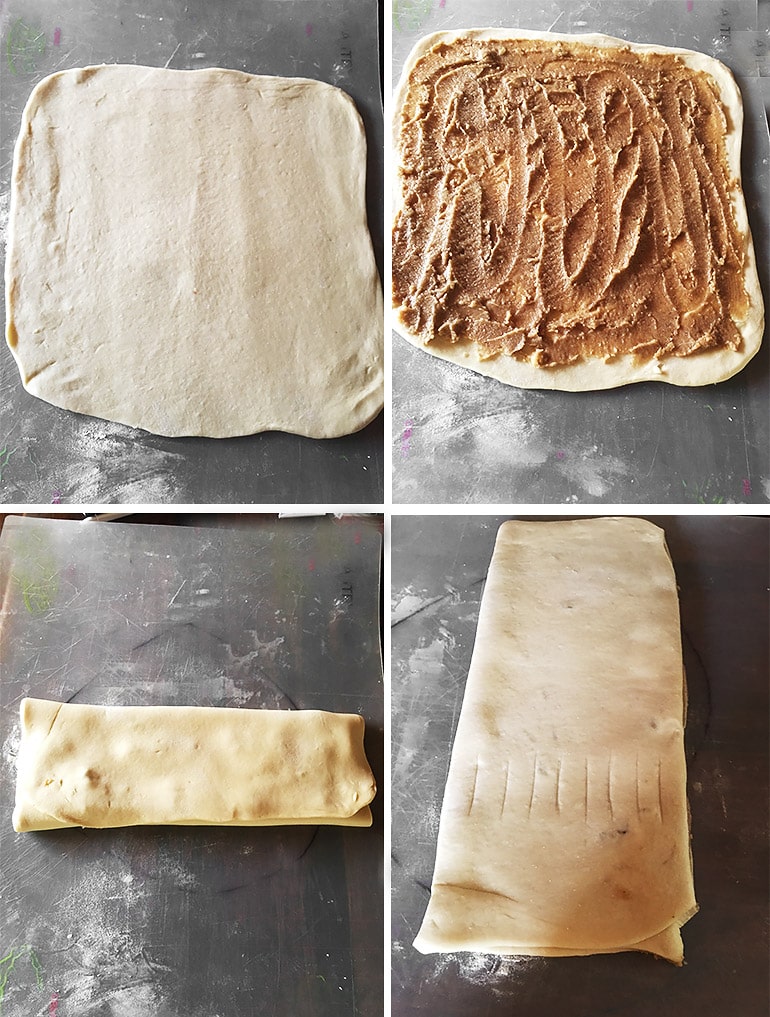
Step 1: Roll dough into a 14-inch square.
Step 2: Spread all the filling over the dough.
Step 3: Fold the dough like a business letter, folding the bottom up by 1/3, then folding the top down to cover it. You should have a roughly 7×14-inch rectangle. Using a rolling pin, roll the dough to make it slightly wider, to just a bit more than 8-inches wide. Trim the folded edges slightly, to expose the filling.
Step 4: Use a ruler to mark out eight 1-inch wide marks.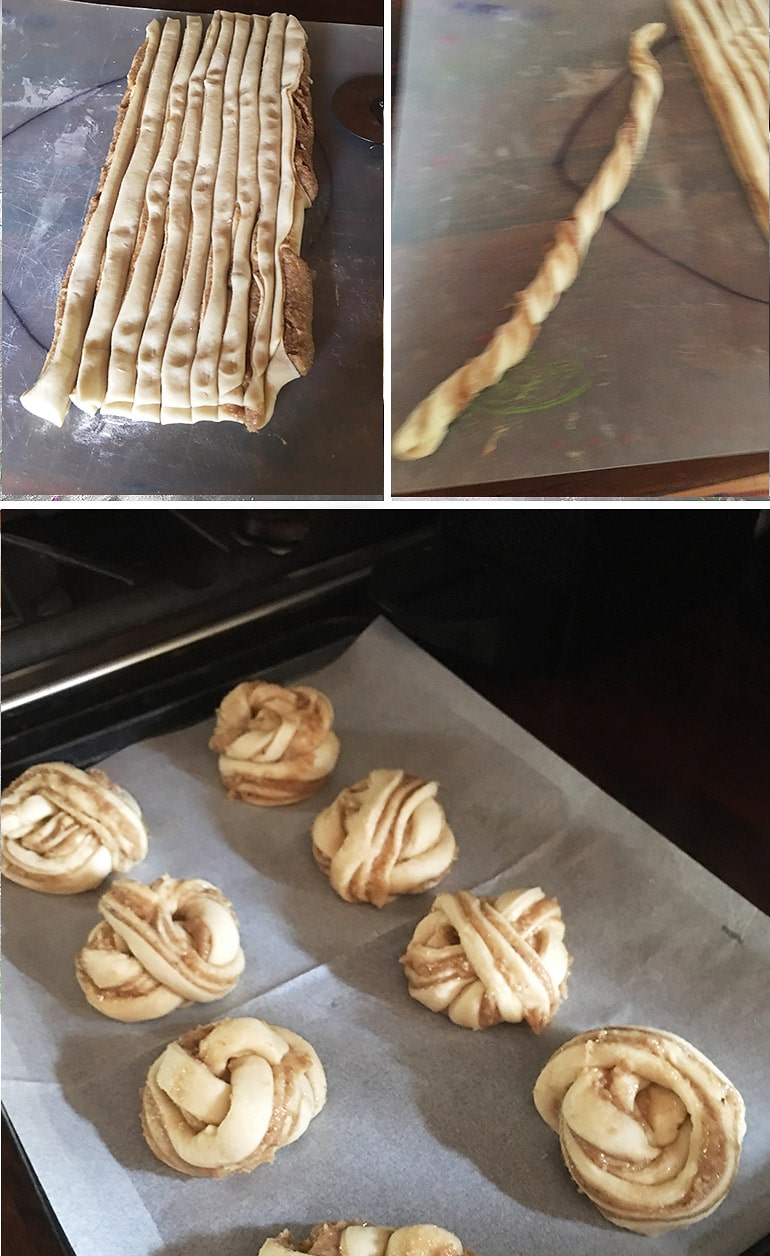
Step 5: Using a sharp knife or pizza cutter, cut along your 1-inch marks to make 8 strips.
Step 6: Grab both ends of the dough strip and twist until it is well twisted down the entire length of the strip,
Step 7: (Not Shown) Grab the end of the strip with your left hand and drape the strip over the top of your index and middle fingers. Wrap the dough around your fingers twice, then on the 3rd time coming around to the front, aim the dough towards the gap between your index and middle fingers. Tuck the end of the dough strip down and push it towards the centre of the ring, while sliding the whole thing off your fingers.
Step 8: Place rolls on a parchment-lined baking sheet to rise some more while your oven preheats.
Storing and freezing
Store baked buns loosely covered on a plate on the counter. Buns will be best on the day they are baked, but still good for a day or two.
Absolutely! These freeze beautifully. Simply cool completely and place into a freezer bag. Freeze up to 3 months. Thaw in the freezer bag.
Want to save this recipe?
Enter your email and I’ll send it to your inbox. Plus, you’ll get great new recipes from me every week!
By submitting this form, you consent to receive emails from Seasons and Suppers.
You can unsubscribe at any time.
Get the Recipe: Maple Twist Rolls
Ingredients
Dough:
- 1/2 cup milk, scalded (see Instructions)
- 2 1/4 teaspoons instant or dry active yeast
- 1/4 cup lukewarm water, about 105F
- 1/4 cup butter, at room temperature
- 3 Tablespoons white granulated sugar
- 1 1/2 teaspoons fine salt
- 1 large egg, lightly beaten
- 3 cups all-purpose flour, spooned and levelled
Maple Walnut Filling:
- 1/4 cup butter, at room temperature
- 1/3 cup white granulated sugar
- 1/2 cup brown sugar, packed (light or dark)
- 1/4 cup maple syrup
- 2 Tablespoons all-purpose flour
- 1/2 teaspoon ground cinnamon
- 1/2 cup walnuts
Glaze:
- 1 Tablespoon hot water
- 1 Tablespoon maple syrup
Topping:
- Pearl sugar or coarse sanding sugar/demerara sugar/maple sugar
Instructions
- In a small saucepan, heat milk until it reaches 180F, or when it starts to steam and small bubbles form around the outside of the pan. Remove from heat and allow to cool to 105F or lukewarm.
- In a small bowl, combine 1/4 cup warm (105F) water with yeast. Let stand for 5 minutes.
- Add the yeast mixture to a large bowl or the bowl of a stand mixer fitted with the kneading hook. Add the cooled lukewarm milk, sugar, butter, salt and egg, along with 2 cups of the flour. Mix until well combined. Begin adding more flour 1/4 cup at a time, at first, then in smaller increments, until you have a soft, smooth and moist, but not sticky dough, kneading the dough in the mixer or by hand for about 5 minutes.
- Remove the dough to a greased bowl. Cover with plastic wrap and allow to rise until doubled, about 60-90 minutes.
- While the dough is rising, prepare the filling by adding all ingredients to a food processor and processing until reduced to a paste. Set aside.
- Prepare a large baking sheet with parchment paper. Set aside.
- Remove dough to a floured surface and roll into a 14-inch square. Spread filling over the entire square of dough. Fold in thirds, like a business letter, to make a roughly 7 x 14-inch rectangle. Use a rolling pin to roll into an 8 1/2 x 14-inch rectangle, by rolling in just one direction to make it a bit wider. Use a sharp knife to trim the outside folded edges slightly (about 1/4-inch), to expose the filling.
- Use a ruler to mark 1-inch increments along the 8-inch width of the dough. Using a sharp knife or a pizza cutter, cut into eight 1-inch wide by 14-inch long strips.
- Grab the end of the strip with your left hand and drape the strip over the top of your index and middle fingers. Wrap the dough around your fingers twice, then on the 3rd time coming around to the front, aim the dough towards the gap between your index and middle fingers. Tuck the end of the dough strip down and push it towards the centre of the ring, while sliding the whole thing off your fingers.
- Place buns onto the parchment-lined baking sheet, allowing a couple of inches between each bun.
- Cover baking sheet with a clean tea towel and allow to rise until puffy, about 30 minutes more.
- Meanwhile, preheat oven to 350F. (non-convection) and prepare they glaze by stirring together the glaze ingredients in a small bowl.
- Before baking, brush the rolls with the maple glaze. Sprinkle with pearl or coarse sugar, if desired.
- Bake at 350F for 23-25 minutes, or until quite golden. Remove from the oven and then transfer to a cooling rack to cool completely.
Notes
- Always remember that flour amounts listed in a yeasted dough are always approximate. Start by adding 2 of the 3 cups, then work up from there, adding only as much as is needed to make a soft, smooth and moist (but not sticky) dough.
- After you’ve folded your filling-spreaded dough into thirds, you only need to roll it slightly in one direction, to make it wider. It should already be 14 inches long. So just roll until it’s 8 inches wide.
- Don’t sweat the twisting. They don’t have to be perfect and they don’t all have to be the same. Their uniqueness is part of their charm.
More maple recipes to love!
Hi! I’m Jennifer, a home cook schooled by trial and error and almost 40 years of getting dinner on the table! I love to share my favourite recipes, both old and new, together with lots of tips and tricks to hopefully help make your home cooking enjoyable, stress free, rewarding and of course, delicious!
How good does this look. YUMMMM!!!!
Thanks so much, Sheenam :)
I would love to try fresh maple syrup one day – it must be delicious! And I bet these gorgeous buns are fantastic too. I love the twists – so pretty! Pinned :)
Thanks Tricia! There is nothing finer than fresh maple syrup. I literally drink a small glass of it every Spring :)
These look SO good and big fan of maple anything! Love the pretty twisting too! A must try for sure :) Pinned!
Thanks so much, Dawn!
Definitely a baked treat I have to try! The filling is absolutely decadent and I just love yeasty dough, mmm.
Thanks Milena :)
Portion control would be a problem for me for sure with these little beauties Jennifer. They look mighty delicious!
Thanks Mary Ann!