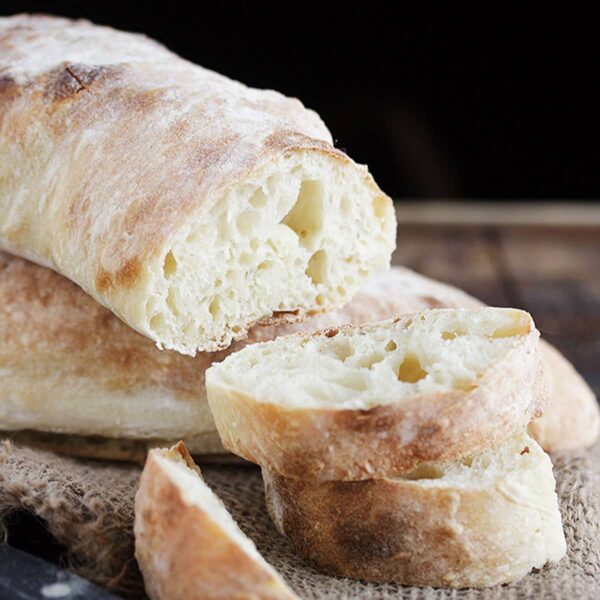
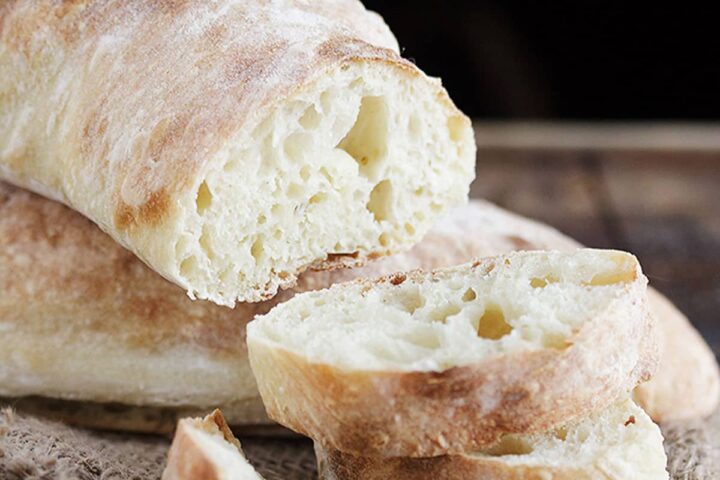
Delicious homemade ciabatta bread is not nearly as hard to make at home as you may think! This ciabatta recipe is great for first-time ciabatta bakers!
If you’re anything like me, the weekends are when I really dig in to cooking and baking projects. So in that spirit, I thought I’d share a great recipe for making this delicious ciabatta bread recipe this weekend. It’s not nearly as hard to make as you might think.
I’m not going to lie though, this is probably not the bread that should be your first bread-baking experience. It’s somewhat unique in both it’s consistency and method. That’s not to say it’s hard – just different :)
Ingredients and Substitutions
Flour – Bread flour will always give the best results when making ciabatta, but all purpose flour will technically work, with a bit of a compromise on texture. You may find you need a little extra flour is using all purpose flour.
Yeast – I only use SAF Instant Yeast for all my yeast baking. I highly recommend it. Regular Active Dry yeast will also work.
Making this ciabatta bread
This bread starts with a yeast “starter” dough. I like to mix it up quickly before going to bed and then let it bubble away on the counter over-night. Then the next morning, I can just carry on with making the bread.
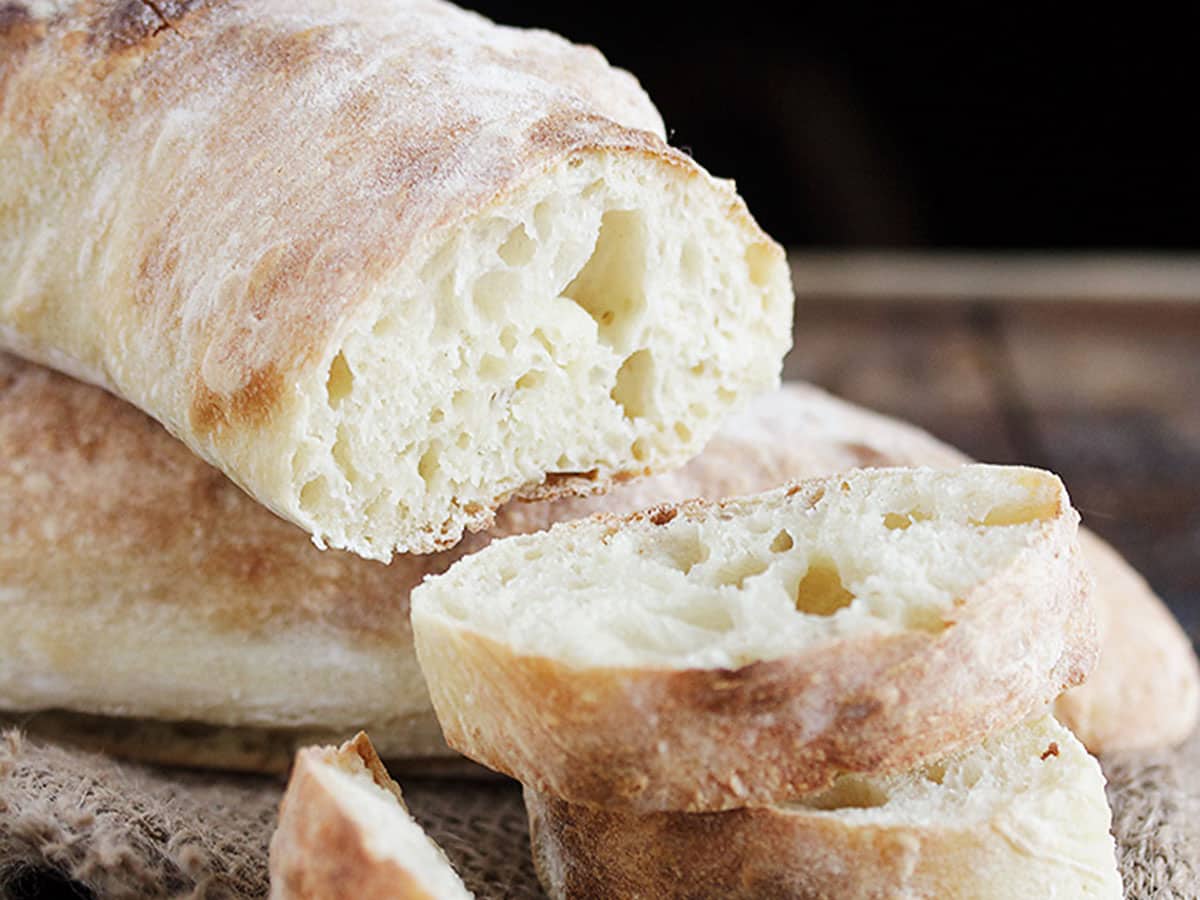
Once you mix the dough, you’re immediately going to notice that you have more of a batter than a dough. Resist the urge to add more flour at this point. The secret to those great holes it to have a really moist dough and the more flour you add, the more you’ll be defeating that.
This is not a bread dough that will ever be kneadable!
That said, you will need to add a little bit of flour along the way here. Purists will suggest flouring your hands (or even wetting them to deal with the dough). That’s great advice if you have lots of experience with wet dough. For the rest of us, a little sprinkling of flour here and there is a sanity saver!
Even as you move along with this dough, it will resemble a jiggly mass that seems to be barely holding its shape. Again, just go with it as much as you can, adding only enough flour to remove extreme stickiness.
Recipe Tips
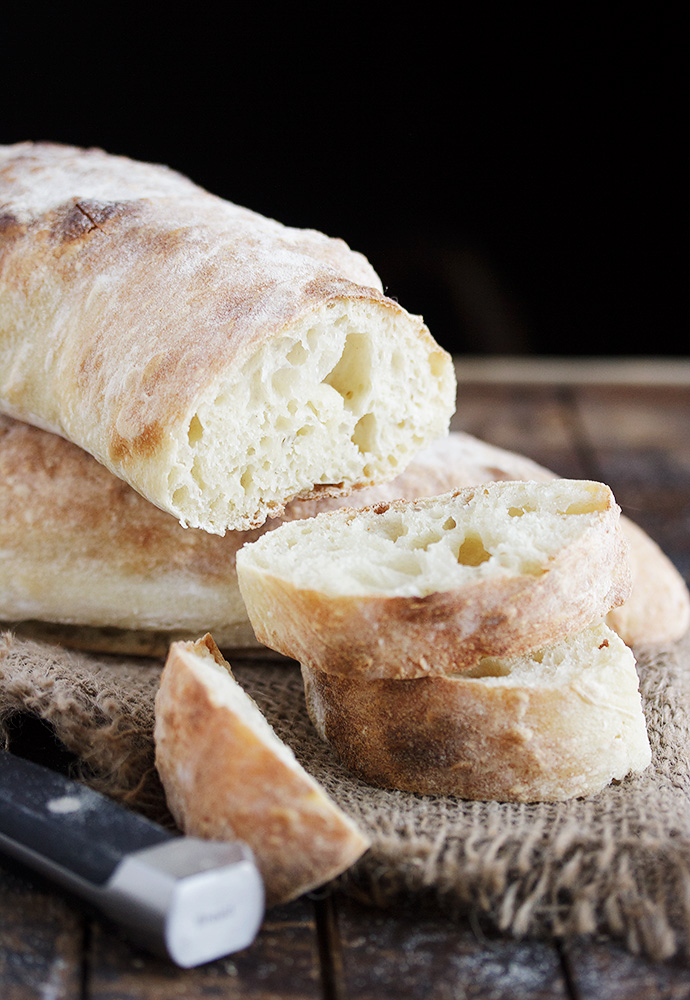
I cannot recommend the use of a silicone bowl scraper enough when dealing with this dough. It’s worth picking one up for this bread for sure – it’s a sanity saver! A metal bench scraper sprayed with cooking oil will also work. If all else fails, a large silicon spatula would be my choice. All these tools will allow you to work this dough without actually touching it with your hands, which is a bonus when working with a sticky dough.
Storing and Freezing
Store baked bread in an airtight container at room temperature for a couple of days, or freeze for longer storage.
Want to save this recipe?
Enter your email and I'll send it to your inbox. Plus, you'll get great new recipes from me every week!
By submitting this form, you consent to receive emails from Seasons and Suppers.
You can unsubscribe at any time.
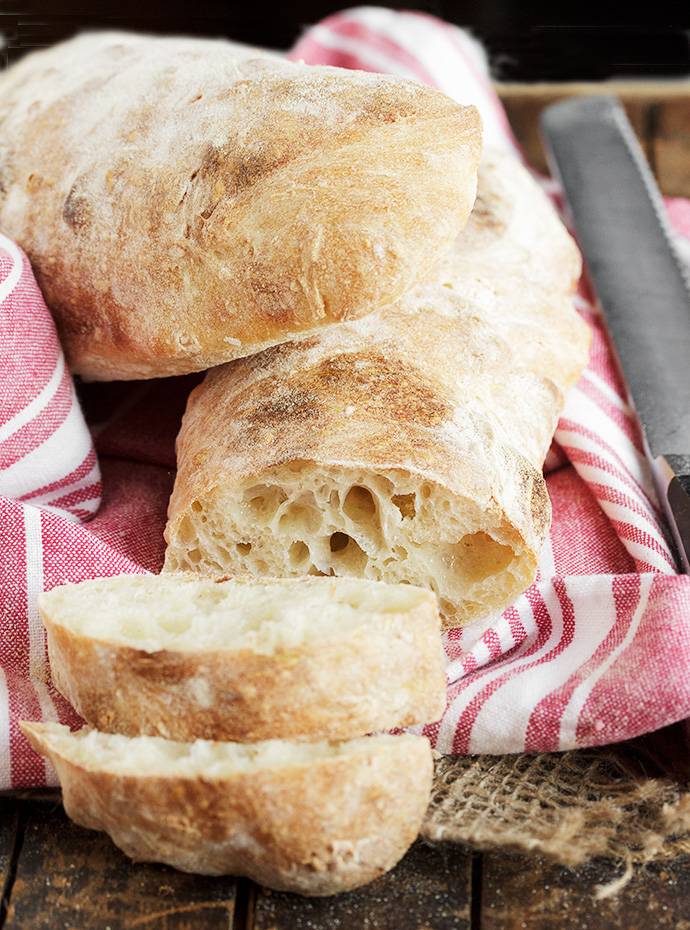
Get the Recipe: Homemade Ciabatta Bread
Ingredients
Yeast Starter Dough: (Start 8-12 hours ahead - the night before works perfectly)
- 1/2 teaspoon active dry yeast or instant yeast
- 3/4 cup (177 ml) water, at room temperature
- 1 cup (125 g) bread or all-purpose flour, bread flour recommended
Ciabatta Dough:
- 1/2 teaspoon active dry yeast or instant yeast
- 3/4 cup (177 ml) water, at room temperature
- All of the Yeast Starter Dough From above, plus the following:
- 2 cups (250 g) bread or all-purpose flour, bread flour recommended
- 1 1/2 teaspoons salt
Instructions
- This bread dough is very moist and loose, but only use as much additional flour as you need to be able to handle it without it sticking. Be sure to start your starter dough 8-12 hours ahead of when you want to make your bread.
- For the Yeast Starter Dough: Combine all ingredients in a 1-quart (4-cup) bowl and stir well. Cover with plastic wrap and allow to sit at room temperature for 8-12 hours (overnight works perfectly).
- For the Ciabatta Dough: In a large bowl or the bowl of a stand mixer fitted with a paddle attachment, stir the yeast in to the water. Add all of the Yeast Starter Dough that you made earlier and has been sitting. Mix briefly. Add the flour and salt and mix to combine. Beat on medium-low for 3 minutes. Stop the mixer and let dough rest for 10 minutes. Beat again on medium-low for 3 minutes. Stop again and let dough rest for 10 minutes.
- Remove dough to a lightly oiled bowl large enough to hold double the amount of dough. Cover the bowl with plastic wrap and let the dough rest until it starts to puff up, about 30-45 minutes.
- Using a silicone bowl scraper or spatula, scrape the dough on to a well-floured work surface. Have a cup of flour handy to use. Sprinkle the top of the dough with some flour. Using your silicone bowl scraper, scoop up one edge of the dough and fold it over the top of the dough to reach the middle. Scoop up the opposite edge and scoop it up to cover the fold you just made. Add some more flour to your board and the top of the dough (just enough to control stickiness). Let dough rest for 15 minutes and then repeat this same folding. Let rest another 15 minutes.
- Line a baking sheet with parchment paper. Sprinkle the parchment paper with flour. Roughly shape the dough in to an 8x8-inch square . Using a sharp knife, cut your dough into two 4x8-inch rectangles. Gently transfer to the parchment-lined baking sheet by using a bench scraper positioned underneath the rectangles to support it. Flour the top of the dough then cover with a tea towel and allow to rise until puffy, about 30 minutes.
- Meanwhile, preheat oven to 475° F. (regular bake setting/not fan assisted)
- Bake in the preheated oven for 20-25 minutes, or until deep golden brown and the internal temperature is over 200° Transfer to a cooling rack to cool.
Notes
More Bread Recipes to Love!
Hi! I’m Jennifer, a home cook schooled by trial and error and almost 40 years of getting dinner on the table! I love to share my favourite recipes, both old and new, together with lots of tips and tricks to hopefully help make your home cooking enjoyable, stress free, rewarding and of course, delicious!
Just took my 2 loaves out of the oven. Could not resist tasting and it is fantastic and worth all the steps. Been making bread for a long time. I am Italian and love rustic bread. Thank you for a great recipe.
So glad to hear, Barbara :) Thanks so much!
I’m not sure what I did wrong (or right) but I’ve failed at making the ciabatta but instead made a normal white loaf. Which I normally fail at. So it’s a success/fail story haha. I am going to keep practising
Lol! A happy accident :) I’ve had a lot of those, too. Enjoy the bread. When you decide to try the ciabatta again, it sounds like you may have gone too heavy on the flour. Keep in mind that ciabatta is a very wet dough. It can never be kneaded like regular bread dough. The best you’ll be able to do is flop it around with a silicone scraper (as it will stick to your hands if you try to touch it). Just try to trust it and go with it and I think you’ll end up with something more ciabatta-like.
I get that when the last rise isn’t long enough. I’ve actually let the second rise go another 30 minutes and achieved the more typical holey bread. Also, make sure the oven is preheated and at the full temp for 10 minutes before you put it in.
Hi
I need clarification on room temperature. I am from South Africa and not all houses have central heating so the winter temperature in the house could be between 10 and 15 degrees celsius. What should the room temperature be for proofing?
Hi Andries, dough will rise in a wide range of temperatures, but the time it will take to rise at those temperatures changes. So the cooler the space, the longer the rise. To answer your question though, “room temperature” is generally considered to be in the 19-21C range, so if you can create a micro-climate in your kitchen in that range, that would be perfect. (Maybe in the oven with the oven light on?) Hope that helps :)
sI made this a couple of months ago and I am in the process of making it again. I am in Step 5 about 15 minutes into the 30 minute rise. The bread is very flat. That is what happened the last time I made it. In step 4 I used flour very sparingly. The dough is very sticky. Any thoughts?
Hi Carol, my first thought is that ciabatta is quite flat. Any rising that it does will go out, rather than up. Any lift that you get from ciabatta generally comes from the oven spring as it bakes. As long as it is growing in some way to indicate it is alive, it all sounds normal.
The bread turned out delicious and higher than the first time I made it. But it doesn’t look as high as those in your photos.
Mine tends to vary in height from bake to bake. It never gets really high, but the right hydration and being really gentle with it to avoid deflating helps.
Oops! I forgot to ask you why the bread is so high in sodium. Would 1 1/2 tsp of salt really cause the bread to be so high in sodium? My husband is on a low sodium diet and the sodium content in your recipe has as almost as much as his entire day’s worth of his sodium level. Will if affect the bread if I use only 1/2 tsp. salt? What is one serving? One slice?
Unfortunately, most of the recipes on the internet don’t offer a low sodium version of the recipe. I’ve had no luck searching for low sodium recipes.
Hi Roberta, the sodium level is for one loaf of the two loaves you will be making, so no need to reduce the salt, as a slice would have much, much less than stated.
I’m in the process of making the starter dough. The bowl I put it in didn’t hold 1qt of liquid. I measured water in a duplicate bowl and uh oh, it didn’t hold 1 qt of water. I should have just put the starter in the measuring cup! Now I don’t know what’s going to happen with the dough. Will it just flow over the bowl? I hope I haven’t messed up before I even make the bread! Unfortunately, I’m sure I won’t get an answer right away. I’m just hoping that somebody else can benefit from your answer.
Hi Roberta, the starter needs just 3/4 cup of water, not a quart. Did you use a quart?
Made this today, followed recipe exactly. Used a pizza peel topped with parchment paper to rest loaves for 40 minutes, then transfer to preheated oven with pizza stone!
Worked great! Thank you will make again.
So glad you enjoyed it, Susan :) Thanks so much!
Hi Jennifer,
What a great recipe–my happy taste testers have declared this the best bread yet! That said, I’ve made it a few times..always tasty results but not much rise. My crumb is definitely denser than what your picture shows and not nearly the same amount of larger air pockets. I’ve refrained from adding additional flour, knowing it’s a high-hydration loaf, and tried not to overwork it..but still ending a bit flat? Any ideas?
Hi Anna and so glad everyone enjoyed the bread. And yes, I think I have some ideas for you. I think you need to use less flour and get that dough even wetter. So hold back some of the flour and keep the dough super wet. It should not be kneadable at all (wondering if your reference to over-working was referring to kneading?). Anyway, start by cutting back the flour in the bowl to maybe 1 1/2 cups. Add a touch more if absolutely needed, but as little as you can get away with. The wetter the dough, the bigger the holes :) Let me know how you make out.
Jennifer, Ciabatta Bread is my favorite. After trying several different recipes, your recipe and technique is by far the best. It is also easy to adjust by addding various herbs, flaxseed meal, and garlic. Last night I added about 1/2 cup chopped chives from the garden and instead of 2 loafs, made 1 very large loaf. The interior was soft and tender, full of those wonderful holes, and the exterior had a beautiful browned crust. I can’t thank you enough for my “forever” Chiabatta Bread recipe!
All that said, I’ve just finished looking over all your bread recipes and have never seen such a delightful, interesting variety of breads with easy, well-written directions. Have spotted about 10 more breads I can’t wait to make!
Hi Tricia and so glad you are enjoying the ciabatta. Love all the variation ideas, too! And yes, bread is my thing, so I have a lot of different recipes already and am always adding more. I never tire of making bread :) Enjoy and thanks!
I don’t have a mixer. Could I use the dough cycle on my bread maker?
Hi Katy and I’m really not sure. I haven’t used a bread maker, but this is a very wet dough and I’m not sure how a bread maker would handle that. If you’ve done a super wet dough in it before, I guess this one would work the same.
i wanna make this but i dont have a stand mixer. is it still possible?
Hi Elise, it’s a really tough go without a stand mixer, as it is a very wet dough. My best advice would be to hit up google for some techniques on kneading wet dough (King Arthur Flour has some good resources) and go from there. You can certainly mix it up in a bowl. It’s the kneading that will be tricky.
This recipe has never disappointed. The bread always turns out AMAZING.
So glad to hear, Soumya :) Thanks so much!
Hi!
I tried this recipe and we all loved it, even my 8 year old daughter. I was wondering if I can use whole wheat flour instead of all purpose flour? Will the measurements stay the same?
Thank you 😊
Hi Richelle, So glad you all enjoyed it! Substituting whole wheat flour here is not as simple as it may seem. The amounts would definitely change and I’m not even sure how satisfying the outcome would be (texture-wise). My best advice would be to seek out a dedicated whole wheat ciabatta recipe, that has already made those adjustments for you.
Hi Jennifer,
I’m about to make the ciabatta bread from your recipe. In your opinion, do you get better results from bread flour or all purpose?
Thanks,
Joe
Hi Joe and bread flour will give the best results for ciabatta, if you have some. All purpose performs pretty well for me as well, but that said, I’m in Canada, where our regular all purpose is quite high in protein than in other areas.
At what stage of the process can I freeze the dough? Or is it better to make the bread all the way and freeze it afterward?
thanks
Hi Wayne, bread freezes beautifully after baking, so that’s the way I would go. Just wrap it tightly and thaw in the wrapping. Enjoy!
Can this recipe be made with Gluten free flour?
Hi Josie and no, I don’t think it can be with this recipe. You should seek out a recipe written specifically for gluten free flour, as there are modifications that are needed beyond swapping out the flour. Sorry.