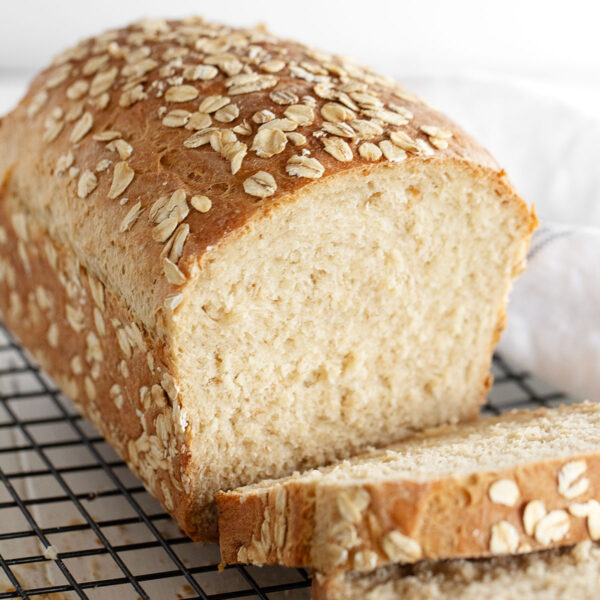
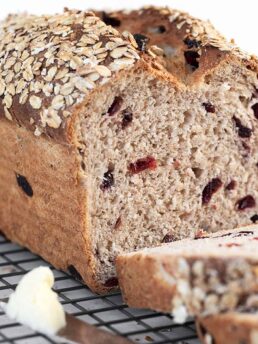
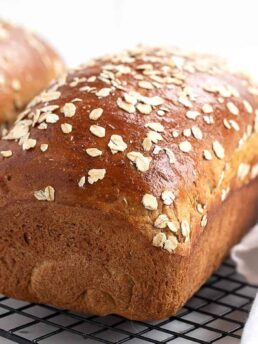
A lovely, moist honey oat bread, with rolled oats, honey and a bit of whole wheat flour, as well. This bread stays fresh for days and makes a great sandwich bread!
When it comes to bread, I love a loaf that delivers some whole grain goodness, but that also maintains a lovely soft crumb, like my Seeded Multigrain Sandwich Bread. This Honey Oat Bread also falls into that camp, with a good bit of rolled oats and a touch of whole wheat flour added into the mix.
I love this loaf for its great flavour from the oats and honey, its tender, moist crumb and its rustic, oat-rolled appearance. This oat bread keeps well, slices beautifully and makes the most fabulous sandwiches!
Ingredients and substitutions
A few notes about the key ingredients …
Rolled oats – the large-flake, old-fashioned rolled oats are best, though quick oats will work here as well.
Whole wheat flour – regular whole wheat or white whole wheat are both fine
All-purpose flour – unbleached all-purpose flour is recommended, but regular bleached is fine
Honey – or alternately you can use an equal amount of maple syrup or brown sugar
How to make honey oat bread
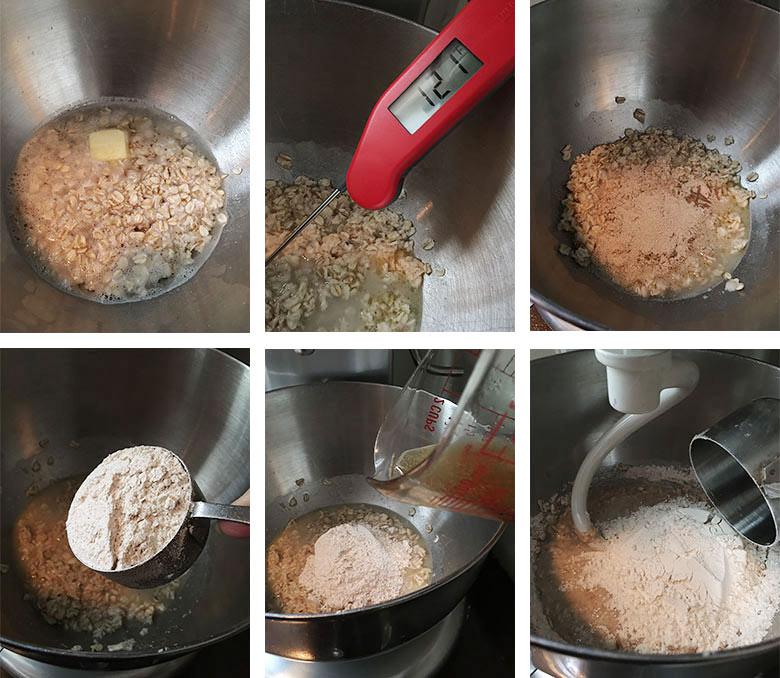
- Step 1: Soak the oats in boiling water with the butter and salt, for 20-25 minutes.
- Step 2: Check the temperature of the mixture. Make sure it’s cooled to lukewarm, about 110F. If it’s too hot when you add your yeast, it will kill the yeast.
- Step 3: Add the proofed yeast mixture.
- Step 4: Add the whole wheat flour.
- Step 5: Add the honey.
- Step 6: Add the first cup of all-purpose flour
- Step 7: Add another 1 – 1 1/2 cups all-purpose flour until you have a moist dough that wraps around the hook and cleans the bowl a little.
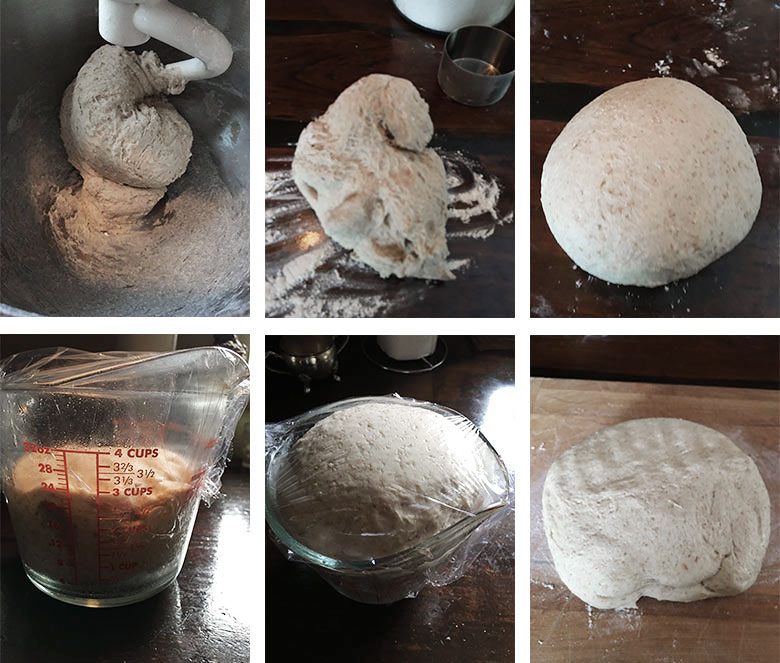
- Step 8: Remove the dough to a floured surface and knead, adding just as much flour as needed to prevent the dough from sticking.
- Step 9: Form dough into a ball.
- Step 10: Place dough into a greased bowl or measuring cup. Cover with plastic wrap.
- Step 11: Let dough rise until doubled.
- Step 12: Remove dough to a floured surface and gently deflate.
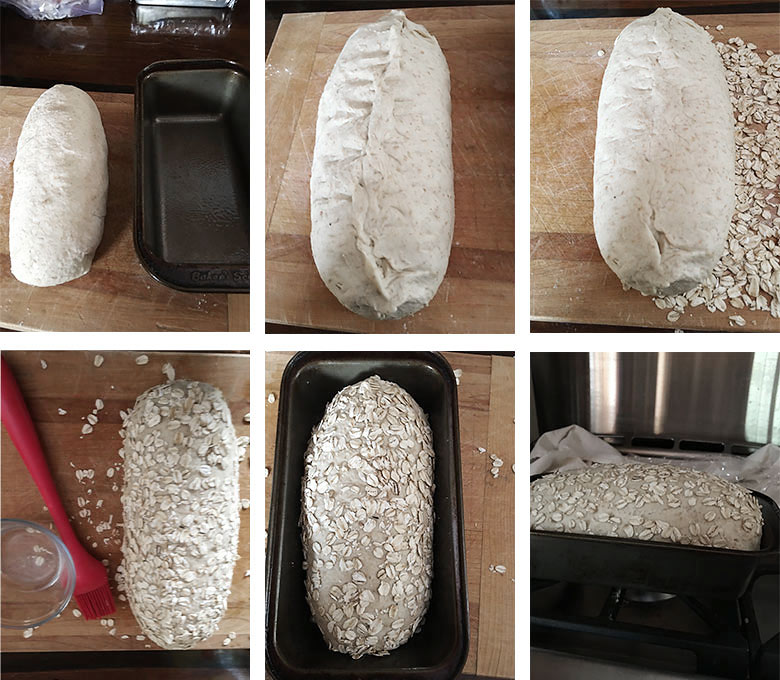
- Step 13: Form dough into a rough oval, about as long as the loaf pan.
- Step 14: Flip the dough over and pinch the sides into the centre, down the length of the loaf, pinching the ends in as well.
- Step 15: Flip back over right side up. Scatter some rolled oats on your work surface.
- Step 16: Lightly brush your loaf with water, then roll over the oats, coating the top, sides and bottom of the loaf.
- Step 17: Place the loaf into a greased 8×4-inch loaf pan. Cover with a greased piece of plastic wrap.
- Step 18: Let the loaf rise until doubled. Remove plastic wrap and bake.
Recipe tips!
- If you are new to bread making, I highly encourage you to check out my Getting Started With Yeast Bread Baking resource page, to get a good understanding of the process of making homemade bread.
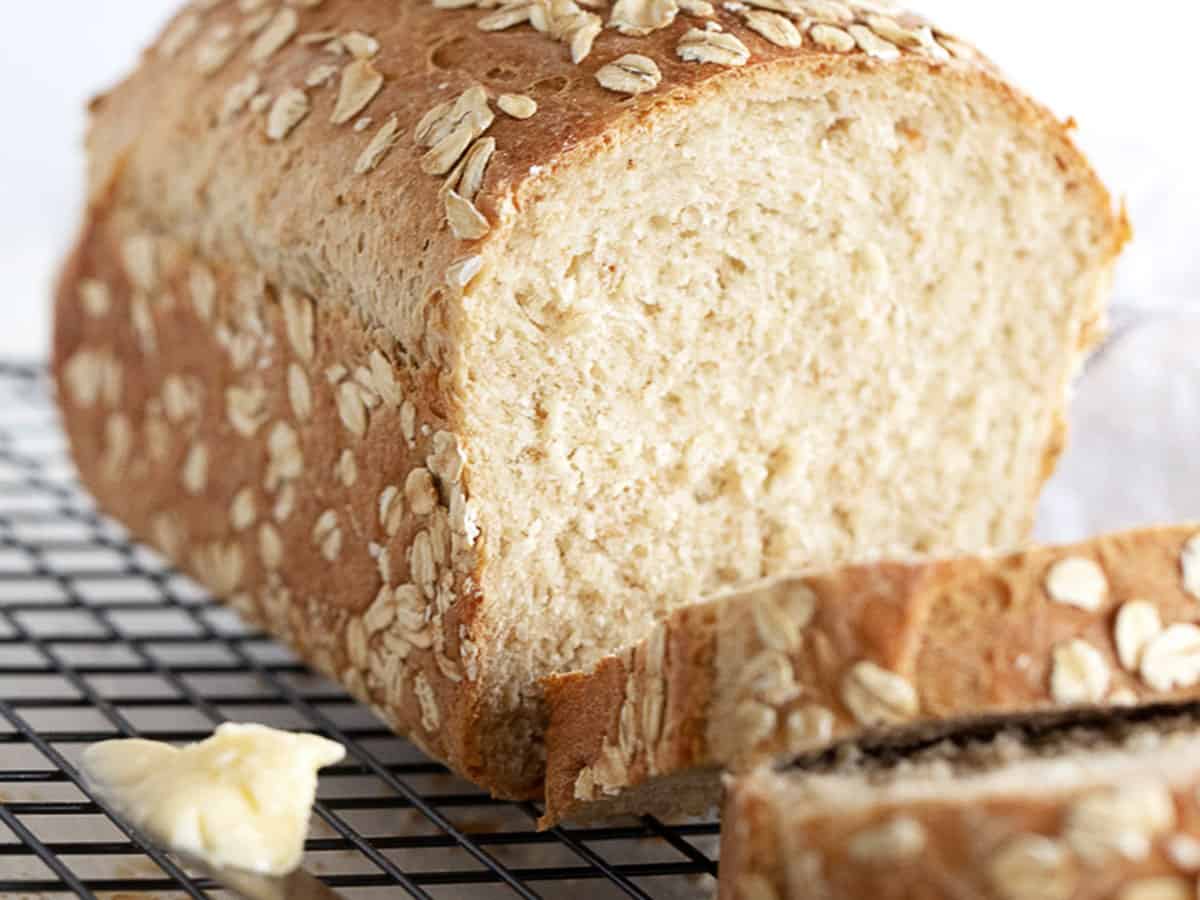
- This loaf will need a solid 45 minutes in the oven or until it reaches at least 200F internal temperature when tested with an instant-read thermometer. Be sure you are inserting the thermometer in the dead centre of the loaf for the most accurate reading. It shouldn’t have over-browned in that time, but check your loaf at about 35-40 minutes and if it seems in danger of over-browning, lay a sheet of aluminum foil loosely over top for the last part of baking.
Top tip!
The addition of soaked oatmeal to this bread produces a lovely, moist loaf, but it also means the loaf will need longer in the oven to bake off some of that moisture. This loaf will need at least 45 minutes in the oven, which is quite a bit longer than most bread loaves. A thermometer is best for testing done-ness, but if you don’t have a thermometer, err on the side of leaving it in the oven a few minutes longer, rather than rushing it out, to ensure you don’t end up with a loaf with an under-done middle.

Storing and freezing
This bread will keep well, well-wrapped on the counter for several days. This bread will also freeze beautifully for up to 3 months.
Want to save this recipe?
Enter your email and I’ll send it to your inbox. Plus, you’ll get great new recipes from me every week!
By submitting this form, you consent to receive emails from Seasons and Suppers.
You can unsubscribe at any time.

Get the Recipe: Honey Oat Bread
Ingredients
- 1 1/4 cups (285 ml) boiling water
- 3/4 cup large-flake, old-fashioned rolled oats, plus more for coating
- 1/2 teaspoon fine salt
- 2 Tablespoons (28 g) butter, or vegetable oil
- 1/3 cup (75 ml) honey, any mild-flavoured runny honey or substitute an equal amount of maple syrup or brown sugar
- 1/4 cup (55 ml) lukewarm water, about 105F.
- 2 1/4 teaspoons active dry or instant yeast
- 1/2 cup (60 g) whole wheat flour, (or more all purpose flour)
- 2 1/2 – 3 cups (300-360 g) all purpose flour, approximately
Instructions
- Boil some water and measure out 1 1/4 cups. Add to a large bowl or the bowl of a stand mixer. Add the rolled oats, salt and butter and stir to combine. Let stand 20 minutes, to soak and cool. *Be sure your mixture has cooled enough before you add your yeast to the bowl. If it's too hot, you will kill your yeast. Use a thermometer to test the temperature. It should be around 105F to 110F before you add the yeast. If you don't have a thermometer, let cool 5 minutes more and make sure it's just lukewarm.
- Add the yeast to the lukewarm water. Stir and let stand 5 minutes.
- Once the oat mixture is cooled enough, add the honey, proofed yeast mixture, whole wheat flour and the 1st cup of all purpose flour to the bowl. Mix to combine with the kneading hook. With the mixer running, begin adding the 2nd cup of flour in small increments, letting it mix in before adding more. Continue adding this cup and additional flour, if needed, until you have a quite moist dough, but one that wraps around the hook and cleans the bowl in spots. It may still have a sticky bit at the bottom of the bowl. That is ok. Remove the dough to a floured surface and knead a few minutes, adding a bit more flour, only as needed, to prevent it from sticking to your hands or the work surface. Form into a ball. Place into a greased bowl. Cover with plastic wrap and let rise until doubled, about 1 hour.
- Grease an 8×4-inch loaf pan and set aside.
- Remove dough to a lightly floured surface and gently deflate it by pressing down on it with your palms. Form the dough into a rough oval, about as long as your loaf pan (set your loaf pan next to your work area to judge the length). Flip the dough over and pinch in from the sides to the centre of the dough, pinching a seam down the middle. Pinch in the ends, as well. Flip it back over, right side up. Scatter some rolled oats on your work surface. Lightly brush your dough with water (not too much – just a light coating), then roll it over the oats, rolling to cover top, sides and bottom. Place dough into your prepared loaf pan. Spray a piece of plastic wrap with cooking spray and cover the top of the pan tightly. Allow to rise until doubled again, about 45-60 minutes.
- Preheat oven to 350F. (regular bake setting/not fan assisted)
- When dough is ready, remove plastic wrap and bake in preheated oven for about 45 minutes, or until the loaf tests at least 200F with an instant read thermometer. If you don't have a thermometer, insert a tester in the side and into the centre. It should come out clean and dry. If in doubt, leave it in the oven a few extra minutes, as you probably won't hurt it. *It is unlikely that your loaf will over-brown, but check it after about 35 minutes and if it looks like it may over-brown, lay a sheet of aluminum foil loosely over-top for the last part of baking.
- Remove loaf from oven and immediately remove from pan to a cooling rack to cool completely before slicing.
Notes
More oat bread recipes to love!
Hi! I’m Jennifer, a home cook schooled by trial and error and almost 40 years of getting dinner on the table! I love to share my favourite recipes, both old and new, together with lots of tips and tricks to hopefully help make your home cooking enjoyable, stress-free, rewarding and of course, delicious!
I’m wondering about how long to knead the dough.
Hi Vicki, if it has been mixed in a stand mixer (with a kneading hook), you only need to knead it 2-3 minutes on the counter. If kneading by hand, you’ll want to do 6-8 minutes total.
Hi. Can you replace the flour(s) with freshly milled flour and how much? Thanks
Hi Linda, yes, you could certainly use freshly milled flour. As for how much, I have no idea, as I’ve never done it myself. My best advice would be to add the flour a bit at a time until the dough reaches the desired consistency.
This was so tasty and pretty easy! My first time making an actual loaf of bread and I was very happy with it :)
So glad to hear, Chloe :) Thanks so much!
Made this for the first time and it was very good. I missed the 1/4C lukewarm water in the recipe, so I put my yeast directly into the lukewarm oatmeal mixture. When it didn’t need even close to the amount of flour listed to make a good dough I discovered my error. Whoops! No worries. A smaller loaf, but still delicious and I’ll make it again (with the right amount of water!).
Glad it worked out :) Thanks!
Can I refrigerate this overnight and make in the morning? I want to make into rolls so I’m assuming that I would make the rolls the next day and let them rise again?
Hi Christine and yes, you could do an overnight fridge rise for the first rise, then shape, rise and bake the next day.