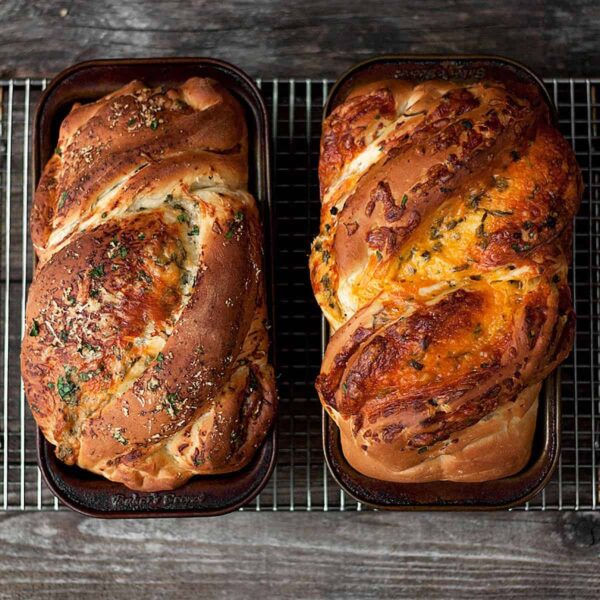
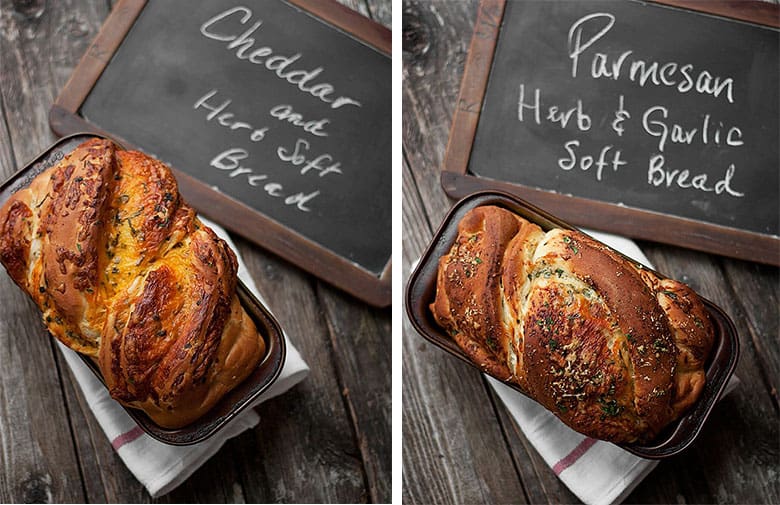
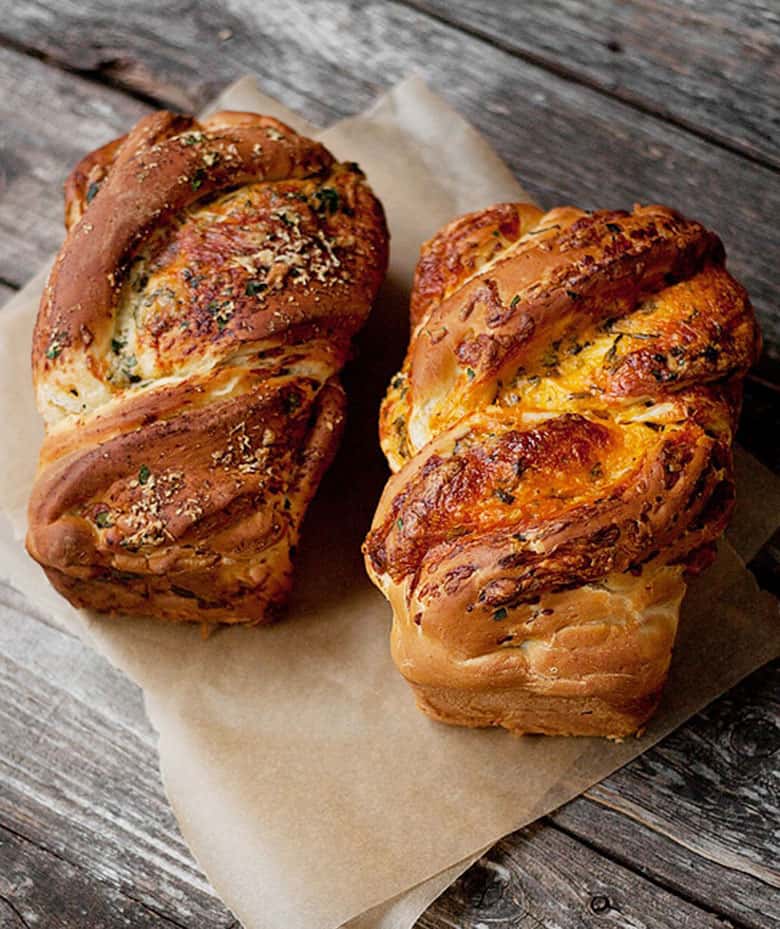
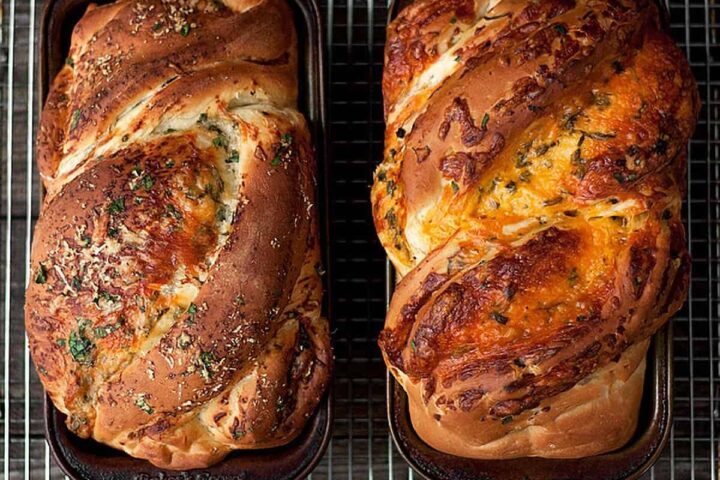
Delicious soft homemade cheese bread, made two ways – a lovely Cheddar cheese version and a Parmesan and Herb version.
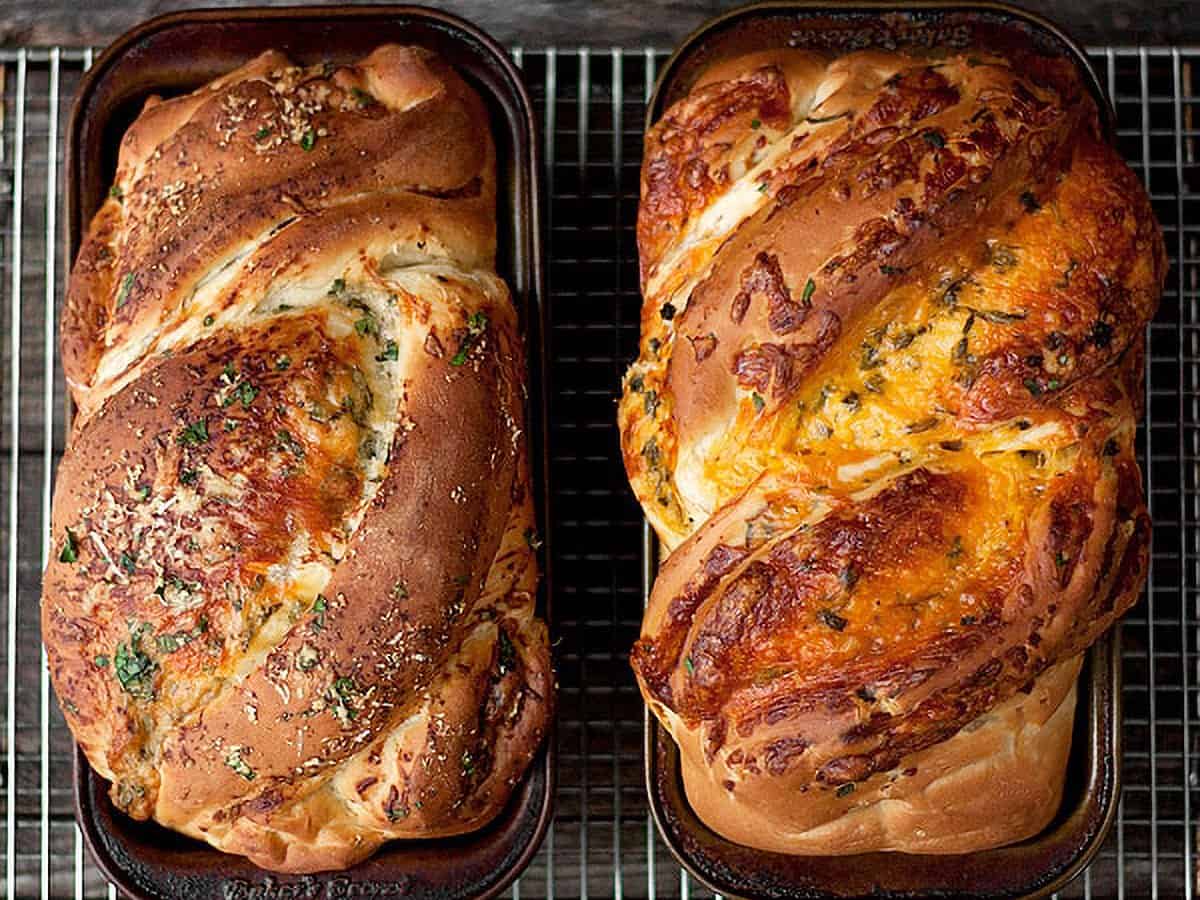
This is my absolute favourite cheese bread recipe! The dough is a dream to work with and the unique shaping makes for a pretty loaf with none of those cheese bread dreaded gaps.
Ingredients and substitutions
A few notes about the key ingredients …
Bread Flour – high protein bread flour will provide the nicest texture for your finished loaf. If you only have all-purpose flour, you can use it, but do note that you may need to add a bit more flour to get that moist, smooth dough when using all purpose flour. The texture of your loaf will be slightly heavier than it would have been if using bread flour, but will still be nice and soft.
Yeast – Regular Instant Yeast, such as SAF Brand is specified here. Quick or rapid-rising Instant yeast is NOT recommended. If you only have Dry Active Yeast, you can use it, but you will have to proof it in the warm water portion for the dough first (add a pinch of sugar), and then add to the dough when the water is specified.
Milk – you can use either milk or buttermilk here. For milk, anything 1% or higher is best. I like to use whole milk (3.5% b.f.), when I can. If you don’t have buttermilk, but would like a bit of buttermilk flavour, you can mix the 1 cup milk with 1 Tbsp of either lemon juice or white vinegar, then let it stand 10 minutes until thickened.
Cheese – use a sharp cheddar cheese for best flavour and grate it yourself. I find a yellow cheddar makes a prettier loaf, as you can see the cheese, but an old white cheddar also works here.
Recipe video
Confused about how this cheese bread is shaped? Watch the video, that shows how easy it is!
Recipe tips!
- This bread is endlessly customizable. All kinds of cheese, herb and other add-in combinations will work. Want to throw in some sun-dried tomatoes and/or a bit of pesto? Why not! Olives? Sure. Lots of cheese or just a bit? It’s up to you.
- This recipe will make two loaves of bread. You can make one of each – one cheddar and one Parmesan and herb – or you can just make two of the same one. Do note that the ingredients for the filling in the Recipe Card are for one loaf, so if you want to make two of the same loaf, simply double the filling amounts.
- Finally, there is an option to overnight-rise this dough in the fridge. I rarely do that, because I’m a) impatient and b) not that organized, but feel free to do so. There’s no doubt that any bread benefits from a longer rise for better flavour.
Tips for baking with yeast
I think most of the problems people have when starting out baking with yeast, is treating yeast-based recipes like say, a cake recipe, where you just measure the ingredients, mix them all together and bake.
Yeast-based recipes will never be that precise. Things like kitchen temperature, humidity, moisture in the flour you are using, the season your are baking in and rising time can differ from one kitchen to the next. All that makes yeast recipes less consistent from one kitchen to the next.
Now that you know this though, that’s more than half the battle :) What you’ll need to add to the mix to be a successful bread baker is some trust in what you see and feel. Does the dough look and feel too sticky? Add a bit more flour (regardless of how much flour the recipe says should go in.) Does the dough look nice and smooth before you’ve added all the flour specified? Trust it and don’t add any more flour. How much has the dough actually risen? When it comes to rising time, trust your eyes and not the clock. Trust what you SEE and FEEL and don’t be too tightly tied to the specifics of the recipe. Do that, and all will be good!
- Be careful with the temperature of your proofing liquid before adding the yeast, so you don’t compromise the yeast from the start. If the liquid is too cold, the yeast won’t activate. Too hot and it will die. The best temperature range for proofing liquid is 105-110F for Active Dry Yeast. Instant yeast is a bit more forgiving and can take temperatures up to 120F. All yeasts die at about 140°F. An Instant Read thermometer is handy to have on hand to check.
- Always treat the amount of flour specified in yeast-based recipes as “approximate”. Flours will vary from kitchen to kitchen and by season, so the amount needed to make a smooth, soft dough will vary.
- Given tip #2, I always hold back 1/4-1/3 of the flour specified in a recipe and add in only as much as is needed. If you dump all the flour in at the start, you may find that it is too much and it’s difficult to adjust well after that.
- Use a large glass measuring cup to proof the dough, if you can. The markings on the measuring cup make it easy to see when the dough has doubled.
- Be patient. Rising times are also “approximate” and will vary as well. Trust what you see and not the clock.
Want to save this recipe?
Enter your email and I’ll send it to your inbox. Plus, you’ll get great new recipes from me every week!
By submitting this form, you consent to receive emails from Seasons and Suppers.
You can unsubscribe at any time.
Get the Recipe: Simply Perfect Homemade Cheese Bread (Two Ways)
Ingredients
- 6 1/2 cups (794 g) unbleached bread flour, spooned and levelled (can use all purpose, flour *see Note 1 below)
- 2 teaspoons (14 g) fine salt , or a bit more, if using coarse kosher salt
- 5 Tablespoons (64 g) white sugar, or 5 Tbsp brown sugar or 3 1/2 Tbsp. honey or agave nectar
- 1 cup (227 g) lukewarm water, about 95F (for even softer bread, you can use 1 cup water leftover from boiling potatoes, cooled)
- 1 cup plus 2 Tablespoons (255 g) milk or buttermilk , lukewarm, about 95F
- 1 1/2 Tablespoons (14 g) Instant yeast, (can also use Active Dry yeast *see Note 2 below
- 1/4 cup (57 g) unsalted butter , melted, or the same amount of vegetable/canola oil
Cheddar and Herb (to make one loaf):
- 2 cups (340 g) shredded sharp cheddar cheese
- 1/4 cup (60 ml) minced fresh herbs, parsley and chives are good choices or a heaping tablespoon of dried herbs
Parmesan, Garlic and Herb (to make one loaf):
- 1 1/2 cups (375 ml) Parmesan cheese, freshly grated
- 1/2 teaspoon garlic powder, or about 2 tsp. minced fresh garlic
- 1/4 cup (60 ml) minced fresh herbs, parsley works well, or a heaping tablespoon of dried herbs
- 1/4 cup (57 g) butter, at room temperature
Instructions
- In a mixing bowl or the bowl of a stand mixer, combine the flour, salt and sugar* together. (Tip: If measuring your flour in cups, without a scale, hold back 1 cup of the flour, to add as needed later, as needed). *If you're using honey or agave, add with the liquid ingredients instead.
- In a large measuring cup or bowl, combine the water and buttermilk and whisk in the yeast until dissolved. Add this mixture, along with the melted butter, to the dry ingredients. Mix by hand or with a dough hook, until the mixture is combined, about 2 minutes. Let the dough rest for 5 minutes.
- Continue mixing the dough, adding more flour in very small increments, as needed, until the dough becomes soft, smooth and tacky, but not sticky.
- Transfer the dough to a lightly floured surface and knead for a couple of minutes, adding more flour only if the dough is sticking to your hands or the work surface, then form dough into a ball. Place the dough in a lightly oiled bowl, cover with plastic wrap and either refrigerate for up to 4 days, or allow to sit at room temperature until doubled in size (about 60-90 minutes). (*Tip: I like to use an 8-cup glass measuring cup, so it's easy to see when it's doubled by the markings).
- Note: If you have refrigerated your dough, remove from the refrigerator 2 hours before you plan to bake, to allow it to come to room temperature.
- Grease two 8-inch by 4-inch loaf pans and set aside.
- Divide the dough into 2 equal pieces. Dust each with a bit of flour and then, using a rolling pin, roll into a rectangle approximately 10 inches wide and 16 inches long.
- **If you are unclear about the shaping process for this bread, scroll up to the Recipe Video above this Recipe Card. You may wish to watch before starting the shaping process**
- For the Cheddar and Herb Bread: spread the shredded cheddar and herbs evenly over the surface of the dough. Starting with the shortest side, roll the dough up jelly-roll style and pinch the seam together.
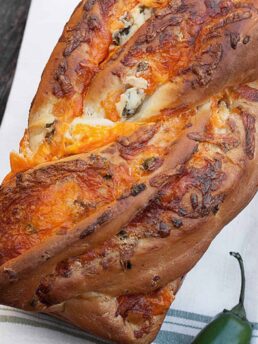
- For the Parmesan, Garlic and Herb: spread the softened butter over the surface of the dough. Sprinkle evenly with Parmesan, garlic and herbs. Press lightly with the palm of your hand to press the toppings into the butter. Starting with the shortest side, roll the dough up jelly-roll style and pinch the seam together.
- Shaping: Using a sharp knife, cut the roll of dough down the centre, lengthwise. Rotate each piece so that the cut sides are facing upward and place them side-by-side. Pinch together the farthest end. Keeping the cuts sides facing upwards as much as possible, place the right-side piece over the left-side piece. Straighen it up all up and then repeat, pinching together the end closest to you. If any cheese escapes, just place it back on top. Using a bench scraper or spatula, carefully lift the dough into the greased loaf pan. Repeat with the other dough log, then cover both with a greased piece of plastic wrap and allow to rise until the dough rises to about 1-inch above the side of the pans in the middle.
- Preheat oven to 350° F. (not fan assisted). Bake for 45-50 minutes total, but after 25 minutes of baking, rotate pans front-to-back in the oven and loosely cover with a piece of aluminum foil if necessary (if bread is already well-browned), to prevent the top from over-browning. Bread should reach about 185° internal temperature in the centre.
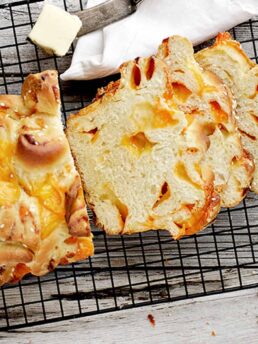
- Remove the bread from the oven and allow to cool in the pans for a couple of minutes. Run a sharp knife around the edge of the bread and carefully remove the loaves to a cooling rack. Allow the loaves to cool for 1 hour before slicing. *Slicing hot or very warm bread will make for a gummy crumb, so resist the urge and let it cool :)
Notes
- High protein bread flour is recommended for best texture and lightness. If you only have all purpose flour on hand, you can use it, but your bread may be a bit less light. If using all purpose flour, you may find you have to use a bit more flour to get to that moist, smooth dough stage.
- If you only have Active Dry yeast, you can use it, but you will need to proof it in the lukewarm water first (add a pinch of sugar). Allow to stand 5 minutes, then add it to the dough when the water is specified.
Watch how to make it
More cheese bread recipes to love!

Hi! I’m Jennifer, a home cook schooled by trial and error and almost 40 years of getting dinner on the table! I love to share my favourite recipes, both old and new, together with lots of tips and tricks to hopefully help make your home cooking enjoyable, stress-free, rewarding and of course, delicious!
Made this yesterday. Halved the recipe and made the parmesan one alone. Our whole family loved it. Thanks a lot for the recipe.
So glad you all enjoyed it, Lakshmi :) Thanks so much!
Probably the finest special bread ever! I’ll never bother with making foaccacia because this bread tops it all. It’s a never fail for me after making it several times.
I’m so glad to hear, Jan :) It’s a favourite of mine, too (the dough is always so nice to work with!). Thanks so much!
Hello Jennifer… What a bread! It is delicious and the shape has its effect too …. I also made it with the cranberry filling but this time I would like to make it with chocolate for Easter, do you have a filling to suggest me, thank you !
Hi Guylaine and so glad you are enjoying this bread :) As for chocolate, I think I would look for chocolate Babka recipes and borrow the chocolate filling from there, as it is a classic when combining bread and chocolate. Let me know how it came out!
We made this yesterday – the video showing how to make the loaves was essential – the bread is a joy to knead and it smells amazing whilst baking. Thank you for the recipe!
So glad to hear :) Thanks so much!
Thanks for the detailed video on how to shape and plait the dough. I’ll try this out next time I make the cheesy loaf. My plaiting technique needs practice. I guess my family will have to suffer.
So glad you found it helpful. Even the slightly less pretty ones are still delicious, so I’m sure your family will enjoy the all :) Thanks!
Just tried it. Only made one loaf, so just divided everything by 2.
Turned out perfect. Best bread I ever made. Thanks so much.
Happy to hear, Andre :) Thanks so much!
Haven’t tried it yet still hot! Cant wait.would live to post a pic of the results!
Do enjoy, Bobbi. If you are on Instagram, you can post a photo and tag me at @seasonsandsuppers
Hi, Jennifer! Just a quick question about the yeast: Are you letting the yeast sit and foam up before adding it to the rest of the recipe, or are you just dissolving it and then immediately mixing it into the dry ingredients? Thanks in advance!
Hi Wendy, it really depends on what type of yeast you are using. Active Dry Yeast will always need proofing in water and will benefit from sitting a bit. Instant Yeast doesn’t need proofing in water, though it won’t hurt it if you do. It doesn’t need to sit or soak to do it’s thing, so you can just dump it in.
Thanks, Jennifer, I appreciate that you replied! I love to bake, but when it comes to yeast, I always manage to get confused with which kind, and how much, etc., lol. I made your recipe today as just a plain loaf (no cheese or spices, and not twisted), and it was delicious! I have a super-hot oven, and I didn’t adjust the temp quite enough, so the crust was a bit harder than I prefer, but that’s a “me” issue, not a recipe issue! I always have to make things at least twice to get the proper adjustments. I needed some plain bread today to go with what I was making, but since your recipe tasted so good, I WILL end up trying your fancy cheese version too. Thanks for sharing a terrific recipe! :)
So glad you enjoyed it, Wendy and enjoy the cheese version, too. This is one of my favourite doughs to work with. I have adapted it to use many different fillings, both savoury and sweet :)
YES!!!! I did it!!! And they turned out just like your pictures! I made them following your very clear step by step instructions and I did it!!! I really don’t know how though… answered prayer, my hubby’s and kid’s motivation, your true recipe and video… probably all of the above! I have been baking basic white bread, rolls, pie shells for over 20 years now, but never had the courage to try something as “challenging” as this, and to braid it ? What? Wait, Whoa, Never! But I did… and they’re beautiful loaves and my family raved about them.
Thank you Jennifer for sharing your recipe, time, and if you don’t already know it, faith in believing that modest bakers like me could even try to make a delicious bread like this! You have motivated me to try harder and break out of my “old white-bread bread box”.
Thank you Thank you Thank You!
So glad to hear Tonya!! And so glad my tips helped you along the way :) Thanks and Happy baking!
Hi,
Is it possible to use sourdough starter in this?
Hi Cassy and yes, it would, though it would obviously require other adaptations.
Hi Jennifer,
I made this multiple times and it’s great! I was wondering if you can share some tips on the sourdough starter. I have some ready to go but would I need to let the dough rise for 12 hours? Also is 1 cup enough for two loaves?
Hi Cassy, I’m afraid I haven’t tried this one with a sourdough starter. I know it’s technically possible, as it is with any bread, but I don’t have any advice for you I’m afraid, on amount and timing. Perhaps someone has tried it and can weigh in for you.
I halved the recipe so as to only make one loaf. Used the white sugar, milk, and vegetable oil options from the recipe. Used a bread machine to make the dough and then rolled out to assemble the bread for baking.
The final result was delicious. It felt a little bit sweet for a savory bread. I am hoping I could cut back on the sugar without it impacting the yeast / dough. But overall was great. My fillings were cheese and green onions. Great recipe to use and I plan on trying it with other fillings (garlic, tomato, olive, parsley, jalapeno, and more).
So glad you enjoyed it and yes, you can reduce the sugar. You’ll want to keep some of it, to feed the yeast. You can probably go down to about 1/2, without issue.
Hi there! This recipe looks amazing and I really want to try it this weekend…but I have a question being a somewhat novice bread baker. The bread pan I have is an enamelled 1.5 kg to 2.5 kg round pan so how do I figure out whether I make the whole recipe or 1/2 or 2/3 etc?
Thanks in advance for any advice!
Hi Joss and wow, I’m not really sure. I’m trying to picture the pan, but struggling. I guess my best advice would be to make a 1/2 recipe and form into a round, that should fit in your pan to bake. Sorry, just guessing here.
Thanks; I figured it was a bit of a tough question. Maybe I will look at some other recipes that use a round pan (like for a sourdough miche) and compare quantities of ingredients. Will keep you posted 😊
Yes, please do and curious how it comes out as a free-form loaf, too!
1 cup plus 2 Tbsp lukewarm buttermilk? Do I just measure it and leave it out on the counter ? I’m going to make this today looks and sounds easy to make :)
Hi Donna, you want it to be a little more than room temperature, to help the yeast do its thing. I generally warm a little bit in a saucepan or microwave. You only want it about 105F. Not any hotter, or you could kill your yeast. Think baby bottle warm :)
When you follow the measurements for 1x that’s makes one loaf correct?
Hi Robin and no, in this case “1X” is the 2-loaf recipe. You can half it (just half all the ingredients), but you’ll have to do the math :)
Thank you so much for this recipe. I have made this numerous times many different ways. Cinnamon raisin, even apple cinnamon with small chunks of apple. Every single variation was amazing.
So glad you enjoying it, Tyler :) It’s my favourite dough to work with and I have made a dozen variations as well. Thanks so much!
Can you over prove at room temperature?
Hi Belinda, I’m not exactly sure what you’re asking. Are you asking if it is possible to over prove it? If so, then yes, definitely.