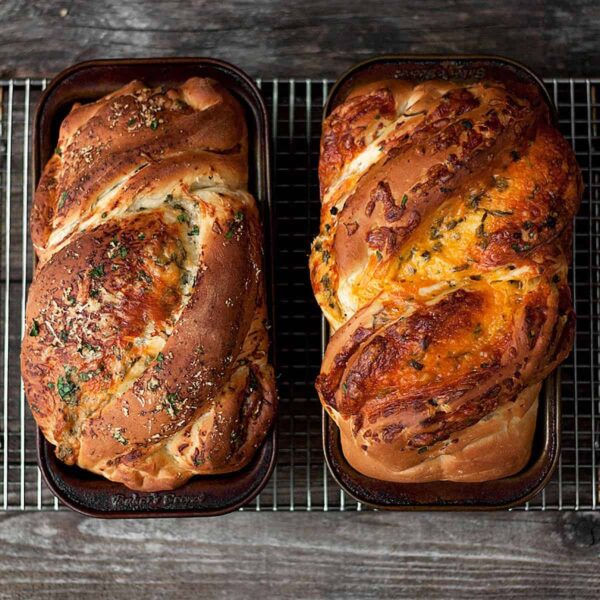
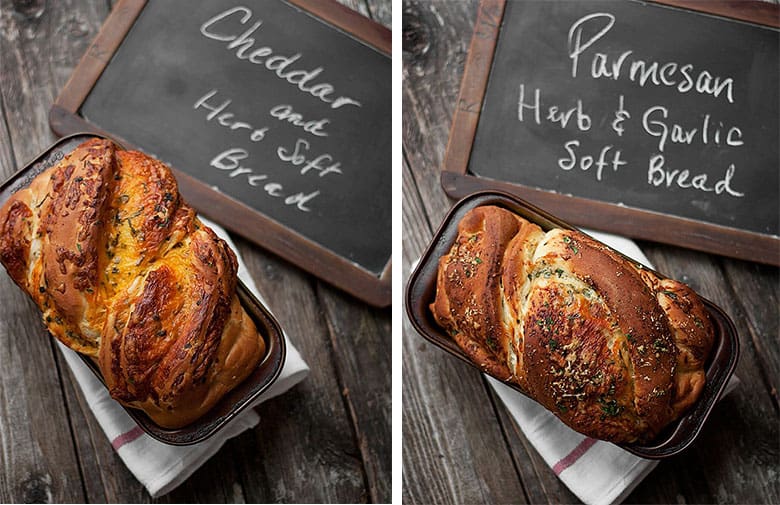
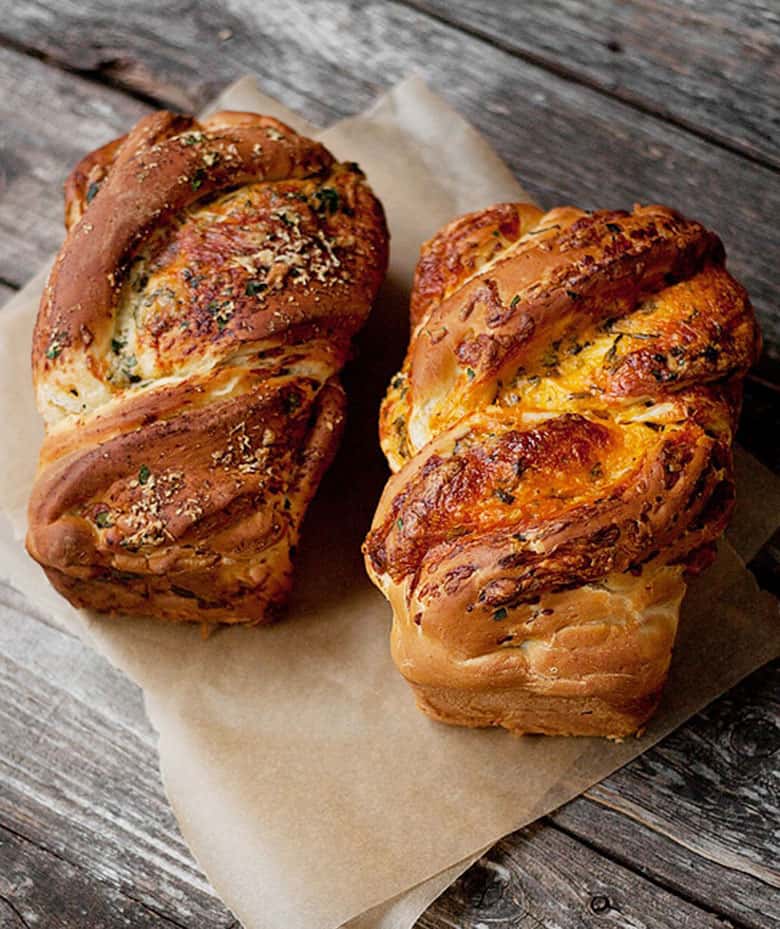
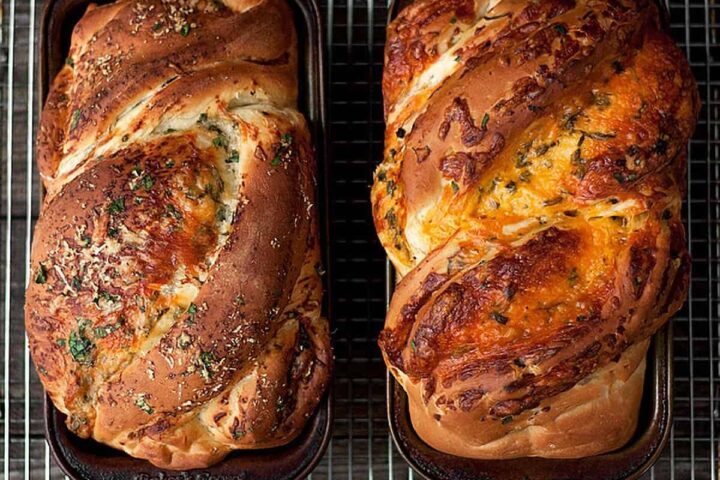
Delicious soft homemade cheese bread, made two ways – a lovely Cheddar cheese version and a Parmesan and Herb version.
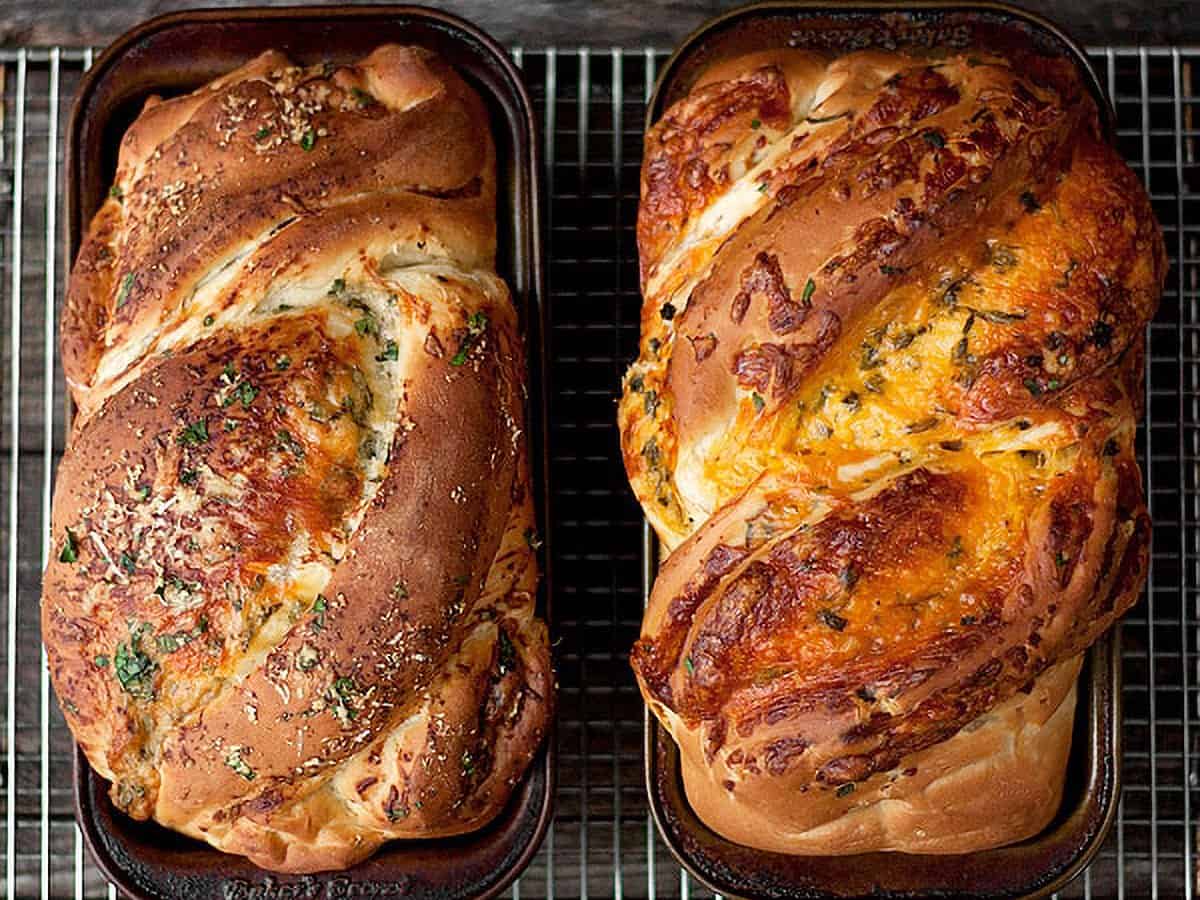
This is my absolute favourite cheese bread recipe! The dough is a dream to work with and the unique shaping makes for a pretty loaf with none of those cheese bread dreaded gaps.
Ingredients and substitutions
A few notes about the key ingredients …
Bread Flour – high protein bread flour will provide the nicest texture for your finished loaf. If you only have all-purpose flour, you can use it, but do note that you may need to add a bit more flour to get that moist, smooth dough when using all purpose flour. The texture of your loaf will be slightly heavier than it would have been if using bread flour, but will still be nice and soft.
Yeast – Regular Instant Yeast, such as SAF Brand is specified here. Quick or rapid-rising Instant yeast is NOT recommended. If you only have Dry Active Yeast, you can use it, but you will have to proof it in the warm water portion for the dough first (add a pinch of sugar), and then add to the dough when the water is specified.
Milk – you can use either milk or buttermilk here. For milk, anything 1% or higher is best. I like to use whole milk (3.5% b.f.), when I can. If you don’t have buttermilk, but would like a bit of buttermilk flavour, you can mix the 1 cup milk with 1 Tbsp of either lemon juice or white vinegar, then let it stand 10 minutes until thickened.
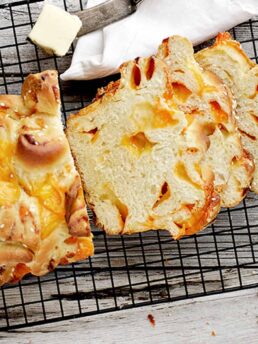
Cheese – use a sharp cheddar cheese for best flavour and grate it yourself. I find a yellow cheddar makes a prettier loaf, as you can see the cheese, but an old white cheddar also works here.
Recipe video
Confused about how this cheese bread is shaped? Watch the video, that shows how easy it is!
Recipe tips!
- This bread is endlessly customizable. All kinds of cheese, herb and other add-in combinations will work. Want to throw in some sun-dried tomatoes and/or a bit of pesto? Why not! Olives? Sure. Lots of cheese or just a bit? It’s up to you.
- This recipe will make two loaves of bread. You can make one of each – one cheddar and one Parmesan and herb – or you can just make two of the same one. Do note that the ingredients for the filling in the Recipe Card are for one loaf, so if you want to make two of the same loaf, simply double the filling amounts.
- Finally, there is an option to overnight-rise this dough in the fridge. I rarely do that, because I’m a) impatient and b) not that organized, but feel free to do so. There’s no doubt that any bread benefits from a longer rise for better flavour.
Tips for baking with yeast
I think most of the problems people have when starting out baking with yeast, is treating yeast-based recipes like say, a cake recipe, where you just measure the ingredients, mix them all together and bake.
Yeast-based recipes will never be that precise. Things like kitchen temperature, humidity, moisture in the flour you are using, the season your are baking in and rising time can differ from one kitchen to the next. All that makes yeast recipes less consistent from one kitchen to the next.
Now that you know this though, that’s more than half the battle :) What you’ll need to add to the mix to be a successful bread baker is some trust in what you see and feel. Does the dough look and feel too sticky? Add a bit more flour (regardless of how much flour the recipe says should go in.) Does the dough look nice and smooth before you’ve added all the flour specified? Trust it and don’t add any more flour. How much has the dough actually risen? When it comes to rising time, trust your eyes and not the clock. Trust what you SEE and FEEL and don’t be too tightly tied to the specifics of the recipe. Do that, and all will be good!
- Be careful with the temperature of your proofing liquid before adding the yeast, so you don’t compromise the yeast from the start. If the liquid is too cold, the yeast won’t activate. Too hot and it will die. The best temperature range for proofing liquid is 105-110F for Active Dry Yeast. Instant yeast is a bit more forgiving and can take temperatures up to 120F. All yeasts die at about 140°F. An Instant Read thermometer is handy to have on hand to check.
- Always treat the amount of flour specified in yeast-based recipes as “approximate”. Flours will vary from kitchen to kitchen and by season, so the amount needed to make a smooth, soft dough will vary.
- Given tip #2, I always hold back 1/4-1/3 of the flour specified in a recipe and add in only as much as is needed. If you dump all the flour in at the start, you may find that it is too much and it’s difficult to adjust well after that.
- Use a large glass measuring cup to proof the dough, if you can. The markings on the measuring cup make it easy to see when the dough has doubled.
- Be patient. Rising times are also “approximate” and will vary as well. Trust what you see and not the clock.
Want to save this recipe?
Enter your email and I’ll send it to your inbox. Plus, you’ll get great new recipes from me every week!
By submitting this form, you consent to receive emails from Seasons and Suppers.
You can unsubscribe at any time.
Get the Recipe: Simply Perfect Homemade Cheese Bread (Two Ways)
Ingredients
- 6 1/2 cups (794 g) unbleached bread flour, spooned and levelled (can use all purpose, flour *see Note 1 below)
- 2 teaspoons (14 g) fine salt , or a bit more, if using coarse kosher salt
- 5 Tablespoons (64 g) white sugar, or 5 Tbsp brown sugar or 3 1/2 Tbsp. honey or agave nectar
- 1 cup (227 g) lukewarm water, about 95F (for even softer bread, you can use 1 cup water leftover from boiling potatoes, cooled)
- 1 cup plus 2 Tablespoons (255 g) milk or buttermilk , lukewarm, about 95F
- 1 1/2 Tablespoons (14 g) Instant yeast, (can also use Active Dry yeast *see Note 2 below
- 1/4 cup (57 g) unsalted butter , melted, or the same amount of vegetable/canola oil
Cheddar and Herb (to make one loaf):
- 2 cups (340 g) shredded sharp cheddar cheese
- 1/4 cup (60 ml) minced fresh herbs, parsley and chives are good choices or a heaping tablespoon of dried herbs
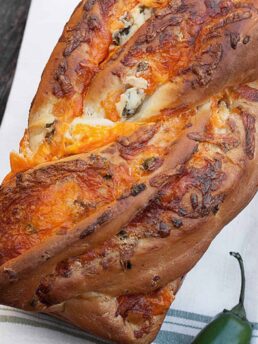
Parmesan, Garlic and Herb (to make one loaf):
- 1 1/2 cups (375 ml) Parmesan cheese, freshly grated
- 1/2 teaspoon garlic powder, or about 2 tsp. minced fresh garlic
- 1/4 cup (60 ml) minced fresh herbs, parsley works well, or a heaping tablespoon of dried herbs
- 1/4 cup (57 g) butter, at room temperature
Instructions
- In a mixing bowl or the bowl of a stand mixer, combine the flour, salt and sugar* together. (Tip: If measuring your flour in cups, without a scale, hold back 1 cup of the flour, to add as needed later, as needed). *If you're using honey or agave, add with the liquid ingredients instead.
- In a large measuring cup or bowl, combine the water and buttermilk and whisk in the yeast until dissolved. Add this mixture, along with the melted butter, to the dry ingredients. Mix by hand or with a dough hook, until the mixture is combined, about 2 minutes. Let the dough rest for 5 minutes.
- Continue mixing the dough, adding more flour in very small increments, as needed, until the dough becomes soft, smooth and tacky, but not sticky.
- Transfer the dough to a lightly floured surface and knead for a couple of minutes, adding more flour only if the dough is sticking to your hands or the work surface, then form dough into a ball. Place the dough in a lightly oiled bowl, cover with plastic wrap and either refrigerate for up to 4 days, or allow to sit at room temperature until doubled in size (about 60-90 minutes). (*Tip: I like to use an 8-cup glass measuring cup, so it's easy to see when it's doubled by the markings).
- Note: If you have refrigerated your dough, remove from the refrigerator 2 hours before you plan to bake, to allow it to come to room temperature.
- Grease two 8-inch by 4-inch loaf pans and set aside.
- Divide the dough into 2 equal pieces. Dust each with a bit of flour and then, using a rolling pin, roll into a rectangle approximately 10 inches wide and 16 inches long.
- **If you are unclear about the shaping process for this bread, scroll up to the Recipe Video above this Recipe Card. You may wish to watch before starting the shaping process**
- For the Cheddar and Herb Bread: spread the shredded cheddar and herbs evenly over the surface of the dough. Starting with the shortest side, roll the dough up jelly-roll style and pinch the seam together.
- For the Parmesan, Garlic and Herb: spread the softened butter over the surface of the dough. Sprinkle evenly with Parmesan, garlic and herbs. Press lightly with the palm of your hand to press the toppings into the butter. Starting with the shortest side, roll the dough up jelly-roll style and pinch the seam together.
- Shaping: Using a sharp knife, cut the roll of dough down the centre, lengthwise. Rotate each piece so that the cut sides are facing upward and place them side-by-side. Pinch together the farthest end. Keeping the cuts sides facing upwards as much as possible, place the right-side piece over the left-side piece. Straighen it up all up and then repeat, pinching together the end closest to you. If any cheese escapes, just place it back on top. Using a bench scraper or spatula, carefully lift the dough into the greased loaf pan. Repeat with the other dough log, then cover both with a greased piece of plastic wrap and allow to rise until the dough rises to about 1-inch above the side of the pans in the middle.
- Preheat oven to 350° F. (not fan assisted). Bake for 45-50 minutes total, but after 25 minutes of baking, rotate pans front-to-back in the oven and loosely cover with a piece of aluminum foil if necessary (if bread is already well-browned), to prevent the top from over-browning. Bread should reach about 185° internal temperature in the centre.
- Remove the bread from the oven and allow to cool in the pans for a couple of minutes. Run a sharp knife around the edge of the bread and carefully remove the loaves to a cooling rack. Allow the loaves to cool for 1 hour before slicing. *Slicing hot or very warm bread will make for a gummy crumb, so resist the urge and let it cool :)
Notes
- High protein bread flour is recommended for best texture and lightness. If you only have all purpose flour on hand, you can use it, but your bread may be a bit less light. If using all purpose flour, you may find you have to use a bit more flour to get to that moist, smooth dough stage.
- If you only have Active Dry yeast, you can use it, but you will need to proof it in the lukewarm water first (add a pinch of sugar). Allow to stand 5 minutes, then add it to the dough when the water is specified.
Watch how to make it
More cheese bread recipes to love!

Hi! I’m Jennifer, a home cook schooled by trial and error and almost 40 years of getting dinner on the table! I love to share my favourite recipes, both old and new, together with lots of tips and tricks to hopefully help make your home cooking enjoyable, stress-free, rewarding and of course, delicious!
I just found you on pinterest and I’m so excited to follow your blog. I love all the recipes on your site, and it will be hard to decide which to make first! Thanks!
Hi Karen and thanks so much! Good cooking (PS The Macaroni and Cheese is awesome, if you’re a fan of cheese)
I made these and we enjoyed them for dinner tonight. Oh my goodness. Amazing and addicting! I have only one loaf pan so I put the second one in my round tube pan and it worked great! Thanks for a delicious recipe.
Glad you enjoyed it, April. You can also refrigerate the other half the dough and bake next day, if you need to.
I’ve made these a few times now, with great success. Thank you!
So glad you enjoyed it, Jani. Thanks for coming back to let me know :)
This bread looks wonderful and I’m itching to make it. I wonder if you could help as I’m a little confused as to the yeast measurement. When you say “1 1/2 tbsp instant yeast”, do you mean one and a half tbsp or just one half of a tablespoon? Sorry if this seems to be a silly question. Here in Scotland I think we may read quantities a little differently – well at least I do. Many thanks.
Not silly at all. For the yeast, it is one and a half tablespoons, so you would add 1 tablespoon + plus 1 1/2 teaspoons. Hope you enjoy the bread!
Oh my goodness, oh my goodness! I followed your recipe to the letter, including using potato water and buttermilk and the bread came out just like your picture. For some strange reason I was surprised to find that when it came out of the tin it was the same, glorious colour all round. I used Gruyere and Rosemary and, when I cut into the bread, there were very professional and complex looking lines running through – I felt like a superstar bread maker *smile*. Thank you so much for this recipe Jennifer. With Christmas in the not too distant future, I intend to make lots of this bread, wrap it in Christmas tea towels with a big bow and give it as presents. I honestly feel like I have come across a real treasure. You’re very generous for sharing such a lovely recipe. I’m off to bake my second batch – cant wait.
Gruyere and rosemary sounds so lovely and I’m so pleased that your bread turned out so well! It will make lovely gifts.
Awesome recipe! Made it a few days ago and will definitely make it again since the other half of the recipe is resting in the fridge. Yum!!
Quick question … Can you freeze the dough and still yield the same results? If so, at what point should I freeze it? After it rises (doubles in size) or right after it’s mixed?
Thanks!
Glad you enjoyed it, Grace. As for freezing, I have to say, I have no experience freezing the dough. I think if I was going to try it, I would let it go through the first rise, shape it, place it in the pan, wrap well and freeze. Thaw the dough in the refrigerator over night and then allow sufficient time for it to fully rise the way you would normally let a bread rise, before baking off. (If you try, let me know how it works out)
Thanks for your quick response! I will definitely try freezing the dough (prior to rolling with all the goodies) in the future and let you know how that works out. I’m a bit timid about getting it all to the last rise (in the bread pan) and then freezing….but perhaps one day I will experiment with that as well … but that will also mean I will be w/o a bread pan while it’s in the freezer.
Just trying to find ways to prep ahead. :) I will be making the remaining loaf tomorrow to bring to a family gathering … can’t wait for everyone to taste it! It is so goooood! :)
Hi Jennifer – first of all, thank you for posting this recipe – I used it to bake my first-ever loaf of yeast-leavened bread, and it’s turned out dangerously, dangerously delicious – the first loaf barely made it past the first day. I did find it a touch sweet so I’ll be reducing the sugar a bit in the future but will definitely be experimenting with other fillings.
Now, to the main point of this reply:
The dough can be frozen.
I only have one loaf pan so I ended up making the full recipe and freezing half the dough, part way through step 6, immediately after portioning the dough into two halves. I put the half batch of dough in a lightly oiled ziplock freezer bag and chucked it in the freezer. It expands a bit before it freezes completely.
A week later, I plopped the frozen dough into a large oiled bowl, covered it with plastic wrap and thawed it on the countertop overnight, about 6-7 hours. Punched the dough down, rolled it, filled it, shaped it, let it rise again and baked it. It’s delicious.
Thanks again!
So glad you enjoyed this bread, Jay and thanks for the information about freezing the dough. Good to know!
I tried this bread today. It’s very good! I made two herb and cheese but used oregano instead of chives and parsley, and it turned out great. I found the top crust was very hard while baking, but softened once the loaves were taken out and cooled.
Glad you enjoyed it, Shane.
If I leave out the cheese/herb filling for half (the second loaf), do you think the basic dough would be okay for a plain bread?
Hi Mel, Sure. It would be fine. It’s a mildly sweet and soft bread, with or without fillings. It was be fine plain for sandwiches or toast.
This is a fantastic recipe!! It was easy to make and turned out beautifully! My husband was a big fan (I made the cheddar version) and we both enjoyed it with some home-made chicken and rice soup! Thank you so much for sharing!
So glad you (and your husband!) enjoyed it. It’s a great bread and if you’re like me, you’ll make it often!
I made this bread yesterday and it is absolutely scrumptious. The recipe worked perfectly, I was so pleased. Had it for dinner with homegrown sliced tomatoes and roasted garlic mayo – perfection. I will definitely be making this again, thank you for the excellent recipe!
So glad you enjoyed it Stephie. If you’re like me, you’ll be making it over and over again. It’s a bit addictive :)
I made this bread a few months ago and love it so much!! I’ve got my second batch rising now. Have you ever tried it with cinnamon sugar inside? I was thinking of doing a sweet and a savory this time.
Hi Amber, I haven’t tried cinnamon sugar inside this particular bread (I have made it with other recipes, though). I don’t see why it wouldn’t be just as nice. If you try it, let me know how it was.
oh gosh, i cannot wait to do this and i have bookmarked it! i tried a cheese bread 2 wks ago and it turned out to be very oily and heavy. Not soft at all and i could not go on after the 2nd slice…
i will make this definitely!
This bread is soft and light, Michelle. I’m sure you’ll enjoy!
Just eating my first slice… Perfection. Thank you :)
Great to hear. Enjoy!
I make this bread every Sunday, made it today! This is the best bread recipe on the web. I have an entire board of different breads on Pinterest, but this is the one I make weekly. I have given it as a gift, everyone loves it! I’ve taken it for potlucks and I use it to make sandwiches to take to work for lunch. Suffice it to say, my lunch is the envy of all who view it. It taste great and it it gorgeous. I put in veggies (spinach, tomatoes, portabella mushroom, etc.) and grill the sandwich on both sides. It is scrumptious! Thank you so much for this wonderful recipe!
So glad to hear that you enjoy this bread as much as I do! I agree. It is my favourite bread.
That is very helpful! Thanks so much, I can’t wait to try it. I’ll let you know how it turns out!
Hi Jennifer, these photos look great! I love making bread and I’m going to make them this weekend. I’m having trouble visualizing how you assemble the dough, in order to get the beautiful swirl effect. Any chance you can elaborate on the process for me? Sorry to be a pain, but I don’t want to mess it up!
Thanks! Sandra
Hi Sandra and it’s not problem at all. It was only after I made it last that I thought it would have been helpful to photograph the shaping thing. I plan to add it to the post the next time I make it. In the meantime, I’ve attached here a picture of shaping Estonian Kringle bread, which is very similar, except we won’t be able to get as many twists out of ours and we’re not going to form it in to a ring at the end.
Image © My Recipe Journey
So basically, we are going to spread the filling over the rolled out dough and then roll up jelly-roll style and pinch together. With a sharp knife, you’ll slice down the centre of the log, lengthwise and then rotate the pieces so the exposed filling is facing upwards. Pinch together the far end, then twist the two pieces together a couple of times, making sure to keep the exposed filling side facing up. Pinch together the other end once you’ve twisted it together (you’ll probably only be able to twist it 2-3 times). Carefully lift twisted loaf into greased loaf pan.
Does that help?